background image

4. DESCRIZIONE DEL PRODOTTO

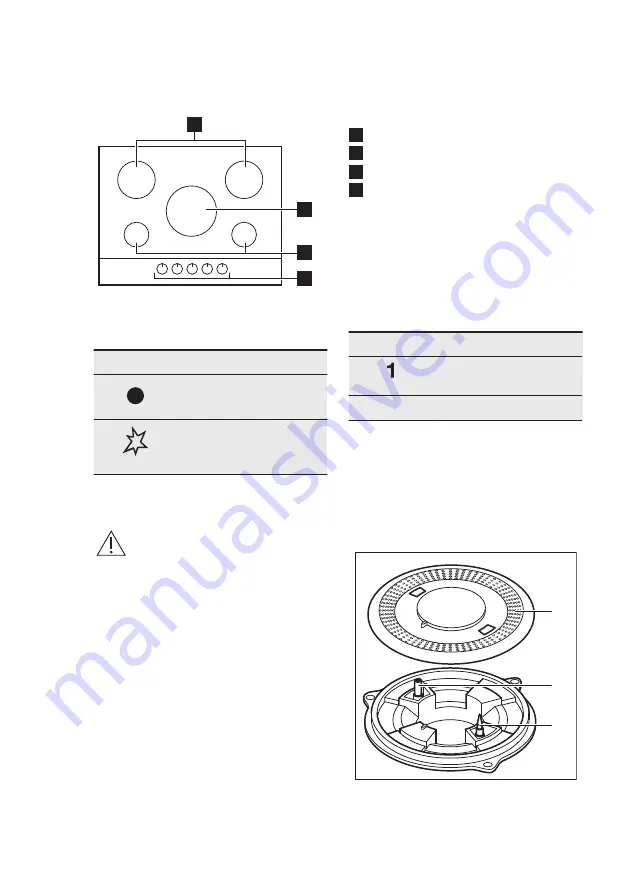
4.1 Disposizione della superficie di cottura

4

3

2

1

1

Bruciatore semirapido

2

Bruciatore rapido

3

Bruciatore ausiliario

4

Manopole di regolazione

4.2 Manette de commande

Simbolo

Description

alimentazione gas assen‐

te/posizione di spento

posizione di accensione/

alimentazione massima

del gas

Simbolo

Description

alimentazione minima del

gas

1 - 9

livelli di potenza

5. UTILIZZO QUOTIDIANO

AVVERTENZA!

Fare riferimento ai capitoli

sulla sicurezza.

5.1 Panoramica bruciatore

B

C

A

A. Spartifiamma

B. Candela di accensione

C. Termocoppia

www.aeg.com

30

Содержание HKB75029NB

Страница 1: ...USER MANUAL EN User Manual 2 Hob IT Istruzioni per l uso 20 Piano cottura HKB75029NB ...

Страница 2: ... repair information www aeg com support Register your product for better service www registeraeg com Buy Accessories Consumables and Original spare parts for your appliance www aeg com shop CUSTOMER CARE AND SERVICE Always use original spare parts When contacting our Authorised Service Centre ensure that you have the following data available Model PNC Serial Number The information can be found on ...

Страница 3: ...way from the appliance unless continuously supervised Do not let children play with the appliance Keep all packaging away from children and dispose of it appropriately WARNING Keep children and pets away from the appliance when it operates or when it cools down Accessible parts become hot during use If the appliance has a child safety device it should be activated Children shall not carry out clea...

Страница 4: ...e is connected to the mains directly using junction box remove the fuse to disconnect the appliance from power supply In either case contact the Authorised Service Centre In case of hotplate glass breakage shut immediately off all burners and any electrical heating element and isolate the appliance from the power supply do not touch the appliance surface do not use the appliance If the supply cord...

Страница 5: ...s with a sealant to prevent moisture from causing swelling Protect the bottom of the appliance from steam and moisture Do not install the appliance next to a door or under a window This prevents hot cookware from falling from the appliance when the door or the window is opened If the appliance is installed above drawers make sure that the space between the bottom of the appliance and the upper dra...

Страница 6: ...ce are compatible Make sure that there is air circulation around the appliance The information about the gas supply is on the rating plate This appliance is not connected to a device which evacuates the products of combustion Make sure to connect the appliance according to current installation regulations Follow the requirements for adequate ventilation 2 4 Use WARNING Risk of injury burns and ele...

Страница 7: ...of a window or more effective ventilation for example increasing the level of mechanical ventilation where present This appliance is for cooking purposes only It must not be used for other purposes for example room heating Do not let acid liquids for example vinegar lemon juice or limescale remover touch the hob This can cause matt patches Discoloration of the enamel or stainless steel has no effe...

Страница 8: ...d nut G 1 2 Screw the parts without force adjust the connection in the necessary direction and tighten everything A B C A End of shaft with nut B Washer supplied with the appliance C Elbow supplied with the appliance Rigid connection Carry out connection by using metal rigid pipes copper with mechanical end UNI CIG 7129 Flexible connection Use a flexible pipe in stainless steel UNI CIG 9891 with a...

Страница 9: ...is applicable to the voltage and the working temperature The yellow green earth wire must be approximately 2 cm longer than the brown or black phase wire L N 1 Connect the green and yellow earth wire to the terminal which is marked with the letter E or the earth symbol or coloured green and yellow 2 Connect the blue neutral wire to the terminal which is marked with the letter N or coloured blue 3 ...

Страница 10: ...technical assistance intervention is necessary The burner flame may be extinguished by an air flow if the removable panel is not installed The air flow may occur when you open or close the cabinet door or drawer Kitchen unit with door min 20 mm max 150 mm 30 mm 60 mm B A A Removable panel B Space for connections Kitchen unit with drawer min 20 mm max 150 mm 30 mm C A 60 mm B A Removable panel B Sp...

Страница 11: ... gas supply 1 9 power levels 5 DAILY USE WARNING Refer to Safety chapters 5 1 Burner overview B C A A Flame spreader B Ignition candle C Thermocouple 5 2 Ignition of the burner Always light the burner before you put on the cookware WARNING Do not light the burner when the flame spreader is removed WARNING Be very careful when you use open fire in the kitchen environment The manufacturer declines a...

Страница 12: ...tion and push it down Keep the control knob pushed for equal or less than 10 seconds to let the thermocouple warm up If the burner accidentally goes out turn the control knob to the off position and try to light the burner again after minimum 1 minute The spark generator can start automatically when you switch on the mains after installation or a power cut It is normal 5 3 Turning the burner off T...

Страница 13: ...ood categories Recipes Burner type Power level Sauces Dressing Bechamel Auxiliary 2 4 Tomato sauce Semi rapid 1 5 Pasta Rice other Ce reals Mushrooms rice Multi Crown 1 5 Couscous Rapid 1 6 Ravioli Auxiliary 6 9 Soup Legumes Vegetable soup Semi rapid 2 7 Mushrooms and pota toes soup Semi rapid 1 5 Fish soup Multi Crown 1 4 Meat Beef meatballs Multi Crown 1 6 Fillet of pork roast Multi Crown 4 9 Be...

Страница 14: ...ING Refer to Safety chapters 7 1 General information Clean the hob after each use Always use cookware with a clean base Scratches or dark stains on the surface have no effect on how the hob operates Use a special cleaner suitable for the surface of the hob WARNING Do not use knives scrapers or similar instruments to clean the surface of the glass or the rims of the burners and the frame if applica...

Страница 15: ... cleaning wipe the hob dry with a soft cloth 7 5 Cleaning the flame spreader You can wash the flame spreaders in a dishwasher WARNING Let the flame spreaders cool down before you clean them Light stains Wash the flame spreader with warm water and soap and dry it with a soft cloth Medium stains Use the dishwasher Place the flame spreader on the bottom rack in a flat position with the top side up He...

Страница 16: ...ely after ignition Thermocouple is not heated up sufficiently After lightning the flame keep the knob pushed for equal or less than 10 sec onds The flame ring is uneven Flame spreader holes are blocked with food residues Make sure that the flame spreader is clean 8 2 If you cannot find a solution If you cannot find a solution to the problem yourself contact your dealer or an Authorised Service Cen...

Страница 17: ...9 A B C A Stick it on Guarantee Card and send this part if applicable B Stick it on Guarantee Card and keep this part if applicable C Stick it on instruction booklet 9 TECHNICAL DATA 9 1 Hob dimensions Width 740 mm Depth 510 mm 9 2 Bypass diameters BURNER Ø BYPASS 1 100 mm Rapid 52 Semi rapid 35 Auxiliary 32 9 3 Other technical data TOTAL POWER Gas original G20 2H 20 mbar 8 9 kW ENGLISH 17 ...

Страница 18: ...mi rapid 61 2 Right rear Semi rapid 61 2 Left front Auxiliary not applicable Right front Auxiliary not applicable Energy efficiency for the gas hob EE gas hob 59 7 EN 30 2 1 Domestic cooking appliances burning gas Part 2 1 Rational use of energy General 10 2 Energy saving Before use make sure that the burners and pan supports are assembled correctly Use cookware with diameters applicable to the si...

Страница 19: ...iners to recycle it Help protect the environment and human health by recycling waste of electrical and electronic appliances Do not dispose of appliances marked with the symbol with the household waste Return the product to your local recycling facility or contact your municipal office ENGLISH 19 ...

Страница 20: ... eliminare eventuali anomalie ottenere informazioni sull assistenza e la riparazione www aeg com support Per registrare il vostro prodotto e ricevere un servizio migliore www registeraeg com Acquistare accessori materiali di consumo e ricambi originali per la vostra apparecchiatura www aeg com shop SERVIZIO CLIENTI E MANUTENZIONE Consigliamo sempre l impiego di ricambi originali Quando si contatta...

Страница 21: ... supervisione continua Tenere lontani dall apparecchiatura i bambini al di sotto dei 3 anni se non costantemente supervisionati Non consentire ai bambini di giocare con l apparecchiatura Tenere gli imballaggi lontano dai bambini e smaltirli in modo adeguato AVVERTENZA Tenere i bambini e gli animali domestici lontano dall apparecchiatura durante il funzionamento o raffreddamento Alcune parti access...

Страница 22: ... coperchi non dovrebbero essere posti sulla superficie del piano di cottura in quanto possono diventare caldi Non usare l apparecchiatura prima di installarla nella struttura a incasso Non usare una pulitrice a vapore per pulire l apparecchiatura Se la superficie di vetroceramica vetro presenta delle crepe spegnere l apparecchiatura e scollegarla dalla presa di corrente Qualora l apparecchiatura s...

Страница 23: ...ra è adatta ai seguenti mercati IT 2 1 Installazione AVVERTENZA L installazione dell apparecchiatura deve essere eseguita da personale qualificato Prima di procedere con l installazione verificare che le condizioni di distribuzione locale pressione e tipo di gas e i valori preimpostati dell apparecchiatura siano compatibili AVVERTENZA Vi è il rischio di ferirsi o danneggiare l apparecchiatura Rimu...

Страница 24: ... qualificato per sostituire un cavo danneggiato I dispositivi di protezione da scosse elettriche devono essere fissati in modo tale da non poter essere disattivati senza l uso di attrezzi Inserire la spina di alimentazione nella presa solo al termine dell installazione Verificare che la spina di alimentazione rimanga accessibile dopo l installazione Nel caso in cui la spina di corrente sia allenta...

Страница 25: ...uo interno o nelle immediate vicinanze AVVERTENZA Vi è il rischio di danneggiare l apparecchiatura Non poggiare pentole calde sul pannello dei comandi Non esporre al calore pentole vuote Fare attenzione a non lasciar cadere oggetti o pentole sull apparecchiatura La superficie si potrebbe danneggiare Non lasciare mai un bruciatore acceso con o senza tegami vuoti sopra Non appoggiare la pellicola di...

Страница 26: ...izzato Utilizzare esclusivamente ricambi originali 2 7 Smaltimento AVVERTENZA Rischio di lesioni o soffocamento Rivolgersi all autorità municipale per informazioni su come smaltire correttamente l elettrodomestico Staccare la spina dall alimentazione elettrica Tagliare il cavo elettrico dell apparecchiatura e smaltirlo Appiattire i tubi del gas esterni 3 INSTALLAZIONE AVVERTENZA Fare riferimento a...

Страница 27: ...ispondano ai valori indicati sulla targhetta dei dati dell apparecchiatura L apparecchiatura è provvista di cavo di collegamento alla rete Deve essere dotato di una spina in grado di supportare il carico indicato sulla targhetta dei dati Accertarsi di inserire la spina nella presa corretta Utilizzare sempre una presa elettrica con contatto di protezione correttamente installata Verificare che la s...

Страница 28: ...i colore blu neutro al morsetto contrassegnato dalla lettera N o colorato di blu 3 Collegare il cavo di fase marrone tensione al terminale contrassegnato con la lettera L Questo deve sempre essere collegato alla fase di rete 3 5 Montaggio 1 2 3 min 55 mm min 650 mm 560 mm 2 0 490 mm 2 0 min 150 mm 30 mm 4 5 6 B A A guarnizione in dotazione B staffa montata www aeg com 28 ...

Страница 29: ... dell assistenza tecnica La fiamma del bruciatore potrebbe spegnersi in presenza di un flusso d aria se non è stato installato il pannello rimovibile Il flusso d aria può essere prodotto dall apertura o chiusura della porta del mobile o di un cassetto Unità da cucina con porta min 20 mm max 150 mm 30 mm 60 mm B A A Pannello rimovibile B Spazio per gli allacciamenti Mobile da incasso con cassetto m...

Страница 30: ...te de commande Simbolo Description alimentazione gas assen te posizione di spento posizione di accensione alimentazione massima del gas Simbolo Description alimentazione minima del gas 1 9 livelli di potenza 5 UTILIZZO QUOTIDIANO AVVERTENZA Fare riferimento ai capitoli sulla sicurezza 5 1 Panoramica bruciatore B C A A Spartifiamma B Candela di accensione C Termocoppia www aeg com 30 ...

Страница 31: ...arla in posizione di spento e attendere almeno 1 minuto prima di tentare di riaccendere il bruciatore ATTENZIONE In assenza di elettricità è possibile accendere il bruciatore senza utilizzare il dispositivo elettrico in tal caso sarà sufficiente avvicinarsi al bruciatore con una fiamma premere verso il basso la relativa manopola e ruotarla in senso antiorario verso la posizione di massimo rilascio...

Страница 32: ...si che le pentole siano ben centrate sul bruciatore per ottenere la massima stabilità e per un consumo ridotto di gas ATTENZIONE I liquidi versati durante la cottura possono causare la rottura del vetro 6 2 Diametro delle pentole ATTENZIONE Usare pentole con diametro adatto alle dimensioni dei bruciatori Bruciatore Diametro delle pentole mm Rapido 180 260 Semi rapido 140 220 Ausiliario 100 160 6 3...

Страница 33: ...tatine fritte Multi corona 5 9 Ciambelle Multi corona 3 7 Snack cotti con padella Noccioline arrostite Semi rapido 2 5 Crouton di pane Multi corona 2 7 Pancake Semi rapido 3 9 Dessert Caramello Ausiliario 1 5 Crema pasticcera Ausiliario 1 5 Panna Cotta Ausiliario 1 5 Tutte le ricette sono indicativamente per 4 porzioni Le impostazioni consigliate nella tabella di cottura dovrebbero fungere solo da...

Страница 34: ...o Se necessario rimuovere le macchie più ostinate servendosi di un apposito prodotto in pasta 3 Dopo aver pulito i supporti pentole assicurarsi che siano riposizionati correttamente 4 Per fare in modo che il bruciatore funzioni correttamente verificare che le braccia dei supporti pentole si trovino allineati al centro del bruciatore 7 3 Rimozione dei supporti pentole Dopo aver pulito il piano di c...

Страница 35: ... per evitare difficoltà di accensione e controllare che i fori spartifiamma non siano ostruiti 7 7 Manutenzione periodica Consultare periodicamente il Centro di Assistenza autorizzato locale per verificare le condizioni del tubo della fornitura di gas e del regolatore di pressione se presente 8 RISOLUZIONE DEI PROBLEMI AVVERTENZA Fare riferimento ai capitoli sulla sicurezza 8 1 Cosa fare se Proble...

Страница 36: ...o di Assistenza o del rivenditore potrà essere effettuato a pagamento anche durante il periodo di garanzia Le istruzioni relative al Centro di Assistenza e alle condizioni di garanzia sono contenute nel libretto della garanzia 8 3 Etichette fornite con il sacchetto degli accessori Attaccare le etichette adesive come indicato di seguito MOD PROD NO SER NO DATA MOD PROD NO SER NO DATA MOD PROD NO SE...

Страница 37: ...llegamento gas G 1 2 Classe dell ap parecchiatura 3 9 4 Bruciatori a GAS NATURALE G20 a 20 mbar BRUCIATORE POTENZA NORMALE kW POTENZA MINIMA kW SIMBOLO INIET TORE 1 100 mm Rapido 2 9 1 2 120B Semi rapido 2 0 0 75 102 Ausiliario 1 0 0 5 73F 10 EFFICIENZA ENERGETICA 10 1 Informazioni prodotto conformi alla norma UE 66 2014 Identificativo modello HKB75029NB Tipo di piano di cottura Piano cottura a in...

Страница 38: ...i Centrare la pentola sul bruciatore Quando si riscalda l acqua utilizzare solo la quantità necessaria Se possibile coprire sempre le pentole con il coperchio Quando il liquido inizia a bollire abbassare la fiamma per provocare una lenta ebollizione del liquido Se possibile utilizzare una pentola a pressione Fare riferimento al relativo manuale per l utente 11 CONSIDERAZIONI SULL AMBIENTE Riciclar...

Страница 39: ......

Страница 40: ...www aeg com shop 867356680 A 322020 ...

Отзывы: