background image

9.2 

Setting and starting a

programme

The Auto Off function

This function decreases energy

consumption by deactivating

automatically the appliance when it is not

operating.
The function comes into operation:

• 5 minutes after the completion of the

programme.

• After 5 minutes if the programme has

not started.

Starting a programme

1.

Keep the appliance door ajar.

2.

Press the on/off button to activate

the appliance. Make sure that the

appliance is in programme selection

mode.

3.

Press the button related to the

chosen programme.

The display shows the programme

duration.

4.

Set the applicable options.

5.

Close the appliance door to start the

programme.

Starting a programme with

delay start

1.

Set a programme.

2.

Press Delay repeatedly until the

display shows the desired delay time

(from 1 to 24 hours).

The indicator of the selected programme

flashes.

3.

Close the appliance door to start the

countdown.

The indicator of the selected programme

is on.

While a countdown is running it is

possible to increase the delay time but

not to change the selection of the

programme and options.

When the countdown is completed, the

programme starts.

Opening the door while the

appliance operates

Opening the door while a programme is

running stops the appliance. It may affect

the energy consumption and the

programme duration. After closing the

door, the appliance continues from the

point of interruption.

If the door is opened for

more than 30 seconds

during the drying phase, the

running programme ends. It

does not happen if the door

is opened by AirDry

function.

Do not try to close the

appliance door within 2

minutes after AirDry

automatically opens it, as

this may cause damage to

the appliance.

If, afterwards, the door is

closed for another 3

minutes, the running

programme ends.

Cancelling the delay start while

the countdown operates

When you cancel the delay start you

have to set the programme and options

again.

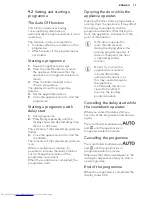
Press and hold simultaneously 
and 

 until the appliance is in

programme selection mode.

Cancelling the programme

Press and hold simultaneously 
and 

 until the appliance is in

programme selection mode.

Make sure that there is detergent in the

detergent dispenser before you start a

new programme.

End of the programme

When the programme is completed the

display shows 0:00.

ENGLISH

13

Содержание FFB41610ZM

Страница 1: ...USER MANUAL EN User Manual 2 Dishwasher TR Kullanma Kılavuzu 22 Bulaşık Makinesi FFB41610ZW FFB41610ZM ...

Страница 2: ...ery best from it Visit our website for Get usage advice brochures trouble shooter service information www aeg com webselfservice Register your product for better service www registeraeg com Buy Accessories Consumables and Original spare parts for your appliance www aeg com shop CUSTOMER CARE AND SERVICE Always use original spare parts When contacting our Authorised Service Centre ensure that you h...

Страница 3: ... door is open Children shall not carry out cleaning and user maintenance of the appliance without supervision 1 2 General Safety This appliance is intended to be used in household and similar applications such as farm houses staff kitchen areas in shops offices and other working environments by clients in hotels motels bed breakfast and other residential type environments Do not change the specifi...

Страница 4: ...late are compatible with the electrical ratings of the mains power supply Always use a correctly installed shockproof socket Do not use multi plug adapters and extension cables Make sure not to cause damage to the mains plug and to the mains cable Should the mains cable need to be replaced this must be carried out by our Authorised Service Centre Connect the mains plug to the mains socket only at ...

Страница 5: ...products or items that are wet with flammable products in near or on the appliance 2 5 Service Contact the Authorised Service Centre to repair the appliance We recommend only the use of original spare parts When you contact the Authorised Service Centre ensure that you have the following information that is available on the rating plate Model PNC Serial Number 2 6 Disposal WARNING Risk of injury o...

Страница 6: ...asket 12 Upper basket 4 CONTROL PANEL 2 1 3 4 5 1 On off button 2 Display 3 Indicators 4 Delay button 5 Programme buttons 4 1 Indicators Indicator Description XtraDry indicator Rinse aid indicator It is always off while the programme operates Salt indicator It is always off while the programme operates www aeg com 6 ...

Страница 7: ...er and energy consumption for crockery and cutlery with normal soil This is the standard programme for test institutes 2 The appliance senses the degree of soil and the quantity of items in the baskets It automatically ad justs the temperature and the quantity of water the energy consumption and the programme duration 3 With this programme you can wash a load with fresh soil It gives good washing ...

Страница 8: ...the programme selection mode the following way Press and hold simultaneously and until the appliance is in programme selection mode How to enter user mode Make sure the appliance is in programme selection mode To enter user mode press and hold simultaneously and until the indicators and flash and the display is blank 6 2 The water softener The water softener removes minerals from the water supply ...

Страница 9: ...nfirm the setting 6 3 The rinse aid empty notification The rinse aid helps to dry the dishes without streaks and stains The rinse aid is automatically released during the hot rinse phase When rinse aid chamber is empty the rinse aid indicator is turned on notifying to refill rinse aid If the drying results are satisfactory while using multi tablets only it is possible to deactivate the notificatio...

Страница 10: ...OPTIONS Desired options must be activated every time before you start a programme It is not possible to activate or deactivate options while a programme is running Not all options are compatible with each other If you select non compatible options the appliance automatically deactivates one or more of them Only the indicators of the still active options are on 7 1 XtraDry Activate this option to b...

Страница 11: ...ntainer CAUTION Use rough salt designed for dishwashers only Fine salt increases the risk of corrosion The salt is used to recharge the resin in the water softener and to assure good washing results in daily use How to fill the salt container 1 Turn the cap of the salt container counterclockwise and remove it 2 Put 1 litre of water in the salt container only for the first time 3 Fill the salt cont...

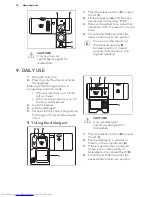
Страница 12: ...tton to activate the appliance Make sure that the appliance is in programme selection mode If the salt indicator is on fill the salt container If the rinse aid indicator is on fill the rinse aid dispenser 3 Load the baskets 4 Add the detergent 5 Set and start the correct programme for the type of load and the degree of soil 9 1 Using the detergent 30 20 A B D C 20 30 B A D C CAUTION Only use deter...

Страница 13: ...ction of the programme and options When the countdown is completed the programme starts Opening the door while the appliance operates Opening the door while a programme is running stops the appliance It may affect the energy consumption and the programme duration After closing the door the appliance continues from the point of interruption If the door is opened for more than 30 seconds during the ...

Страница 14: ...d detergent for dishwasher Other products can cause damage to the appliance In areas with hard and very hard water we recommend to use plain dishwasher detergent powder gel tablets containing no additional agents rinse aid and salt separately for optimal cleaning and drying results At least once a month run the appliance with the use of appliance cleaner which is particularly suitable for this pur...

Страница 15: ...aid unless you use multi tablets The position of the items in the baskets is correct The programme is applicable for the type of load and for the degree of soil The correct quantity of detergent is used 10 6 Unloading the baskets 1 Let the tableware cool down before you remove it from the appliance Hot items can be easily damaged 2 First remove items from the lower basket then from the upper baske...

Страница 16: ...ay arms are clogged remove remaining parts of soil with a thin pointed object 11 3 External cleaning Clean the appliance with a moist soft cloth Only use neutral detergents Do not use abrasive products abrasive cleaning pads or solvents 11 4 Internal cleaning Carefully clean the appliance including the rubber gasket of the door with a soft damp cloth If you regularly use short duration programmes ...

Страница 17: ...to recharge the resin inside the water softener The duration of the procedure is approximately 5 minutes The appliance does not fill with water The display shows or Make sure that the water tap is open Make sure that the pressure of the water supply is not too low For this information contact your local water authority Make sure that the water tap is not clogged Make sure that the filter in the in...

Страница 18: ...that the spray arms can rotate freely The appliance trips the cir cuit beaker The amperage is insufficient to supply simultaneously all the appliances in use Check the socket amperage and the capacity of the meter or turn off one of the applian ces in use Internal electrical fault of the appliance Contact an Au thorised Service Centre Refer to Before first use Daily use or Hints and tips for other...

Страница 19: ...he rinse aid dispenser is empty The quality of the rinse aid can be the cause The quality of the multi tablets can be the cause Try a different brand or activate the rinse aid dispenser and use rinse aid and multi tablets together The interior of the appliance is wet This is not a defect of the appliance it is caused by the humidity in the air that condenses on the walls Unusual foam during washin...

Страница 20: ...e items in the upper basket Refer to Before first use Daily use or Hints and tips for other possible causes 13 TECHNICAL INFORMATION Dimensions Width height depth mm 600 850 625 Electrical connection 1 Voltage V 220 240 Frequency Hz 50 Water supply pressure Min max bar MPa 0 5 0 05 8 0 8 Water supply Cold water or hot water 2 max 60 C Capacity Place settings 13 Power consumption Left on mode W 5 0...

Страница 21: ...product to your local recycling facility or contact your municipal office ENGLISH 21 ...

Страница 22: ...zdan en iyi şekilde yararlanabilmek için birkaç dakikanızı ayırarak bu belgeyi okuyun Aşağıdakiler için web sitemizi ziyaret edin Kullanım önerileri broşürler sorun giderme bilgileri servis bilgileri edinmek için www aeg com webselfservice Ürününüzü daha iyi servis için kaydedin www registeraeg com Cihazınız için Aksesuarlar Sarf Malzemeleri ve Orijinal yedek parçalar satın alın www aeg com shop M...

Страница 23: ...cihaz çocukların oynayabileceği bir oyuncak değildir Deterjanları çocuklardan uzak tutun Kapak açıkken çocukları ve evcil hayvanları makineden uzak tutun Temizlik ve kullanıcı bakımı çocuklar tarafından denetim altında olmadıkları sürece yapılmamalıdır 1 2 Genel Güvenlik Bu cihaz aşağıdaki gibi evle ilgili ve benzeri uygulamalarda kullanılmak üzere tasarlanmıştır çiftlik evleri mağaza ofis ve diğe...

Страница 24: ...lduğu yerlere monte etmeyin ya da buralarda kullanmayın Cihazla birlikte verilen montaj talimatını takip edin Cihazı hareket ettirdiğinizde dikkatli olun ağırdır Her zaman koruyucu eldiven ve koruyuculu ayakkabı kullanın 2 2 Elektrik bağlantısı UYARI Yangın ve elektrik çarpması riski Cihaz topraklanmalıdır Anma değeri plakasındaki parametrelerinin ana güç kaynağının elektrik gücüne uygun olduğunda...

Страница 25: ...ne üzerine veya yakınına yanıcı ürünler ya da yanıcı ürünlerle ıslanmış eşyalar koymayın 2 5 Servis Cihaz onarımı için Yetkili Servis ile temasa geçin Sadece orijinal yedek parça kullanılmasını tavsiye ederiz Yetkili Servis ile temasa geçtiğinizde bilgi etiketinde bulabileceğiniz aşağıdaki bilgilerin elinizde olduğundan emin olun Model PNC Seri Numarası 2 6 Elden çıkarma UYARI Yaralanma ya da boğu...

Страница 26: ...9 11 6 7 12 2 3 1 1 Üst tabla 2 Üst püskürtme kolu 3 Alt püskürtme kolu 4 Filtreler 5 Bilgi etiketi 6 Tuz haznesi 7 Hava menfezi 8 Parlatıcı gözü 9 Deterjan gözü 10 Çatal bıçak sepeti 11 Alt sepet 12 Üst sepet www aeg com 26 ...

Страница 27: ...i Parlatıcı uyarı göstergesi Program çalışırken bu gösterge daima kapalıdır Tuz uyarı göstergesi Program çalışırken bu gösterge daima kapalıdır 5 PROGRAMLAR Program Kirlilik derecesi Bulaşıkların türü Program aşamaları Seçenekler 1 Normal kirli Tabaklar bar daklar kaplar ve çatal bıçaklar Ön yıkama 50 C de yıkama Durulamalar Kurutma XtraDry TÜRKÇE 27 ...

Страница 28: ...alar Kurutma XtraDry 1 Bu programla normal kirli bulaşıklar için suyu ve enerjiyi en verimli şekilde kullanırsınız Bu test en stitüleri için standart programdır 2 Cihaz sepetlerdeki bulaşıkların kirlilik derecesini ve miktarını ölçer Suyun sıcaklığını ve miktarını en erji tüketimini ve program süresini otomatik olarak ayarlar 3 Bu programla yeni kirlenmiş bulaşıkları yıkayabilirsiniz Kısa sürede i...

Страница 29: ...kilde ayarlayın Cihaz program seçme moduna geçinceye kadar ve tuşlarına aynı anda basılı tutun Kullanıcı moduna geçilmesi Makinenin program seçme modunda olduğundan emin olun Kullanıcı moduna geçmek için ve göstergeleri yanıp sönmeye başlayıncaya ve ekran kararıncaya kadar ve tuşlarına aynı anda basın ve basılı tutun 6 2 Su yumuşatma düzeneği Su yumuşatma düzeneği su kaynağındaki mineralleri yok e...

Страница 30: ...r Seviye 10 dan sonra tekrar sayım seviye 1 den başlar 3 Ayarı onaylamak için açma kapama tuşuna basın 6 3 Parlatıcı boş bildirimi Parlatıcı tabakların üzerlerinde çizgiler ve lekeler olmaksızın kurutulabilmesini sağlar Parlatıcı sıcak durulama aşamasında kullanılır Parlatıcı haznesi boşken parlatıcı göstergesi parlatıcının doldurulması için bildirimde bulunarak açılır Yalnızca multi tabletler kul...

Страница 31: ...ilir AirDry etkinleştirildi AirDry devre dışı bırakıldı 2 Ayarı değiştirmek için tuşuna basın 3 Ayarı onaylamak için açma kapama tuşuna basın 7 OPSIYONLAR Bir program başlatmadan önce istediğiniz seçenekleri etkinleştirmelisiniz Bir program çalışırken bu seçeneklerin etkinleştirilmesi ya da devre dışı bırakılması mümkün değildir Tüm seçenekler birbiri ile uyumlu değildir Uyumlu olmayan seçenekleri...

Страница 32: ...bu işlem bittikten sonra başlatılır Prosedür periyodik olarak tekrarlanır 8 1 Tuz haznesi DİKKAT Sadece bulaşık makinelerine uygun kaba tuz kullanın İnce tuz korozyon riskini artırır Su yumuşatıcı içine reçineyi yeniden doldurmak ve günlük kullanımda yıkamadan memnun edici sonuçların alınmasını sağlamak için tuz kullanılır Tuz haznesinin doldurulması 1 Tuz haznesinin kapağını saatin tersi yönde çe...

Страница 33: ...rduğundan emin olun Bırakılan miktar seçicisini B konum 1 en düşük miktar ile konum 4 veya 6 en yüksek miktar arasında ayarlayabilirsiniz 9 GÜNLÜK KULLANIM 1 Musluğu açın 2 Cihazı çalıştırmak için açma kapama tuşuna basın Cihazın program seçme modunda olduğundan emin olun Tuz göstergesi yanıyorsa tuz haznesini doldurun Parlatıcı göstergesi yanıyorsa parlatıcı gözünü doldurun 3 Bulaşıkları sepetler...

Страница 34: ...amın başlatılması 1 Bir program ayarlayın 2 Gösterge ekranında istediğiniz gecikme süresi 1 ila 24 saat görünene dek Delay tuşuna arka arkaya basın Seçilen programın göstergesi yanıp söner 3 Geri sayımı başlatmak için makinenin kapağını kapatın Program göstergesi yanar Geri sayım çalışırken gecikme süresini arttırabilmekle birlikte program seçimini ve seçenekleri değiştiremezsiniz Geri sayım sona ...

Страница 35: ... olmasına dikkat edin Bulaşıkların birbirine temas etmemesi ya da birbirlerinin üzerini kapatmamasına dikkat edin Bulaşık makinesi deterjanı parlatıcı ve tuzunu ayrı ayrı kullanabilir veya multi tablet kullanabilirsiniz örn 3 ü 1 arada 4 ü 1 arada Hepsi 1 arada Ambalaj üzerindeki talimatları uygulayın Bulaşığın türüne ve kirlilik derecesine göre program seçin ECO programıyla normal kirli tabaklar ...

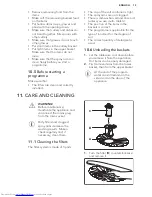
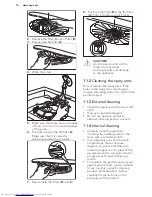
Страница 36: ...ardaklara temas etmediğinden emin olun Küçük bulaşıkları çatal bıçak sepetine koyun Hafif bulaşıkları üst sepete koyun Bulaşıkların sabitlendiğinden ve hareket etmediğinden emin olun Bir programı başlatmadan önce püskürtme kolunun rahatça hareket edebildiğinden emin olun 10 5 Bir programa başlamadan önce Şunlardan emin olun Filtreler temiz olmalıdır ve doğru şekilde yerleştirilmelidir Tuz haznesin...

Страница 37: ... filtreyi A çıkarın 4 Filtreleri yıkayın 5 Haznenin içinde veya kenarlarında yiyecek veya kir kalıntısı olmadığından emin olun 6 Yassı filtreyi A yerine takın Filtrenin 2 kılavuzun altına düzgün şekilde yerleştirildiğinden emin olun 7 B ve C filtrelerini yerine takın 8 Filtreyi B yassı filtrenin A içine geri takın Kilitlenene kadar saat yönünde çevirin TÜRKÇE 37 ...

Страница 38: ...balajının üzerindeki talimatlara aynen uyun 12 ARIZALAR VE ÇÖZÜMLERI Cihaz başlamaz ya da çalışma sırasında durursa öncelikle tablodaki bilgiler yardımıyla sorunu kendi kendinize çözüp çözemeyeceğinizi kontrol edebilir veya Yetkili Servis Merkezini arayabilirsiniz UYARI Tamir işlemlerinin doğru şekilde yapılmaması kullanıcının güvenliği açısından ciddi tehlikelere yol açabilir Her tür tamir işlemi...

Страница 39: ...sürüyor Gecikmeli başlatma ayarlanmış ise gecikme ayarını ip tal edin ya da geri sayımın bitmesini bekleyin Ekranda gösterilen kalan sü re program sonuna doğru uzuyor Bu bir arıza değildir Cihaz sorunsuz çalışıyordur Cihaz kapağında küçük sı zıntı var Cihaz dengelenerek kurulmamıştır Ayarlanabilir ayakla rı varsa gevşetin veya sıkın Cihazın kapağı kasadaki yuvasına tam oturmadan kapa nıyordur Arka...

Страница 40: ...ıcı etkisi içeren multi tablet kullanıyor olsanız da hi her zaman ilaveten parlatıcı kullanmanız tavsiye edilir Bardak ve tabaklarda beya zımsı çizikler ve lekeler ya da mavimsi katmanlar var Parlatıcı ayarı seviyesi çok yüksektir Parlatıcı seviye ayarını daha düşük konuma getirin Çok fazla deterjan kullanılmıştır Bardak ve tabakların üzerinde lekeler ve kurumuş su damla cıkları var Parlatıcı ayar...

Страница 41: ...r Tuz seviye ayarı düşük tuz doldurma uyarı gösterge sini kontrol edin Tuz haznesinin kapağı gevşek bırakılmıştır Musluk suyunuz çok sert Su yumuşatıcısı bölümü ne bakın Musluk suyu çok sert ise tuz etkisi içeren multi tablet kullansanız dahi sertlik oranına uygun olarak tuz sevi yesi ayarını yapmanızı ve tuz kullanmanızı öneririz Su yumuşatıcısı bölümüne bakın Cihaz içerisinde halen kireç kalıntı...

Страница 42: ...unu ispat ettiği takdirde sorumlu tutulmaz 3 Ücretsiz onarım veya malın ayıpsız misli ile değiştirilmesinin satıcı için orantısız güçlükleri beraberinde getirecek olması hâlinde tüketici sözleşmeden dönme veya ayıp oranında bedelden indirim haklarından birini kullanabilir Orantısızlığın tayininde malın ayıpsız değeri ayıbın önemi ve diğer seçimlik haklara başvurmanın tüketici açısından sorun teşki...

Страница 43: ...şvurabilir 15 ÇEVREYLE İLGİLİ BİLGİLER Şu sembole sahip malzemeler geri dönüştürülebilir Ambalajı geri dönüşüm için uygun konteynerlere koyun Elektrikli ve elektronik cihaz atıklarının geri dönüşümüne ve çevre ve insan sağlığının korunmasına yardımcı olun Ev atığı sembolü bulunan cihazları atmayın Ürünü yerel geri dönüşüm tesislerinize gönderin ya da belediye ile irtibata geçin AEEE Yönetmeliğine ...

Страница 44: ...www aeg com shop 156922670 A 312017 ...

Отзывы: