background image

English

58

Troubleshooting 

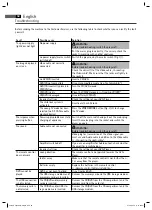
Before sending the machine to the Customer Services, use the following table to check whether you can rectify the fault 
yourself. 

Fault Possible 

cause Solution 

The power supply 
light does not light 

No power supply 

 WARNING: 

Before troubleshooting, switch the player off .
Put the mains plug in correctly, if necessary, check the 
socket is working with another appliance. 

no power supply/ mains switch 
switched off  

Switch the player on by the mains switch (Fig. 1/1). 

No image displayed 
on screen 

Video cable not correctly 
connected 

 WARNING: 

Before troubleshooting, switch the player off .
Check the correct fi t of the Video cable „Connecting 
the Video cable“
. Make sure that the jacks are tightly in 
the sockets. 

no DVD/CD inserted 

Insert a CD/DVD. 

DVD/CD not compatible 

Use only compatible media (see „Technical data“)

DVD/CD incorrectly placed in 
CD/DVD-tray 

Turn the CD/DVD around. 

CD/DVD is dirty 

Clean the CD/DVD around 

 „Handling CD/DVD“

CD/DVD is damaged 

Use a diff erent CD/DVD. 

Incorrect settings 

Check the settings of your DVD-Player. 

The child lock system is 
activated 

Deactivate the child lock. 

The wrong TV mode has been 
selected (no P-SCAN-capable 
playback device).

Press the VIDEO MODE button (Fig. 3/33) to change 
the TV mode.

No response when 
pressing button 

Power supply problem or static 
charging of appliance 

Switch off  the main switch and pull out the mains plug. 
Insert the mains plug into the socket and switch the 
player on again. 

No sound 

Audio cable not connected 

 WARNING: 

Before troubleshooting, switch the player off .
Video plug for transmission of the Video signal, you 
must use and Audio cable in addition to the Video cable 

 „Connecting the Audio cable“

Amplifi er switched off  

If you use an amplifi er for Audio output: check whether 
the amplifi er is switched on. 

Incorrect settings 

Check the settings of your DVD-Player. 

The remote control 
does not work 

wrong direction 

The remote control is not pointed towards the DVD-
Player. 

too far away 

Make sure that the remote control is not further than 
7 m away from the player. 

Batteries empty 

Replace the batteries in the remote control  

 „Remote control battery installation“

DVD cannot be 
played 

DVD has not been fi nalized 

Use a fi nalized DVD. 

The USB storage medium and/
or memory card are inserted.

Remove the memory card and the USB storage medium.

The USB connection 
is not selected.

The CD/DVD and/or memory 
card are inserted.

Remove the CD/DVD from the CD compartment and the 
memory card from the card slot.

The memory card is 
not selected.

The CD/DVD and/or USB sto-
rage medium are inserted.

Remove the CD/DVD from the CD compartment and the 
USB storage medium.

05-DVD 4532 USB-CR_GB.indd   58

05-DVD 4532 USB-CR_GB.indd   58

21.02.2008   11:16:00 Uhr

21.02.2008   11:16:00 Uhr

Содержание DVD 4532 CR

Страница 1: ... 4532 USB CR DVD Player DVD Player Bedienungsanleitung Garantie Instruction Manual Guarantee 05 DVD 4532 USB CR_Titel indd 1 05 DVD 4532 USB CR_Titel indd 1 21 02 2008 10 21 51 Uhr 21 02 2008 10 21 51 Uhr ...

Страница 2: ...te 4 Technische Daten Seite 6 Garantie Seite 30 English Contents Overview of the Components Page 3 Instruction Manual Page 34 Technical Data Page 36 Guarantee Page 59 05 DVD 4532 USB CR_Titel indd 2 05 DVD 4532 USB CR_Titel indd 2 21 02 2008 10 21 54 Uhr 21 02 2008 10 21 54 Uhr ...
Страница 3: ...Übersicht der Bedienelemente 3 Overview of the Components Abb Fig 1 Abb Fig 2 Abb Fig 3 05 DVD 4532 USB CR_Titel indd 3 05 DVD 4532 USB CR_Titel indd 3 21 02 2008 10 21 54 Uhr 21 02 2008 10 21 54 Uhr ...

Страница 4: ...buchsen 9 Kartenschlitz MMC MS SD 10 USB Schnittstelle 11 5 1 Ausgang 12 ML MR Audio Ausgang 13 Komponenten Video Ausgang 14 Optischer Audio Ausgang 15 SCART Ausgang 16 S Video Ausgang 17 Composite Video Ausgang 18 Digitaler Audio Ausgang Geräteteile Abb 1 Abb 2 05 DVD 4532 USB CR_D indd 4 05 DVD 4532 USB CR_D indd 4 21 02 2008 10 34 44 Uhr 21 02 2008 10 34 44 Uhr ...

Страница 5: ...Y 17 P N MULTI NTSC PAL Farbnormum schaltung 18 R L Schaltet zwischen dem rechten und dem linken Kanal um 19 DVD USB CARD USB CARD DVD Umschaltung 20 TIME Passage der CD DVD direkt ansteuern 21 PROG DVD Playlist aufrufen 22 LANGUAGE Audio Einstellungen verändern 23 ANGLE Bildwinkel auswählen 24 SETUP Setup Menü starten 25 Richtungstasten Navigation im Bildschirmmenü 26 MENU Hauptmenü der DVD VCD a...

Страница 6: ...en B x H x T 430 x 50 x 275 mm Gewicht 1 96 kg Laser Halbleiter Laser Signalformat PAL NTSC Signal Rauschabstand 90 dB Video Ausgang 1 0 V P P 75 Ω Analoger Audio Ausgang 2 0 V rms S Video Ausgang Y 1 0 V P P 75 Ω C 286 mV P P 75 Ω Betriebsumgebung 0 C bis 40 C ebener Untergrund Kompatible Medien DVD Video DVD Disc DVD R RW MPEG 4 Video von CD DVD Disc DVD R RW CD R RW Audio CD von CD Disc CD R RW...

Страница 7: ...e Gegen stände hin HINWEIS Hebt Tipps und Informationen für Sie hervor Bei technischen Fragen oder Problemen mit dem Gerät die Sie mit Hilfe dieser Bedienungsanleitung nicht lösen können wenden Sie sich bitte an unsere Service Hotline Telefon 4921522006666 ETV Elektro technische Vertriebsgesellschaft mbH Industriering Ost 40 47906 Kempen Telefon 4921522006666 Mail hotline etv de Im Zuge ständiger ...

Страница 8: ...sätzlich die Gefahr eines elektrischen Schlags Achten Sie daher besonders auf Folgendes Fassen Sie den Stecker niemals mit nassen Händen an Wenn Sie den Stecker aus der Steckdose herausziehen wollen ziehen Sie immer direkt am Stecker Ziehen Sie niemals am Kabel es könnte reißen Achten Sie darauf dass das Stromkabel nicht geknickt eingeklemmt überfahren wird oder mit Hitzequellen in Berührung kommt...

Страница 9: ...tzufuhr gewährleistet ist So vermeiden Sie einen Wärmestau im Inneren des Gerätes Achten Sie dazu darauf dass die Lüftungsschlitze nicht blockiert werden Schützen Sie das Gerät vor mechanischen Erschütterungen Stellen sie das Gerät immer auf eine feste ebene Unterlage Schützen Sie die Fernbedienung vor Witterungseinflüssen Feuchtig keit und hohen Temperaturen z B durch direktes Sonnenlicht Das Ger...

Страница 10: ...ndung Setzen Sie sich mit der Service Hotline in Verbindung Seite 7 Service Hotline Viele Probleme können über diesen Weg gelöst werden Aufstellen und Anschließen Packen Sie das Gerät und alle Zubehörteile aus und überprüfen Sie den Inhalt auf Vollständigkeit ACHTUNG Transportieren versenden Sie das Gerät grundsätzlich immer in der Originaverpackung damit es keinen Schaden nimmt Heben Sie dazu die...

Страница 11: ...en Land geltenden gesetzlichen Vorschriften und Umweltbestimmungen Werfen Sie Batterien niemals ins Feuer HINWEIS Die Lebensdauer der beiliegenden Batterien kann lagerungsbedingt verkürzt sein 1 Öffnen und entfernen Sie den Batteriefachdeckel 2 Legen Sie zwei Batterien Typ AAA R03 1 5 V polaritätsrichtig und in das Batteriefach ein Beginnen Sie jeweils mit dem negativen Polende 3 Setzen Sie den Ba...

Страница 12: ...ideo werden nur Video Signale übertragen 1 Stecken Sie jeden der drei Stecker in die entsprechende Buchse des DVD Players 2 Stecken Sie die Stecker in die entsprechenden Buchsen Ihres Wieder gabegerätes Wählen Sie im Menü Video das Untermenü Komponente aus Hier können Sie die Einstellungen CVBS YUV und RGB auf Ihr angeschlossenes Wiedergabegerät einstellen Die korrekte Einstellung entnehmen Sie bi...

Страница 13: ...ierbei in jede Ecke des Raumes platziert Ein Lautsprecher wird in der Nähe des Wiedergabegerätes positioniert Der sechste Lautsprecher dient der Wiedergabe der tiefen Töne Durch diese Verteilung der Laut sprecher werden sehr natürlich wirkende Raumklangeffekte erzielt Verbinden Sie den 5 1CH AUDIO OUT Anschluss auf der Rückseite des DVD Players mit den entsprechenden Anschlüssen auf der Rückseite ...

Страница 14: ... in den Karteneinschub auf der Vorderseite des Gerätes Mikrofon Eingänge Wollen Sie den DVD Player zum Karaoke verwenden stecken Sie ein bzw beide Mikrofone in die entsprechende Buchse Schalten Sie den Hauptschalter des DVD Players ein indem Sie den Netz Ein Aus Schalter POWER auf der Vorderseite des Gerätes betätigen Über den DVD Player Sie können mit dem DVD Player eine Vielzahl von DVD Formaten...

Страница 15: ...ezeichnet Hierbei kann es sich beispielsweise um ein Lied den Satz einer Sym phonie etc handeln Titel Kapitel Video DVDs werden in Titel und Kapitel unterteilt Ein Titel kann dabei z B ein bestimmter Film sein die Kapitel hingegen Unterabschnitte dieses Films MPEG4 Ihr DVD Player ist weiterhin für die Wiedergabe von Dateien geeignet die MPEG 4 kurz für Moving Picture Experts Group 4 kom primiert s...

Страница 16: ...oder ist die Qualität der Wiedergabe unbefriedigend dann sollten Sie die Voreinstellungen des DVD Players überprüfen 1 Drücken Sie auf die Taste PAUSE II Abb 3 27 der Fernbedienung Die Wiedergabe wird unterbrochen das aktuell sichtbare Bild wird eingefroren 2 Drücken Sie auf die Taste PLAY Abb 3 7 der Fernbedienung um die normale Wiedergabe wieder zu starten Drücken Sie mehrfach auf die Taste LANG...

Страница 17: ...heint die Meldung Kapitel 3 Drücken Sie erneut auf die Taste REPEAT bis Sie die Anzeige Titel oder Alle auf dem Bildschirm sehen Drücken Sie so oft auf die Taste REPEAT Abb 3 15 bis auf dem Bild schirm keine Meldung mehr erscheint Normalerweise weist jede DVD ein eigenes Menü auf Hier können Sie Kapitel auswählen Einstellungen vornehmen etc Dieses Menü ist DVD spezifisch und kann daher hier nicht ...

Страница 18: ...des DVD Players verändern Um die Lautstärke Ihren Wünschen gemäß einzustellen müssen Sie ggf noch die Lautstärke des Wiedergabege rätes anpassen Drücken Sie die Taste R L Abb 1 7 einmal schaltet das Gerät auf L Mono Drücken Sie zweimal wechselt es nach R Mono Betätigen Sie die Taste erneut wechselt es zurück zur Stereo Einstellung Unter Umständen möchten Sie die Titel z B einer DVD nicht in der vo...

Страница 19: ...D laden 2 Wählen Sie die gewünschte n Datei en aus und starten Sie die Wie dergabe Seite 20 Datei Verzeichnis auswählen und Wiedergabe starten Folgende Speicherkarten können Sie verwenden SD Card Multi Media Card Memory Stick 1 Stecken Sie die Speicherkarte in den Kartenleser Abb 1 10 2 Drücken Sie auf die Taste DVD USB CARD Abb 3 19 der Fernbedie nung um den DVD Player in den Dateimodus zu schalt...

Страница 20: ... CARD Taste Abb 3 19 HINWEIS Mit der PROG Taste Abb 3 21 können Sie zwischen der Datei und der Verzeichnis Anzeige umschalten Haben Sie die Datei Anzeige ausgewählt werden ggf auf die CD gebrannte Verzeichnisse nicht angezeigt Medien können zahlreichen Daten Dateien und Verzeichnisse enthalten Sie müssen daher zunächst bestimmen welche Dateien wiedergegeben werden sollen 1 Sofern dies noch nicht g...

Страница 21: ...abegerätes entspricht Dieses beträgt bei Fernsehern normalerweise 1024x576 Pixel Seitenverhältnis 16 9 oder 768x576 Seitenverhältnis 4 3 Starten Sie die Bildwiedergabe indem Sie die Datei auswählen mit der die Wiedergabe beginnen soll Seite 20 Datei Verzeichnis auswählen und Wiedergabe starten Blättern Manuell Drücken Sie auf die Taste PREV I Abb 3 5 oder NEXT I Abb 3 6 der Fernbedienung um vor od...

Страница 22: ...ichtungstasten Abb 3 25 der Fernbedienung Im Untermenü hingegen bewegen Sie sich mit den Richtungstasten Einen Menüpunkt wählen Sie mit der Taste ENTER Abb 3 10 aus Eine Option wählen Sie ebenfalls mit der Taste ENTER aus Die ausge wählte Option ist nun hervorgehoben Schieberegler In einigen Menüs finden Sie Schieberegler mit denen Sie z B die Lautstär ke oder Bildschirmhelligkeit einstellen könne...

Страница 23: ...e des Wide Screen Fernsehers zur Wiedergabe verwendet HINWEIS Die Einstellung Normal PS wird nicht von allen DVDs unterstützt Winkelmarker Kamerawinkel Falls die DVD Sequenzen enthält die von unterschiedlichen Kamerawin keln aus aufgenommen wurden können Sie mittels der Taste ANGLE Abb 3 23 die verschiedenen Kamerawinkel auswählen Diese Funktion steht nur zur Verfügung wenn die DVD Szenen mit vers...

Страница 24: ...en wieder am Anfang des Medium Lautsprecher Einrichten Downmix Verändern Sie die Charakteristik der Lautsprecherausgabe LT RT Wählen Sie diese Einstellung wenn Sie die DVD im Pro Logic Dolby Stereoeffekt abspielen wollen Hierdurch entsteht ein realitäts naher 2 Kanal Wiedergabeeffekt Stereo Wählen Sie diese Einstellung wenn eine DVD die im 5 1 Au dio Format aufgenommen wurde als 2 Kanal Stereoton ...

Страница 25: ...Die Mikrofoneingänge sind aktiviert Aus Die Mikrofoneingänge sind deaktiviert MIC Vol 1 Hier können Sie die Lautstärke der Mikrofone einstellen Echo Level Hier können Sie das Echo der Audio Ausgabe anpassen Stellen Sie den Regler auf 00 wenn kein Echo ausgegeben werden soll MIC Threshold Mikrofon Grenzbereich Hier können Sie den Grenzbereich einstellen Dual Mono Normalerweise erfolgt die Tonausgab...

Страница 26: ...VD Player verbunden ist HINWEIS Wenn Sie die Einstellung RGB wählen möchten stellen Sie sicher dass Ihr Wiedergabegerät diese Einstellung unterstützt Durch Drücken der Taste VIDEO MODE Abb 3 33 können Sie ebenfalls zwischen den Videoausgangsoptionen umschalten Wobei YPbPr der Einstellung Progressive entspricht siehe P Scan Ein Aus P Scan Ein Aus Die Wahl des richtigen Signalformats ist vom verwend...

Страница 27: ...ugte Sprache der filmbeglei tenden Untertitel aus Disk Menü Wählen Sie hier die bevorzugte Sprache der DVD Menüs aus Kindersperre Jugendschutz Manche DVDs weisen Informationen zur Zielgruppe auf Das Vorgehen gleicht hierbei der Freigabe für Kinofilme Freigegeben ab 12 Jahren z B Haben Sie die Kinderschutz Option aktiviert so wird sofern vorhanden die entsprechende Information von der DVD ausgelese...

Страница 28: ...en Sie das aktuelle Kennwort in der Zeile New Password mit den Zifferntasten Abb 3 31 der Fernbedienung ein Damit das Kennwort nicht von Unbefugten gelesen werden kann werden auf dem Bildschirm lediglich die Zeichen XXXX angezeigt 2 Geben Sie das neue Kennwort in der Zeile New Password mit den Zifferntasten der Fernbedienung ein 3 Geben Sie zur Bestätigung das neue Kennwort in der Zeile Confirm PW...

Страница 29: ...E Abb 3 33 um den TV Modus zu wechseln Keine Reaktion auf Tastendruck Probleme mit der Stromversorgung oder statische Aufladung des Gerätes Schalten Sie den Hauptschalter aus und ziehen Sie den Netzstecker Stecken Sie den Netzstecker wieder in die Steckdose und schalten Sie das Gerät wieder ein Kein Ton Audiokabel wurde nicht angeschlossen WARNUNG Bevor Sie sich auf Fehlersuche begeben schalten Si...

Страница 30: ...er Garantiezeit beseitigen wir unentgeltlich die Mängel des Gerätes oder des Zubehörs die auf Material oder Herstellungsfehler beruhen durch Reparatur oder nach unserem Ermessen durch Umtausch Garantieleistungen bewirken weder eine Verlängerung der Garantiefrist noch beginnt dadurch ein Anspruch auf eine neue Garantie Als Garantienachweis gilt der Kaufbeleg Ohne diesen Nachweis kann ein kostenlose...

Страница 31: ...hr bei entsprechendem Telekommunikationstarif Nach der Garantie Nach Ablauf der Garantiezeit können Reparaturen kostenpflichtig vom entsprechenden Fachhandel oder Reparaturservice ausgeführt werden Konformitätserklärung Hiermit erklärt die Firma ETV Elektro Technische Vertriebsgesellschaft mbH dass sich das Gerät DVD 4532 USB CR in Übereinstimmung mit den grundlegenden Anforderungen der europäisch...

Страница 32: ...IF AUSGANG SPDIF AUS SPDIF RAW SPDIF PCM KARAOKE SETUP MIC SETUP MIC EIN AUS MIC VOL 1 ECHO LEVEL MIC THRESHOLD DOLBY DUAL MONO STEREO L MONO R MONO MISCH MONO DYNAMIK VIDEO KOMPONENTE CVBS YUV RGB P SCAN EIN AUS PROGRESSIVE INTERLACE SCHÄRFE HOCH MITTEL NIEDRIG HELLIGKEIT KONTRAST PREFEREN TV TYP PAL MULTI NTSC AUDIO UNTERTITEL DISC MENU KINDERSPERRE 1 KINDERSPERRE 2 G 3 PG 4 PG 13 5 PGR 6 R 7 NC...

Страница 33: ...Deutsch 33 05 DVD 4532 USB CR_D indd 33 05 DVD 4532 USB CR_D indd 33 21 02 2008 10 35 03 Uhr 21 02 2008 10 35 03 Uhr ...

Страница 34: ... sockets 9 Card slot MMC MS SD 10 USB interface 11 5 1 output 12 ML MR Audio output 13 Component Video output 14 Optical Audio output 15 SCART output 16 S Video output 17 Composite Video output 18 Digital Audio output Device parts Fig 1 Fig 2 05 DVD 4532 USB CR_GB indd 34 05 DVD 4532 USB CR_GB indd 34 21 02 2008 11 15 43 Uhr 21 02 2008 11 15 43 Uhr ...

Страница 35: ...norm switching 18 R L Switches between the right hand and left hand channel 19 DVD USB CARD USB CARD DVD switching 20 TIME For direct accessing of a sec tion on the CD DVD 21 PROG Call up DVD play list 22 LANGUAGE To change the Audio settings 23 ANGLE To select the viewing angle 24 SETUP To start the setup menu 25 Cursor buttons Navigation in screen menu 26 MENU To display the main menu of the DVD...

Страница 36: ...ions W x H x D 430 x 50 x 275 mm Weight 1 96 kg Laser Semiconductor laser Signal format PAL NTSC Signal noise distance 90 dB Video output 1 0 V P P 75 Ω Analogue Audio output 2 0 V rms S Video output Y 1 0 V P P 75 Ω C 286 mV P P 75 Ω Operating environment 0 C bis 40 C level base Compatible media DVD Video DVD Disc DVD R RW MPEG 4 Video von CD DVD Disc DVD R RW CD R RW Audio CD von CD Disc CD R RW...

Страница 37: ...dangers to your health and indicates potential risks of injury ATTENTION Indicates potential hazards for the player or other objects NOTE Highlights tips and information for you ETV Elektro technische Vertriebsgesellschaft mbH Industriering Ost 40 47906 Kempen We reserve the right to make technical and design related changes in the course of ongoing product improvements Many thanks Symbols in this...

Страница 38: ...particular attention to the following Never touch the plug with wet hands If you want to pull the plug out of the plug socket always pull directly on the plug Never pull on the cable as it could tear Make sure that the power cable is not bent caught or run over and that it does not come into contact with heat sources Please ensure that during operation the electric lead is not wound around the dev...

Страница 39: ...ht Place the appliance so that a sufficient air supply is assured This is to avoid a build up of heat inside the appliance Make sure that the ventilation slots are not blocked Protect the appliance against the mechanical vibrations Always place the device on a firm and flat surface Protect the remote control against weather influences moisture and high temperatures e g by direct sunlight The playe...

Страница 40: ...e player from the power supply and consult an authorized dealer Setting up and connecting Unpack the appliance and all accessories and check that the contents are complete ATTENTION Always transport send the player in its original packaging to prevent it from being damaged Keep the packaging for this purpose Dispose of unnecessary packaging material in accordance with the regulations applicable in...

Страница 41: ...legal and environmental regulations applicable in your country Do not throw batteries into fire NOTE The lifetime of the enclosed batteries may be shortened because of storage 1 Open and remove the battery compartment cover 2 Insert two batteries of type AAA R03 1 5 V ensure correct polarity and Start with the negative pole 3 Attach and close the battery compartment cover NOTE The signals from the...

Страница 42: ...Video signals 1 Plug each of the three jacks into the corresponding sockets on the DVD Player 2 Plug the jacks into the corresponding socket on your playback device In the Video menu select the Component submenu Here you can change the settings CVBS YUV and RGB on the playback device that you have connected Please see the operating instructions of the connected device for the correct setting S Vid...

Страница 43: ...kers Four of these speakers are placed in the four corners of the room One speaker is positioned close to the playback device The sixth speaker serves the output of very low tones With this arrangement of speakers a very natural stereophonic sound is achieved Connect the 5 1CH AUDIO OUT sockets on the back of the DVD player to the corresponding connections on the back of the subwoofer Proceed as f...

Страница 44: ... card slot on the front of the device Microphone Inputs If you would like to use the DVD player for karaoke please insert one or both microphones into the corresponding socket Turn on the main switch of the DVD player by pressing the POWER on off switch on the front of the machine About the DVD Player With this DVD Player you can play a vast variety of DVD formats Page 36 Technical data However yo...

Страница 45: ... This may be a song the set of a symphony etc Title Chapter Video DVDs are divided into Title and Chapters A Title may be e g a particular film the Chapters may be subsections of this film MPEG4 Your DVD player is also suitable for playing back files that have been compressed using the MPEG 4 system short for Moving Picture Experts Group 4 MPEG 4 is a compression method by means of which large qua...

Страница 46: ...rt or the replay is of poor quality you should check the default settings of the DVD Player 1 Press the PAUSE II button Fig 3 27 on the remote control The replay is interrupted the currently visible image is frozen 2 Press the PLAY button Fig 3 7 on the remote control to restart the normal replay Press the LANGUAGE button Fig 3 22 several times to change the Audio language The available audio lang...

Страница 47: ...g 3 15 repeatedly until the message disap pears from the screen Normally each DVD has its own menu Here you can choose chapters make settings etc This menu is specific for the DVD and can thus not be explained in detail Press the MENU button Fig 3 26 to access the DVD menu Use the Cur sor Buttons Fig 3 25 to navigate in the Menu Press the ENTER button Fig 3 10 to confirm If you are in a menu area ...

Страница 48: ... possible that you may not wish to play the titles in the same order that they are to be found on the DVD The function Create Playlist you can create your own playing order To do this proceed as follows 1 Press the PROG button Fig 3 21 A table is displayed Here you can enter the desired order of the chapters titles NOTE However your playlist will be lost when switching off the DVD Play ers or when...

Страница 49: ...le directory and starting playback 4 If you would like to change back to DVD mode press the DVD USB CARD button Fig 3 19 again By means of the USB connection you can connect numerous devices to the DVD Player Examples of such devices are USB memory sticks or digital cameras This device has been developed in accordance with the latest techni cal developments in the USB field Unfortunately the large...

Страница 50: ...TER button Fig 3 10 If you have selected a file this is now displayed or played back Please note There are both lots of burning and compressing methods as well as high quality differences in CDs DVDs and burned CDs DVDs For this reason there may occasionally be problems when files are played back for example files are displayed but cannot be played back This is no malfunction of the player NOTE Wi...

Страница 51: ...ny of these default settings can be changed via both the remote control and the menu The difference is If you change the default settings via the remote control these changes will only be valid until the DVD Player is switched off or the DVD is changed However any changes made in the menu are permanent The Setup menu has two menu levels Main menu The main level is shown at the top edge of the scre...

Страница 52: ...y see the middle section of the film The borders will be cut off Normal LB You will see the complete width of the film The film is thus reduced in size whereby black bars appear below and above the film Wide Select this option if you use a wide screen TV for replay Please note that films that have been recorded with TV aspect 4 3 can still be replayed using aspect 4 3 This means that replaying thi...

Страница 53: ...w the DVD player should behave if the user presses the STOP button Fig 3 8 during playback On If the playback of a DVD CD or VCD is stopped and then restarted playback begins from the previous position Off If the playback of a DVD CD or VCD is stopped and then restar ted playback begins from the beginning of the medium Speaker Setup Downmix Change the characteristics of the speaker output LT RT Ch...

Страница 54: ...er is a two channel stereo amplifier NOTE If there is no Audio output even though you connected the DVD Player to an amplifier you will most likely have chosen an incorrect setting for the Audio output Karaoke Setup Mic Setup MIC Here you can carry out the microphone adjustments On The microphone inputs are activated Off The microphone inputs are deactivated MIC Vol 1 Here you can adjust the volum...

Страница 55: ...it would make sense to compress the dynamic range i e reduce and increase the output volume at the same time FULL 1 8 The dynamic range is compressed slightly 1 8 to full FULL OFF The dynamic range is not compressed at all default Components video output Select the video output option for the playback device that is connected and which you wish to use Choosing the right signal format depends on th...

Страница 56: ... is connected to the DVD Player by means of a Component Video cable NOTE The Scan mode menu is only available if the YUV option or the RGB option is activated in the Components menu If the option Scan mode is activated in the Progressive but your playback device does not support Progressive Scan signals no picture is displayed Sharpness Brightness Contrast In these submenus it is possible to carry...

Страница 57: ...iles under the age of 17 are not allowed to watch this film Adult The film must only be watched by adults Password In this menu you can change the password for the child lock system In order to change the password you must first enter the current pass word The master password is 1234 NOTE If you forgot your password you can deactivate the child lock system with this password Proceed as follows to ...

Страница 58: ...utton Power supply problem or static charging of appliance Switch off the main switch and pull out the mains plug Insert the mains plug into the socket and switch the player on again No sound Audio cable not connected WARNING Before troubleshooting switch the player off Video plug for transmission of the Video signal you must use and Audio cable in addition to the Video cable Connecting the Audio ...

Страница 59: ... rise to any right to a new guarantee Proof of the guarantee is provided by the proof of purchase Without proof of purchase no free replacement or repair will be carried out If you wish to make a claim under the guarantee please return the entire machine in the original packaging to your dealer together with the receipt Defects to consumables or parts subject to wearing as well as cleaning mainten...

Страница 60: ...T SPDIF OFF SPDIF RAW SPDIF PCM KARAOKE SETUP MIC SETUP MIC ON OFF MIC VOL 1 ECHO LEVEL MIC THRESHOLD DOLBY DUAL MONO STEREO L MONO R MONO MIX MONO DYNAMIC VIDEO COMPONENT CVBS YUV RGB SCAN MODE P SCAN INTERLACE SHARPNESS HIGH MIDDLE LOW BRIGHTNESS CONTRAST OSD Menu Overview PREFEREN TV TYPE PAL MULTI NTSC AUDIO SUBTITLE DISC MENU PARENTAL 1 KID SAF 2 G 3 PG 4 PG 13 5 PGR 6 R 7 NC 17 8 ADULT PASSW...

Страница 61: ...English 61 05 DVD 4532 USB CR_GB indd 61 05 DVD 4532 USB CR_GB indd 61 21 02 2008 11 16 01 Uhr 21 02 2008 11 16 01 Uhr ...

Страница 62: ...siącegwarancjinapodstawiekartygwarancyjnej Záruka24mésíců podle prohlášení o záruce A garanciát lásd a használati utasításban Гарантийные обязательства смотри руководство пользователя Kaufdatum Händlerstempel Unterschrift Koopdatum Stempel van de leverancier Handtekening Date d achat cachet du revendeur signature Fecha de compra Sel lo del vendedor Firma Data de compra Carimbo do vendedor Assinatu...

Отзывы: