background image

62

Maintenance and Care

• Before performing any maintenance operation, isolate the

hood from the electrical supply by switching off at the connec-
tor and removing the connector fuse.
Or if the appliance has been connected through a plug and
socket, then the plug must be removed from the socket.

Metal grease filter

• The purpose of the grease filters is to absorb grease particles which

form during cooking and it 

must

 always be used, either in the exter-

nal extraction or internal re-circulation function.

Attention:

 the metal grease filters must be removed and washed,

either by hand or in the dishwasher, every four weeks.

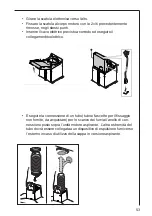
Removing the metal grease filter

• Use the spring handle and remove the filter downward.

Hand washing

Soak grease filters for about one hour in hot water with a grease-
loosening cleaner, then rinse off thoroughly with hot water. Repeat
the process if necessary. Refit the grease filters when they are dry.

Dishwasher

Place grease filters in the dishwasher. Select most powerful washing
programme and highest temperature, at least 65°C. Repeat the
process. Refit the grease filters when they are dry.
When washing the metal grease filter in the dishwasher a slight
discolouration of the filter can occur, this does not have any impact
on its performance.

• Never use corrosive, abrasive or flammable cleaning products or

products containing bleach.

Содержание DK 4460

Страница 1: ...Benutzerinformation Notice d utilisation Istruzioni per l uso User manual Dunstabzugshaube Hotte Cappa aspirante Cooker Hood DK 4460 DK 4490 ...

Страница 2: ...ienst in Ihrer Nähe jederzeit zur Verfügung Adressen und Telefonnummern finden Sie im Abschnitt Kundendienststellen Beachten Sie dazu auch den Abschnitt Service AEG DIRECT INFO SERVICES 0180 555 45 Entsorgung Verpackungsmaterial entsorgen Alle Verpackungsteile sind recyclebar Folien und Hartschaumteile entsprechend gekennzeichnet Verpackungsmaterial und eventuelles Altgerät bitte ordnungsgemäß ent...

Страница 3: ...betrieb 6 Bedienung der Dunstabzugshaube 7 Wartung und Pflege 10 Metallfettfilter 10 Aktivkohlefilter 11 Achtung 12 Austausch der Lampe n 12 Reinigung 13 Sonderzubehör 13 Kundendienst 13 Technische Daten 14 Zubehör Montagematerial 14 Elektroanschluss 14 Installation 15 ...

Страница 4: ...it eingeschränkten körperlichen geistigen oder Wahrnehmungsfähig keiten und mit mangelnder Erfahrung oder Kenntnis geeignet es sei denn unter Aufsicht oder Anleitung zum Gebrauch durch eine für ihre Sicherheit verantwortliche Person Kinder müssen beaufsichtigt werden dass sie nicht mit dem Gerät spielen Die Dunstabzugshaube niemals ohne korrekt montiertes Gitter in Betrieb setzen Die Dunstabzugsha...

Страница 5: ...forderungen der Europäischen Richtli nie 2002 96 EG über Elektro und Elektronik Altgeräte WEEE ist vorliegendes Gerät mit einer Markierung versehen Sie leisten einen positiven Beitrag für den Schutz der Umwelt und die Gesundheit des Menschen wenn Sie dieses Gerät einer gesonderten Abfallsammlung zuführen Im unsortierten Siedlungsmüll könnte ein solches Gerät durch unsachgemäße Entsorgung negative ...

Страница 6: ...Sonderzubehör benötigt Abluftbetrieb Die Luft wird mit Hilfe eines an den Abluftstutzen anzubringenden Rohres ins Freie geleitet Das Abluftrohr muss bei Abluftbetrieb den selben Durchmesser wie der Gebläseaustrittstutzen haben um die spezifizierten Leistungs werte zu erreichen Umluftbetrieb Die Luft wird gefiltert und in den Raum zurückgeführt Für den Umluftbetrieb wird der Original Aktivkohlefilt...

Страница 7: ...altet sie sich aus OFF 2 Erhöhung der Geschwindigkeit Wird die Taste gedrückt startet die Dunstabzugshaube mit der Geschwindigkeit 1 Wird die Taste gedrückt Dunstabzugshaube läuft wird die Ge schwindigkeit des Motors geändert Geschwindigkeit 1 auf dem Display erscheint die Nummer 1 Geschwindigkeit 2 auf dem Display erscheint die Nummer 2 Geschwindigkeit 3 auf dem Display erscheint die Nummer 3 Höc...

Страница 8: ...en Geschwindigkeit zurück Fettfilter Anzeige Nach 80 Betriebsstunden beginnt die Nummer 1 auf dem Display zu blinken Halten Sie die Taste 1 für 3 gedrückt um die Anzeige zurückzuset zen Führen Sie die Wartung des Fettfilters entsprechend der Anweisungen in diesem Handbuch aus Aktivkohlefilter Anzeige Nach 320 Betriebsstunden beginnt die Nummer 2 auf dem Display zu blinken Halten Sie die Taste 1 fü...

Страница 9: ...d 3 gleichzeitig für 3 gedrückt Die Nummern 1 und 2 blinken für 2 um die erfolgte Aktivierung anzuzeigen Aktivkohlefilter Anzeige ausschalten Stellen Sie das Gerät auf OFF und halten Sie die Tasten 1 und 2 gleichzeitig für 3 gedrückt Die Nummer 1 blinkt für 2 um die erfolgte Ausschaltung anzuzeigen ...

Страница 10: ...andreinigung Metallfettfilterkassette ca 1 Stunde in heißem Wasser mit fett lösendem Reinigungsmittel einweichen und danach mit heißem Wasser abbrausen Vorgang evtl wiederholen Abgetrocknete Kassette wieder einbauen Geschirrspüler Metallfettfilterkassette in Geschirrspüler stellen Reinigung bei stärkstem Reinigungsprogramm und höchster Temperatur mind 65 C Vorgang evtl wiederholen Abgetrocknete Ka...

Страница 11: ...schen noch wiederverwendet wer den Montage Aktivkohlefilter im Haubenkörperper so positionieren dass das Motorschutzgitter komplett abgedeckt ist Filter mit den 2 seitlichen Klips befestigen Zum Ausbau in umgekehrter Reihenfolge vorgehen Innengehäuse nur mit warmer Spülmittellauge reinigen Keine scharfe Reinigungsmittel Bürste oder Scheuersand verwenden Bei Bestellung eines Ersatzfilters die Model...

Страница 12: ...nsachgemäße Wartung oder Nichteinhaltung der oben angeführten Sicherheits vorschriften zurückzuführen sind Austausch der Lampe n Dunstabzugshaube vom Stromnetz trennen Die Lampen erst berühren wenn sie kalt sind Lampenabdeckung mit einem Schraubenzieher entnehmen und entfernen Defekte Lampe herausnehmen und durch neue eines gleichwerti gen Typs ersetzen Lampenabdeckung wieder montieren Bevor der K...

Страница 13: ...ikteile werden mit einem weichen und feuchten Tuch gereinigt Es ist wichtig die Filterwechsel sowie die Reinigungsintervalle einzuhalten Bei Nichtbeachtung besteht infolge von Fettab lagerungen Feuergefahr Sonderzubehör Aktivkohlefilter Type 15 Kundendienst Bei eventuellen Rückfragen und Störungen Kundendienst anrufen siehe Kundendienst Stellenverzeichnis Folgende Daten beim Anruf angeben 1 Modell...

Страница 14: ...eckung 2 Schrauben 3 5 x 9 5 zur Befestigung des Verbindungsrings 1 Stromkabel Elektroanschluss Sicherheitshinweise für den Elektoinstallateur Die Netzspannung muss der Spannung entsprechen die auf dem Betriebsdatenschild im Innern der Haube angegeben ist Sofern die Haube einen Netzstecker hat ist dieser an zugänglicher Stelle an eine den geltenden Vorschriften entsprechende Steckdose anzuschließe...

Страница 15: ...vkohlefilter entfernen Mit einem Bleistift eine senkrechte Linie mittig über dem Kochfeld an der Wand bis zur Decke anzeichnen dadurch wird die Installati on erleichtert Die Bohrschablone entsprechend der angezeichneten Mittellinie an der Wand anbringen Die Unterkante der Schablone entspricht der Unterkante der Dunstabzugshaube ...

Страница 16: ...ienen zur Befestigung die beiden unteren zur Sicherung der Haube Ø 8 Ø 8 5x45 Ø 8 Den Kaminbefestigungsbügel deckenbündig an der Wand anbrin gen dabei die Einkerbung am Bügel mittig auf der Mittellinie anbrin gen und mit einem Bleistift die beiden Befestigungslöcher anzeich nen Die Bohrungen ausführen und die Dübel einsetzen Den Befestigungsbügel mit 2 Schrauben anbringen G Ø 8 Ø 5x45 Ø 8 Ø 5x45 ...

Страница 17: ...ICH Anschließend nachdem die ordnungsgemäße Position der Dunstabzugshaube überprüft wurde alle Schrauben sowohl die unteren wie die obe ren gut anziehen Den Flansch mit 2 Schrauben an der Abluftöffnung befestigen Die 2 im vorderen Bereich der Abluftöffnung befindlichen Schrauben herausnehmen und aufbewahren Das Klebeband zur provisorischen Befestigung des Elektronik gehäuses an das Ansaugmotorgehä...

Страница 18: ...rauben befestigen Das Stromkabel am Elektronikgehäuse befestigen und den Elektro anschluss ausführen Ein Rohr oder Schlauch nicht im Lieferumfang an der den Abluft stutzen anbringen und gegebenenfalls mit Schlauchschellen si chern Das andere Ende in den vorgesehenen Rauchabzug einführen nur für Abluftbetrieb ...

Страница 19: ...filter einsetzen Aktivkohlefilter beim Kundendienst bestellen Den unteren Teil des Kamins zur vollständigen Abdeckung der Abzugsanlage herunterrutschen lassen bis er sich an dem dafür vorgesehenen Platz über der Dunstabzugshaube befindet Den oberen Kamin oben mit 2 Schrauben an dem Halterungsbügel befestigen Den die Fettfilter wieder einbauen ...

Страница 20: ...mise au rebut L appareil ne doit pas être jeté avec les ordures ménagères Renseignez vous auprès des services de votre commune des endroits autorisés pour la mise au rebut de l appareil Attention Rendez inutilisable l appareil usagé avant de le mettre au rebut Coupez le câble d alimentation au ras de l appareil Chère cliente cher client Veuillez lire attentivement cette notice d utilisation et not...

Страница 21: ...lisation de la hotte 25 Entretien 28 Filtre à graisse métallique 28 Filtre à charbon 29 Attention 30 Remplacement de l ampoule d éclairage 30 Nettoyage 31 Accessoires en option 31 Service Après vente 31 Caractéristiques techniques 32 Accessoires Matériel de montage 32 Branchement électrique 32 Installation 33 ...

Страница 22: ...circuit électrique en retirant la prise ou en coupant l interrup teur général de l habitation L appareil n est pas destiné à une utilisation par des enfants ou des personnes à capacités physiques sensorielles ou mentales réduites et sans expérience et connaissance à moins qu ils ne soient sous la supervision ou formés sur l utilisation de l appareil par une personne responsable de leur sécurité Le...

Страница 23: ...r d éventuels inconvé nients dégâts ou incendies provoqués par l appareil et dérivés de la non observation des instructions reprises dans ce manuel Cet appareil porte le symbole du recyclage conformément à la Directive Européenne 2002 96 CE concernant les Déchets d Équipements Électriques et Électroniques DEEE ou WEEE En procédant correctement à la mise au rebut de cet appareil vous contribuerez à...

Страница 24: ... L air est rejeté à l air libre par un conduit raccordé sur la bride d éva cuation Pour obtenir des performances optimales lors de l aspiration le tuyau d évacuation doit avoir un diamètre équivalent à celui de l ouverture d évacuation Version recyclage L air est filtré par un filtre à charbon et renvoyé dans la pièce En version recyclage utilisez le filtre à charbon actif d origine voir Accessoir...

Страница 25: ... la hotte démarre à la vitesse 1 En appuyant sur la touche durant le fonctionnement la hotte se met à l arrêt 2 Vitesses moteur En appuyant sur la touche la hotte passe de mise à l arrêt à la vitesse 1 En appuyant par pressions successives sur la touche hotte en fonctionnement la vitesse du moteur change Vitesse 1 1 apparaît sur l afficheur Vitesse 2 2 apparaît sur l afficheur Vitesse 3 3 apparaît...

Страница 26: ...eures d utilisation Après avoir nettoyé le filtre à graisse appuyez sur la touche 1 pendant 3 secondes jusqu à ce que le voyant cesse de clignoter Lisez attentivement les conseils pour l entretien du filtre à graisse Signalisation de saturation du filtre au charbon 2 clignote lorsque le filtre à charbon actif doit être remplacé Ceci se produit après environ 320 heures d utilisation Après avoir rem...

Страница 27: ...ise à l arrêt Activez le dispositif en appuyant simultanément sur les touches 2 et 3 pendant 3 secondes 1 et 2 clignotent pendant 2 secondes sur l afficheur Pour le désactiver appuyez à nouveau sur les touches 2 et 3 pendant 3 secondes 1 clignote pendant 2 secondes puis cesse de clignoter ...

Страница 28: ...haude avec un détergent doux puis rincez à l eau chaude Remettez en place la cassette soigneusement sé chée Lave vaisselle Placez la cassette du filtre à graisse métallique dans le lave vais selle Vérifiez que la rotation du bras de lavage du lave vaisselle ne puisse pas être gêné par le filtre à graisse Lavez avec un programme pour vaisselles très sales et une tempéra ture d au moins 65 C Recomme...

Страница 29: ...sation Ce filtre ne peut être ni lavé ni réutilisé Montage Placez le filtre au charbon à l intérieur de la hotte en couvrant la grille de protection du moteur Fixez le filtre à l aide des 2 pommeaux latéraux Pour le démontage procédez dans l ordre inverse Lors de la commande d un filtre de rechange veuillez préciser la désignation du modèle et la référence du produit Ces données sont indiquées sur...

Страница 30: ...d incendie liés à un entretien négligé ou au non respect des consignes de sécurité précédemment mentionnées Remplacement de l ampoule d éclairage Mettez la hotte hors tension Avant de toucher les ampoules assurez vous qu elles soient complètement refroidies Retirez l ampoule grillée Remplacez l ampoule défectueuse par une ampoule du même type et de même caractéristique Si l ampoule ne s allume pas...

Страница 31: ...portant de respecter les intervalles de remplacement du des filtre s et de nettoyage Le non respect peut entraîner un risque d incendie suite à l accumulation de graisse dans le filtre Accessoires en option Filtre à charbon Type 15 Service Après vente Dans le cas de demandes de renseignement ou de pannes veuillez appeler notre service après vente voir la liste de nos différents points de service a...

Страница 32: ...1 câble d alimentation 1 filtre à charbon actif Branchement électrique Consignes de sécurité pour l électricien La tension électrique doit correspondre à la tension reportée sur la plaque signalétique située à l intérieur de la hotte Si une prise est présente branchez la hotte dans une prise murale conforme aux normes en vigueur et placée dans une zone accessible Si aucune prise n est présente rac...

Страница 33: ...iser une ligne sur la paroi jusqu au plafond correspondant à la ligne médiane ce qui facilitera les opérations d installation Appliquer le gabarit de forage au mur la ligne verticale médiane imprimée sur le gabarit de forage devra correspondre à la ligne médiane dessinée sur le mur en outre le bord inférieur du gabarit de forage devra correspondre au bord inférieur de la hotte ...

Страница 34: ...andis que les trous inférieurs servent pour la fixation définitive et de sécurité Ø 8 Ø 8 5x45 Ø 8 Appliquer l étrier de support cheminées à la paroi adhérant au pla fond utiliser l étrier de support cheminées comme gabarit de forage si présente la petite fente sur le support doit correspondre avec la ligne précédemment tracée sur le mur et marquer 2 trous avec le crayon réaliser les trous insérer...

Страница 35: ...rès avoir vérifié l horizontalité de la hotte VISSER FERMEMENT TOUTES LES VIS inférieures et supérieures Fixer la bride sur le trou d évacuation de la hotte à l aide de 2 vis Retirer momentanément les 2 vis placées sur le côté avant du caisson moteur mettre les vis de côté Retirer le ruban adhésif qui fixe provisoirement le boîtier électronique au caisson moteur ...

Страница 36: ... avec le boîtier électronique et raccorder la prise à l alimentation électrique Réaliser le raccordement d un tube tube et joints de fixation non fournis à acheter séparément pour l évacuation des fumées à l anneau de rac cordement placé au dessus de l unité moteur d aspiration L autre extrémité du tube devra être reliée à un dispositif d évacuation des fumées vers l extérieur en cas d utilisation...

Страница 37: ... Placez le filtre au charbon à l intérieur de la hotte Vous pouvez comman der le filtre à charbon auprès de votre magasin vendeur Appliquer les cheminées et les fixer au dessus à l aide de 2 vis à l étrier de support cheminées Faire glisser la partie inférieure de la cheminée en couverture complète du groupe d aspiration jusqu à l insérer à l endroit prévu au dessus de la hotte Remontez les filtre...

Страница 38: ...unzionamento della cappa 42 Manutenzione e cura 45 Filtro grassi in metallo 45 Filtro al carbone 46 Attenzione 47 Sostituzione delle lampade 47 Pulizia 48 Accessori speciali 48 Servizio assistenza tecnica 48 Dettagli tecnici 49 Accessori di montaggio inclusi 49 Collegamento Elettrico 49 Installazione 50 ...

Страница 39: ...lettrica togliendo la spina o staccando l interrut tore generale dell abitazione L apparecchio non è destinato all utilizzo da parte di bambini o persone con ridotte capacità fisiche sensoriali o mentali e con mancata esperienza e conoscenza a meno che essi non siano sotto la supervisione o istruiti nell uso dell apparecchiatura da una persona responsabile per la loro sicurezza I bambini devono es...

Страница 40: ...venienti danni o incendi provocati all apparecchio derivati dall inosservanza delle istruzioni riportate in questo manuale Questo apparecchio è contrassegnato in conformità alla Direttiva Europea 2002 96 EC Waste Electrical and Electronic Equipment WEEE Assicurandosi che questo prodotto sia smaltito in modo corretto l utente contribuisce a prevenire le potenziali conseguenze negative per l ambient...

Страница 41: ...nte L aria viene espulsa all esterno attraverso un tubo che deve essere montato ad una flangia di raccordo Per un miglior rendimento il tubo dovrebbe avere lo stesso diametro del foro di scarico flangia di raccordo Versione filtrante L aria passa attraverso il filtro al carbone attivo e viene rimessa nell ambiente mediante la griglia superiore del foro di uscita Per il funzionamento della cappa ne...

Страница 42: ...uesto tasto per spe gnere la cappa 2 Tasto di selezione delle velocità A cappa spenta premere questo per selezionare la velocità potenza di aspirazione 1 Premendo ancora è possibile selezionare le velocità potenze di aspirazione disponibili Velocità potenza di aspirazione 1 nel diplay appare il numero 1 Velocità potenza di aspirazione 2 nel diplay appare il numero 2 Velocità potenza di aspirazione...

Страница 43: ...tore di saturazione del filtro grassi Dopo 80 ore di funzionamento nel display inizia a lampeggiare il numero 1 Per resettare l indicatore di saturazione premere e mantenere premuto il tasto 1 per 3 secondi circa Eseguire la manutenzione del filtro grassi come indicato in questo manuale Indicatore di saturazione del filtro al carbone Dopo 320 ore di funzionamento nel display inizia a lampeggiare i...

Страница 44: ...umeri 1 e 2 ad indicare l avvenuta attivazione dell indicatore di saturazione del filtro al carbone Disattivazione dell indicatore di saturazione del filtro al carbone Spegnere le cappa e premere contemporaneamente i tasti 2 e 3 per 3 secondi Sul display lampeggia per 2 secondi solo il numero 1 ad indicare l avvenuta disattivazione dell indicatore di saturazione del filtro al carbone ...

Страница 45: ...iglia a molla e rimuovere il filtro grassi verso il basso Lavaggio dei filtri a mano Lasciare i filtri a bagno per circa un ora in acqua calda con un detersivo sciogli grasso risciacquare abbondantemente con acqua calda Se necessario ripetere l operazione Rimettere a posto i filtri quando sono asciutti Lavaggio in lavastoviglie Sistemare i filtri nella lavastoviglie Selezionare il programma di lav...

Страница 46: ...n ogni caso è necessario sostituire la cartuccia al massimo ogni quattro mesi NON può essere lavato o rigenerato Montaggio Agganciare il filtro al carbone posteriormente sulla linguetta del vano motore utilizzare l asola posteriore del filtro per l aggancio Fissare il filtro anteriormente girando di 90 i due pomelli del filtro Per smontare il filtro procedere in ordine inverso Specificare sempre i...

Страница 47: ...ddette avvertenze Sostituzione delle lampade Scollegare l apparecchio dalla rete elettrica Prima di toccare le lampade sincerarsi che siano fredde Togliere la protezione della lampada facendo leva con un piccolo cacciavite a taglio o con un utensile analogo Estrarre la lampada danneggiata e sostituirla con una nuova dello stesso tipo Reinstallare la protezione della lampada Nel caso in cui la luce...

Страница 48: ...stituire i filtri agli intervalli consigliati L inosservanza delle suddette dispo sizioni potrebbe causare l accumulo di depositi di grasso comportando rischi di incendio Accessori speciali Filtro al carbone TYPE 15 Servizio assistenza tecnica E possibile telefonare al nostro servizio di assistenza tecnica vedere lista dei centri di assistenza tecnica ogniqualvolta si desiderano informazioni o in ...

Страница 49: ... della flangia 1 Cavo di alimentazione Collegamento Elettrico Avvertenze per l elettricista La tensione di rete deve corrispondere alla tensione riportata sull eti chetta caratteristiche situata all interno della cappa Se provvista di spina allacciare la cappa ad una presa conforme alle norme vigenti posta in zona accessibile Se sprovvista di spina collegamento diretto alla rete o la spina non è p...

Страница 50: ...nea sulla parete sino al soffitto corrispondente alla linea di mezzeria faciliterà le operazioni di installazione Applicare lo schema di foratura al muro la linea verticale di mezzeria stampata sullo schema di foratura dovrà corrispondere alla linea di mezzeria disegnata sul muro Il bordo inferiore dello schema di foratura corrisponde inoltre al bordo inferiore della cappa ...

Страница 51: ... mentre i fori inferiori generalmente 2 laterali servono per il fissaggio definitivo e di sicurezza Ø 8 Ø 8 5x45 Ø 8 Applicare la staffa camini alla parete adiacente al soffitto Usare la staffa come dima la piccola tacca sul lato superiore deve corrispon dere alla linea di mezzeria precedentemente segnata sul muro segnare 2 fori con una matita Eseguire i fori ed inserire 2 tasselli Fissare la staf...

Страница 52: ...O Quindi dopo aver verificato la posizione della cappa STRINGERE TUTTE LE VITI superiori e inferiori Fissare la flangia al foro di scarico con due viti Togliere e conservare le due viti forntali che serviranno per fissare la scatola elettronica al corpo motore Rimuovere il nastro adesivo che fissa temporaneamente la scatola elettronica al corpo motore ...

Страница 53: ...redo ed eseguire il collegamenbto elettrico Eseguire la connessione di un tubo tubo e fascette per il fissaggio non fornite da acquistare per lo scarico dei fumi all anello di con nessione posto sopra l unità motore aspirante L altra estremità del tubo dovrà essere collegata a un dispositivo di espulsione fumi verso l esterno in caso di utilizzo della cappa in versione aspirante ...

Страница 54: ...l deflettore Installazione del filtro al carbone Il filtro al carbone attivo può essere richiesto al servizio assistenza tecnica Far scivolare la sezione inferiore del camino a copertura completa del gruppo aspirante sino a inserirlo nell apposito alloggiamento sopra la cappa Sollevare il camino superiore e fissarlo mediante 2 viti alla staffa di supporto camini Rimontare il filtro grassi ...

Страница 55: ...ntrol Panel 59 Maintenance and Care 62 Metal grease filter 62 Charcoal filter 63 Warning 64 Changing the light bulb s 64 Cleaning the hood 65 Special accessories 65 What to do if 66 Technical assistance service 67 Technical Details 67 Mounting accessories included 67 Electrical connection 68 Installation 69 ...

Страница 56: ...al supply Always wear work gloves for all installation and maintenance opera tions The appliance is not intended for use by children or persons with impaired physical sensorial or mental faculties or if lacking in experience or knowledge unless they are under supervision or have been trained in the use of the appliance by a person responsible for their safety This appliance is designed to be opera...

Страница 57: ...not accept any responsibility for any faults damage or fires caused to the appliance as a result of the non observance of the instructions included in this manual This appliance is marked according to the European directive 2002 96 EC on Waste Electrical and Electronic Equipment WEEE By ensuring this product is disposed of correctly you will help prevent potential negative consequences for the env...

Страница 58: ...n original charcoal filter for the recirculation mode See Special Accessories Extraction mode In this mode fumes are extracted to the outside via a hose con nected to the coupling ring In order to obtain the best performance the hose should have a diameter equal to the outlet hole Recirculation mode The air is filtered through a charcoal filter and returned to the kitchen You will need an original...

Страница 59: ...ON OFF button By pressing the button the hood starts at speed 1 Pressing the button OFF while the hood is in function turns the latter off 2 Speed increase button By pressing the button the hood starts at speed 1 Pressing the button while the hood is on modifies the motor speed Speed 1 the number 1 appears on the display Speed 2 the number 2 appears on the display Speed 3 the number 3 appears on t...

Страница 60: ...ration the number 1 starts flashing on the display Press and hold button 1 or 3 to reset the indicator Carry out maintenance on the grease filter according to the indications of this manual Charcoal filter indicator After 320 hours of operation the number 2 starts flashing on the display Press and hold button 1 or 3 to reset the indicator Carry out maintenance on the charcoal filter according to t...

Страница 61: ...f and keep buttons 2 and 3 pressed for 3 The numbers 1 and 2 will flash for 2 once the function has been activated Charcoal filter indicator deactivation Turn the hood off and keep buttons 1 and 2 pressed for 3 The number 1 will flash for 2 to indicate that the function has been deactivated ...

Страница 62: ...hand or in the dishwasher every four weeks Removing the metal grease filter Use the spring handle and remove the filter downward Hand washing Soak grease filters for about one hour in hot water with a grease loosening cleaner then rinse off thoroughly with hot water Repeat the process if necessary Refit the grease filters when they are dry Dishwasher Place grease filters in the dishwasher Select m...

Страница 63: ...every 4 months under normal use Replacement filters are available from your local Service Force Centre Fitting Position the carbon filter inside the hood to cover the protection grill of the motor Fix the filter with 2 lateral knobs To remove proceed in the reverse order Always specify the hood model number serial number and product number code when ordering replacement filters This information is...

Страница 64: ...tor or any fire damage linked to inappropriate maintenance or failure to observe the above safety recommendations Changing the light bulb s Disconnect the cooker hood from the mains supply Prior to touching the light bulbs ensure they have cooled down Remove the damaged lamp Replace the old bulb with a new one of the same type If the light does not come on make sure the bulb has been inserted in c...

Страница 65: ...in the motor s protective grid Only ever clean the switch panel and filter grill using a damp cloth and mild washing up liquid Clean all the plastic parts with a soft cloth soaked in warm water and neutral soap It is extremely important to clean the unit and change the filters at the recommended intervals Failure to do so will cause grease deposits to build up that could constitute a fire hazard S...

Страница 66: ...check that the ducting and outlets are not blocked The cooker hood has The safety cut out device has been switched off during operation tripped Turn off the hob and then wait for the device to reset If the hood has been installed below the heights indicated in the installation instructions the motor will cut out frequently which will damage the hood If after all these checks the problem persists c...

Страница 67: ...ing technological development Technical Details DK 4460 DK 4490 Dimensions in cm Height 76 6 121 3 76 6 121 3 Width 59 8 89 8 Depth 50 50 Max absorb power 210 W 210 W Motor 170 W 170 W Lighting 2 x 20 W 12V G4 2 x 20 W 12V G4 Length of the cable 150 cm 150 cm Electrical connection 220 240 V 220 240 V Fuse rating 5At 5At Mounting accessories included 2 screwdriver inserts to tighten torx screws 1 c...

Страница 68: ...ble area If it not fitted with a plug direct mains connection or if the plug is not located in an accessible area apply a double pole switch in accordance with standards which assures the complete disconnec tion of the mains under conditions relating to over current category III in accordance with installation instructions Warning Before re connecting the hood circuit to the mains supply and check...

Страница 69: ...ine on the wall with a pencil up to the ceiling correspond ing to the centre line will make the installation operations easier Apply the template to the wall the vertical centre line printed on the perforation diagram should correspond to the centre line drawn on the wall In addition the lower edge of the perforation diagram corre sponds to the lower edge of the hood ...

Страница 70: ...ing the hood up while the lower holes are for the definitive and safety fixing Ø 8 Ø 8 5x45 Ø 8 Apply flues support bracket to the wall touching the ceiling Use the flues support bracket as a perforation diagram the small slot in the support must coincide with the line previously drawn on the wall if present and mark two holes with a pencil Make the holes and insert 2 dowels Fix the flues support ...

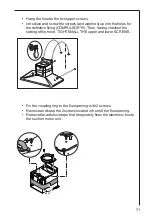
Страница 71: ...tive fixing COMPULSORY Then having checked the setting of the hood TIGHTENALLTHE upper and lower SCREWS Fix the coupling ring to the flue opening with 2 screws Remove and keep the 2 screws located in front of the flue opening Remove the adhesive tape that temporarily fixes the electronic box to the suction motor unit ...

Страница 72: ... into the electronic box and carry out the electrical connection Connect a tube tube and bands for fixing not supplied to be pur chased for discharging the fumes to the coupling ring placed over the aspiration motor unit The other end of the tube should be connected to a device for expel ling fumes on the outside of the hood in the aspiration version ...

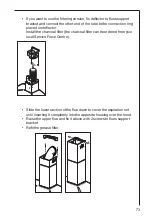
Страница 73: ...on deflector Install the charcoal filter the charcoal filter can be ordered from your local Service Force Centre Slide the lower section of the flue down to cover the aspiration set until inserting it completely into the apposite housing over the hood Raise the upper flue and fix it above with 2 screws to flues support bracket Refit the grease filter ...

Страница 74: ......

Страница 75: ......

Страница 76: ...LIB0006223 Ed 11 09 ...

Отзывы: