background image

FÜR  PERFEKTE  ERGEBNISSE

Danke, dass Sie sich für dieses AEG Produkt entschieden 

haben. Wir haben es geschaffen, damit Sie viele Jahre 

von seiner ausgezeichneten Leistung und den innovativen 

Technologien, die Ihnen das Leben erleichtern, profitieren 

können. Es ist mit Funktionen ausgestattet, die in gewöhn-

lichen Geräten nicht vorhanden sind. Nehmen Sie sich ein 

paar Minuten Zeit zum Lesen, um seine Vorzüge kennen zu 

lernen.

ZUBEHÖR  UND  VERBRAUCHSMATERIALIEN

Im AEG Webshop finden Sie alles, was Sie für ein makello-

ses Aussehen und perfektes Funktionieren Ihrer AEG Geräte 

benötigen. Wir bieten auch ein umfangreiches Zubehörsor-

timent, das Ihre höchsten Qualitätsansprüche erfüllt, vom 

Profi-Kochgeschirr bis zu Besteckkörben, von Flaschenhaltern 

bis hin zu Wäschebeuteln für empfindliche Wäsche...

Visit the webshop at:
www.aeg-electrolux.com/shop

Содержание DD9996-B

Страница 1: ...N BEDIENUNGSANLEITUNG INSTRUCTIES VOOR HET GEBRUIK EN INSTALLEREN INSTRUCCIONES PARA EL USO Y LA INSTALACIÒN INSTRUÇÕES PARA O USO E A INSTALAÇÃO EN FR DE NL ES PT COOKER HOOD HOTTE DE CUISINE DUNSTABZUGSHAUBE DAMPKAP CAMPANA EXAUSTOR 2 14 26 38 50 62 ...

Страница 2: ...end a few minutes reading to get the very best from it ACCESSORIES AND CONSUMABLES In the AEG webshop you ll find everything you need to keep all your AEG appliances looking spotless and working per fectly Along with a wide range of accessories designed and built to the high quality standards you would expect from specialist cookware to cutlery baskets from bottle holders to delicate laundry bags ...

Страница 3: ...3 CONTENTS 4 5 7 10 11 Recommendations And Suggestions Characteristics Installation Use Maintenance Contents ...

Страница 4: ... for purposes other than for which it has ben designed Never leave high naked flames under the hood when it is in operation Adjust the flame intensity to direct it onto the bottom of the pan only making sure that it does not engulf the sides Deep fat fryers must be continuously monitored during use overheated oil can burst into flames Do not flambè under the range hood risk of fire This appliance ...

Страница 5: ...CHARACTERISTICS 5 CHARACTERISTICS Dimensions ...

Страница 6: ...mney 2 2 1 Lower chimney 8 1 Air outlet grid 9 1 Reducer flange Ø 150 120 10 1 Damper 16 1 Cover for recycling version Ref Q ty Installation Components 7 2 12 Fixing brackets for upper chimney 11 7 Plugs 11a 2 Plugs SB 12 10 12a 7 Screws 4 2 x 44 4 12c 10 Screws 2 9 x 6 5 12e 2 Screws 2 9 x 9 5 Q ty Documentation 1 Instruction Manual ...

Страница 7: ... a reference point 3 at 743 mm above the cooker top on the vertical reference line Drill at the marked points 1 using a ø 12 mm drill bit Drill at the marked points 2 and 3 using a ø 8 mm drill bit Insert the bracket plugs 11a into the holes 1 and tighten the screws Insert plug 11 into holes 2 and 3 Place bracket 7 2 1 on the wall about 1 2 mm from the ceiling or from the upper limit aligning the ...

Страница 8: ...ns supply Attention If any barrier occurs in its way during the panel opening or closing the upper panel stops for 1 sec and starts again the other way round If within 5 sec the panel does not open or close the motor stops Press the key once again Connections DUCTED VERSION AIR EXHAUST SYSTEM When installing the ducted version connect the hood to the chimney using either a flexible or rigid pipe ø...

Страница 9: ...Part USE for at least 2 seconds Remove the metal filters See Part MAINTE NANCE and make sure that the connector piece of the supply cable is correctly inside the hood socket FLUE ASSEMBLY Upper exhaust Chimney Slightly widen the two sides of the upper chimney and hook them behind the brack ets 7 2 1 making sure that they are well seated Secure the sides to the brackets using the 4 screws 12c 2 9 x...

Страница 10: ...on By pressing this key it is possible to set the delayed shutdown of the motor and the lighting to 30 minutes A flashing clock symbol appears By pressing the key the function is deacti vated G By pressing this key for about 2 seconds it is possible to reset the filter saturation alarm A drop symbol indicates that the metal grease filters satura tion alarm has been activated and the filters need t...

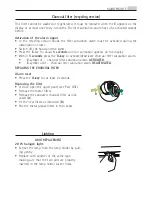
Страница 11: ...pen the upper panel see Part USE Remove the filters one by one pushing them towards the back side of the hood unit and simultaneously pulling downwards Any kind of bending of the filters has to be avoided when washing them Before fitting them again into the hood make sure that they are completely dry The colour of the filter surface may change throughout the time but this has no influence to the f...

Страница 12: ...ress the D key to activate deactivate charcoal filter saturation alarm C symbol lit charcoal filter saturation alarm ACTIVATED C symbol unlit charcoal filter saturation alarm DEACTIVATED REPLACING THE CHARCOAL FILTER Alarm reset Press the G key for at least 2 seconds Replacing the filter If close open the upper panel see Part USE Remove the metal filters Remove the saturated charcoal filter as ind...

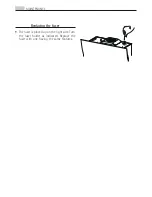
Страница 13: ...MAINTENANCE 13 Replacing the fuser The fuser is placed up on the right side Turn the fuser holder as indicated Replace the fuser with one having the same features ...

Страница 14: ...ndre quel ques instants pour lire cette notice afin d utiliser au mieux votre appareil ACCESSOIRES ET CONSOMMABLES Dans la boutique en ligne d AEG vous trouverez tout ce qu il vous faut pour que vos appareils AEG fonctionnent parfai tement Sans oublier une vaste gamme d accessoires conçus et fabriqués selon les critères de qualité les plus élevés qui soient des articles de cuisine spécialisés aux ...

Страница 15: ...15 SOMMAIRE 16 17 19 22 23 RECOMMENDATIONS AND SUGGESTIONS CHARACTERISTICS INSTALLATION USE MAINTENANCE SOMMAIRE ...

Страница 16: ...iser abusivement la hotte Ne pas laisser les flammes libres à forte intensité quand la hotte est en ser vice Toujours régler les flammes de manière à éviter toute sortie latérale de ces dernières par rapport au fond des marmites Contrôler les friteuses lors de l utilisation car l huile surchauffée pourrait s en flammer Ne pas préparer d aliments flambés sous la hotte de cuisine risque d incen die ...

Страница 17: ...CARACTERISTIQUES 17 CARACTERISTIQUES Encombrement ...

Страница 18: ...2 2 1 Conduit inférieur 8 1 Grille orientable Sortie de l Air 9 1 Buse de réduction 150 120 10 1 Buse avec clapet 16 1 Couverture filtrante Réf Q té Composants de l installation 7 2 12 Équerre de fixation du conduit supérieur 11 7 Chevilles 11a 2 Chevilles SB 12 10 12a 7 Vis 4 2 x 44 4 12c 10 Vis 2 9 x 6 5 12e 2 Vis 2 9 x 9 5 Q té Documentation 1 Notice d emploi ...

Страница 19: ...e 3 à 743 mm au dessus du plan de cuisson sur la ligne verticale de référence Percer les points 1 avec une mèche de ø 12 mm Percer les points 2 et 3 avec une mèche de ø 8 mm Mettre les chevilles avec l équerre 11a dans les trous 1 et visser Mettre la cheville 11 dans les trous 2 et 3 Comme indiqué poser l équerre 7 2 1 à 1 2 mm du plafond ou de la limite supérieure en alignant le centre entailles ...

Страница 20: ...tention Si la porte en phase de fermeture rencontre un obstacle elle se bloque pendant 1 seconde et repart dans le sens inverse Si la porte ne s ouvre pas ou ne se ferme pas dans les 5 se condes le moteur se bloque Appuyer de nouveau sur la touche pour finir le mouvement Branchements SORTIE AIR VERSION ASPIRANTE En cas d installation en version aspirante bran cher la hotte à la tuyauterie de sorti...

Страница 21: ...de 2 secondes Voir le paragraphe EMPLOI pour ouvrir le panneau supérieur Retirer les filtres à graisse Voir le paragraphe EMPLOI et s assurer que le connecteur du câble électrique est introduit de façon correcte dans la prise d aspiration Montage Cheminée Cheminée supérieure Elargir légèrement les deux bords latériaux et les accrocher derrières les brides 7 2 1 refermer jusqu à la butée Fixer laté...

Страница 22: ...ouche F Activable à moteur allumé active l extinction automatique du moteur et de l éclairage avec un retard de 30 secondes Affiche le symbole d une horloge clignotante Désactivé en appuyant sur la touche G Effectue la Réinitialisation de l alarme de saturation des filtres en appuyant sur la touche pendant environ 2 secondes Au bout de 100 heures de fonctionnement affiche le symbole de Goutte pour...

Страница 23: ...ouche G pendant au moins 2 secondes Nettoyage des filtres Si la porte est fermée ouvrir Voir EMPLOI Retirer les filtres un à un en les poussant vers l arrière du groupe tout en les tirant vers le bas Laver les filtres en évitant de les plier et les faire sécher avant de les remonter Tout changement de couleur sur la surface du filtre susceptible de se produire avec le temps ne nuit en rien l effic...

Страница 24: ...ltres au C A Le symbole C s allume alarme de saturation du filtre au C A ACTIVÉE Le symbole C s éteint alarme de saturation du filtre au C A DÉSACTIVÉE REMPLACEMENT DU FILTRE ANTI ODEUR AU CHARBON ACTIF Rétablissement du signal d alarme Appuyer sur la touche G pendant au moins 2 secondes Remplacement du Filtre Si la porte est fermée ouvrir Voir EMPLOI Retirer les Filtres à graisse Retirer les filt...

Страница 25: ...RETIEN 25 Remplacement du fusible Le fusible est situé en haut à droite tourner le porte fusible selon les indications fournies et remplacer le fusible par un autre fusible ayant les mêmes caractéristiques ...

Страница 26: ...icht vorhanden sind Nehmen Sie sich ein paar Minuten Zeit zum Lesen um seine Vorzüge kennen zu lernen ZUBEHÖR UND VERBRAUCHSMATERIALIEN Im AEG Webshop finden Sie alles was Sie für ein makello ses Aussehen und perfektes Funktionieren Ihrer AEG Geräte benötigen Wir bieten auch ein umfangreiches Zubehörsor timent das Ihre höchsten Qualitätsansprüche erfüllt vom Profi Kochgeschirr bis zu Besteckkörben...

Страница 27: ...27 INHALT 28 29 31 34 35 Empfehlungen Und Hinweise Charakteristiken Montage Bedienung Wartung INHALT ...

Страница 28: ...und Kohleherden Frittiergeräte müssen während des Gebrauchs stets beaufsichtigt werden über hitz tes Öl kann sich entzünden Keine flambierten Speisen unter der Abzugshaube zubereiten Brandgefahr Dieses Gerät darf nicht von Personen auch Kindern mit verminderten psychi schen sensorischen und geistigern Fähigkeiten oder von Personen ohne Erfah rung und Kenntnisse benutzt werden sofern sie nicht von ...

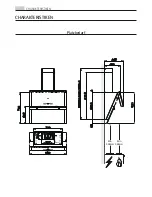
Страница 29: ...CHARAKTERISTIKEN 29 CHARAKTERISTIKEN Platzbedarf ...

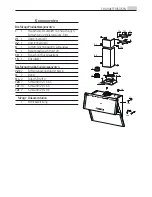
Страница 30: ... 1 Unterer Kaminteil 8 1 Luftstromrichtungsgitter Luftauslass 9 1 Reduktionsflansch 150 120 10 1 Flansch mit Ruckstauklappe 16 1 Filterdeckel Bez MengeInstallationskomponenten 7 2 12 Befestigungsbügel oberer Kamin 11 7 Dübel 11a 2 Dübel SB 12 10 12a 7 Schrauben 4 2 x 44 4 12c 10 Schrauben 2 9 x 6 5 12e 2 Schrauben 2 9 x 9 5 Menge Dokumentation 1 Betriebsanleitung ...

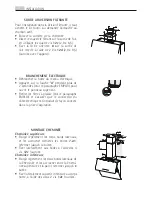
Страница 31: ...uf der waagrechten Be zugslinie kennzeichnen Die gekennzeichneten Punkte 1 mit einem Bohrer ø 12 mm bohren Die gekennzeichneten Punkte 2 und 3 mit einem Bohrer ø 8 mm bohren Die Dübel mit dem Bügel 11a in die Bohrungen 1 einfügen und festschrauben Den Dübel 11 in die Bohrungen 2 und 3 einfügen Den Bügel 7 2 1 wie angegeben 1 2 mm unterhalb der Decke oder der oberen Begrenzung an legen und seinen M...

Страница 32: ...eßen auf ein Hindernis wird sie 1 Sekunde lang blockiert und versucht dann die umgekehrte Bewegung Wenn die Klappe innerhalb von 5 Sekunden we der geöffnet noch geschlossen wurde hält der Motor an Die Taste nochmals drücken um das Manöver zu beenden Anschlüsse ANSCHLUSS IN ABLUFTVERSION Bei Abluftbetrieb kann die Haube vom Installateur wahlweise mittels Rohr oder Schlauch ø150 oder 120mm an die Au...

Страница 33: ...e A siehe Abschnitt Gebrauch länger als 2 Sekunden gedrückt halten Die Fettfilter entfernen siehe Abschnitt Wartung Kontrollieren dass der Verbinder des Stromkabels korrekt in der Steckdose des Sauggerätes sitzt Kaminmontage Oberer Kaminteil Die beiden seitlichen Schenkel leicht auseinan derbiegen hinter den Bügeln 7 2 1 einhängen und bis zum Anschlag wieder schließen Bei den Bügeln mit Hilfe der ...

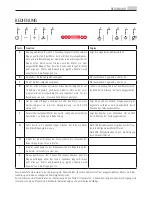
Страница 34: ...nd alle auf dem Display angezeigten Segmente verlöschen nacheinander Wird durch Drücken der Taste ausgeschaltet F Aktiviert bei laufendem Motor das um 30 verzögerte automatische Abschalten von Motor und Beleuchtung Zeigt das Symbol einer blinkenden Uhr an Wird durch Drücken der Taste ausgeschaltet G Führt durch ca 2 Sekunden langes Drücken der Taste ein Reset des Filtersättigungsalarms aus Nach 10...

Страница 35: ...den lang drü cken Filterreinigung Ist die Tür geschlossen siehe GEBRAUCH öff nen Die Filter einzeln entnehmen indem sie zur Rückseite der Gruppe geschoben und gleichzeitig nach unten gezogen werden Die Filter waschen darauf achten sie nicht zu verbiegen und vor der Remontage trocknen las sen Eine eventuell im Lauf der Zeit auftretende Verfärbung der Filteroberfläche hat keinerlei Einfluss auf die ...

Страница 36: ...efilter zu aktivieren oder zu deaktivieren Einschalten des Symbols C Alarm für Aktivkohlefiltersättigung AKTIVIERT Ausschalten des Symbols C Alarm für Aktivkohlefiltersättigung DEAKTIVIERT ERSETZEN DES AKTIVKOHLE GERUCHSFILTERS Rückstellen der Sättigungsanzeige Die Taste G mindestens 2 Sekunden lang drü cken Ersetzen des Filters Ist die Tür geschlossen siehe GEBRAUCH öff nen Die Fettfilter ausbaue...

Страница 37: ...ARTUNG 37 Auswechseln der Schmelzsicherung Die Schmelzsicherung befindet sich oben rechts den Sicherungshalter wie angegeben ausschrauben und die Sicherung durch eine neue gleichwerte Sicherung ersetzen ...

Страница 38: ...en de tijd om het door te lezen zodat u er optimaal van kunt profiteren ACCESSOIRES EN VERBRUIKSARTIKELEN In de AEG webshop vindt u alles wat u nodig heeft om al uw apparaten van AEG mooi te houden en perfect te laten functioneren Ook vindt u hier een groot aantal ac cessoires die zijn ontworpen en gebouwd volgens de hoge kwaliteitsnormen die u verwacht van speciaal kookgerei tot bestekmandjes en ...

Страница 39: ...39 INHOUDSOPGAVE 40 41 43 46 47 ADVIEZEN EN SUGGESTIES EIGENSCHAPPEN INSTALLATIE GEBRUIK ONDERHOUD INHOUDSOPGAVE ...

Страница 40: ...aat geen hoog brandende branders onbedekt onder de wasemkap terwijl deze in werking is Regel de vlammen altijd zo dat ze niet langs de pannen omhoogkomen Controleer frituurpannen tijdens het gebruik de oververhitte olie zou vlam kunnen vatten Er mag niet onder de afzuigkap geflambeerd worden brandgevaar Dit apparaat mag niet worden gebruikt door personen inclusief kinderen met beperkte psychische ...

Страница 41: ...EIGENSCHAPPEN 41 EIGENSCHAPPEN Buitenafmetingen ...

Страница 42: ...1 Onderstuk Schouw 8 1 Richtingsrooster Luchtuitlaat 9 1 Reductieflens 150 120 10 1 Toom met Klep 16 1 Deksel filterversie Ref Aantal Installatieonderdelen 7 2 12 Bevestigingsstangen Bovenstuk Schouw 11 7 Pluggen 11a 2 Pluggen SB 12 10 12a 7 Schroeven 4 2 x 44 4 12c 10 Schroeven 2 9 x 6 5 12e 2 Schroeven 2 9 x 9 5 Aantal Documentatie 1 Gebruiksaanwijzing ...

Страница 43: ...oogte liggen Teken zoals aangegeven een punt 3 af op de verticale referentielijn op een hoogte van 743 mm boven de kookplaat Boor op de afgetekende punten 1 gaten van ø 12 mm Boor op de afgetekende punten 2 en 3 gaten van ø 8 mm Schuif de pluggen met stang 11a in de gaten 1 en aanschroeven Schuif de plug 11 in de gaten 2 en 3 Plaats zoals aangegeven de stang 7 2 1 op 1 2 mm van het plafond of van ...

Страница 44: ...ijdens het sluiten een obsta kel tegenkomt blokkeert het 1 seconde en beweegt daarna in de tegenovergestelde richting Als het paneel binnen 5 seconden niet open of dicht gaat dan blokkeert de motor Druk opnieuw op de toets om de beweging te beëindigen Aansluitingen LUCHTUITLAAT AFZUIGVERSIE Bij installatie in afzuigversie moet u de wasemkap met de uitlaatleiding verbinden door middel van een starr...

Страница 45: ...nden op Toets A Zie ook Paragraaf Gebruik om het bovenste paneel te openen Verwijder de vetfilters Zie ook Paragraaf Onderhoud en controleer of de con nector van de voedingskabel correct in het contact van de afzuigkap zit Montage van de schouw Bovenstuk van de schouw De twee zijplaten enigszins openen ze vast haken achter de beugels 7 2 1 en ze weer zo ver mogelijk sluiten Aan de zijkant aan de b...

Страница 46: ...chakeld bij een druk op de toets F Deze functie kan met ingeschakelde motor worden geactiveerd en schakelt de motor en de verlichting na 30 automatisch uit Toont het knipperende symbool van een klok Wordt uitgeschakeld bij een druk op de toets G Reset het alarm van de verzadiging van de filters door ongeveer 2 seconden op de toets te drukken Na 100 bedrijfsuren wordt het symbool druppel getoond om...

Страница 47: ...G Schoonmaak van de Filters Om het paneeltje te openen Zie paragraaf GE BRUIK Verwijder de filters één voor één door ze naar de achterkant van de groep te duwen en ze gelijktijdig naar beneden te trekken Was de filters zonder ze te vouwen en laat ze drogen alvorens ze weer terug te plaatsen Na verloop van tijd is het mogelijk dat de oppervlakte van de filter een kleurverandering ondergaat maar dit...

Страница 48: ... met actieve koolstof Het symbool C brandt Alarm verzadiging filter met actieve koolstof GEACTIVEERD Het symbool C brandt niet Alarm verzadiging filter met actieve koolstof NIET GEAC TIVEERD VERVANGING GEURFILTER MET ACTIEVE KOOLSTOF Reset van het alarmsignaal Druk gedurende minstens 2 seconden op toets G Vervanging van de Filter Om het paneeltje te openen Zie paragraaf GE BRUIK Verwijder de vetfi...

Страница 49: ...ONDERHOUD 49 Vervanging van de smeltveiligheid De zekering bevindt zich rechtsboven Draai de zekeringhouder volgens de aanwijzingen en vervang de zekering door een exemplaar met dezelfde eigenschappen ...

Страница 50: ...os a la lectura para disfrutar de todas sus ventajas ACCESORIOS Y CONSUMIBLES En la página web de AEG encontrará todo lo necesario para la perfecta limpieza y funcionamiento de todos sus electrodomésticos AEG Junto con una amplia gama de accesorios diseñados y fabricados conforme a los elevados estándares de calidad característicos de la marca desde utensilios de cocina especializados a cestos de ...

Страница 51: ...51 ÍNDICE 52 53 55 58 59 CONSEJOS Y SUGERENCIAS CARACTERÍSTICAS INSTALACIÓN USO MANTENIMIENTO ÍNDICE ...

Страница 52: ... manera inadecuada No dejar llamas libres de fuerte intensidad mientras la campana esté funcio nan do Regular siempre las llamas de manera que éstas no sobresalgan lateralmente con respecto al fondo de las ollas Controlar las freídoras durante su uso el aceite muy caliente se puede infla mar No preparar alimentos flambè debajo de la campana de la cocina peligro de incendio Este aparato no tiene qu...

Страница 53: ...CARACTERÍSTICAS 53 CARACTERÍSTICAS Dimensiones ...

Страница 54: ...enea Inferior 8 1 Rejilla direccionada Salida del Aire 9 1 Arandela de reducción 150 120 10 1 Arandela con válvula 16 1 Tapa filtrante Ref Cant Componentes de Instalación 7 2 12 Bridas sujeción Chimenea Superior 11 7 Tacos 11a 2 Tacos SB 12 10 12a 7 Tornillos 4 2 x 44 4 12c 10 Tornillos 2 9 x 6 5 12e 2 Tornillos 2 9 x 9 5 Cant Documentación 1 Manual de Instrucciones ...

Страница 55: ...cia 3 a 743 mm por encima del Plano de Coc ción sobre la línea Vertical de referencia Agujerear con una punta de ø 12 mm los puntos 1 marcados Agujerear con una punta de ø 8 mm los puntos 2 e 3 marcados Insertar los tacos y la brida 11a en los agujeros 1 y atornillarlos Insertar el taco 11 en los agujeros 2 y 3 Apoyar como se indica la brida 7 2 1 a 1 2 mm del techo o límite superior alineando su ...

Страница 56: ...a un obstáculo se bloquea por 1 segundo y vuelve a partir invirtiendo el movimiento Si en el plazo de 5 segundos la puerta no se ha abierto ni cerrado el motor se bloquea Presionar la tecla nuevamente para acabar el movimiento Conexiones SALIDA DEL AIRE VERSION ASPIRANTE Para instalar la campana en versión aspirante co nectarla a la tubería de salida mediante un tubo rígido ó flexible de 150 ó 120...

Страница 57: ...árrafo Uso para abrir el panel superior Quitar los filtros antigrasa Ver Párrafo Mantenimiento y asegurarse de que el conector del cable de acometida esté colo cado correctamente en la toma del aparato Montaje de la chimenea Chimenea superior Ensanchar ligeramente las dos faldas latera les engancharlas detrás de las bridas 7 2 1 cerrarlas hasta el tope Fijar a los lados de las bridas con los 4 tor...

Страница 58: ...onando la tecla F Activable desde motor encendido activa el apagado automático del motor y de la iluminación retrasado en 30 Visualiza el símbolo de un Reloj que parpadea Se desactiva presionando la tecla G Efectúa el Reset de la alarma de saturación filtros presionando la tecla por aproximadamente 2 segundos Después de 100 horas de funcionamiento visualiza el símbolo Gota para señalar la saturaci...

Страница 59: ... Segundos Limpieza Filtros Si está cerrado abrir el postigo Ver USO Sacar los Filtros uno a la vez empujándolos hacia la parte posterior del grupo y tirando al mismo tiempo hacia abajo Lavar los Filtros evitando doblarlos y dejarlos secar antes de volver colocarlos Un eventual cambio del color de la superficie del filtro que podría producirse en el tiempo no perjudica absolutamente la eficiencia d...

Страница 60: ...ara la habilitación deshabilitación de los filtros C A Encendido del símbolo C alarma de saturación filtro C A ACTIVADA Apagado del símbolo C alarma de saturación filtro C A DESACTIVADA SUSTITUCIÓN FILTRO ANTIOLOR AL CARBÓN ACTIVADO Reset de la señal de alarma Apretar la tecla G durante 2 Segundos Sustitución Filtro Si cerrado abrir el postigo Ver USO Sacar los Filtros antigrasa Quitar los Filtros...

Страница 61: ...Sustitución fusible El fusible está posicionado en la parte superior derecha rotar como se indica el portafusible y sustituir el fusible con uno de iguales características MANTENIMIENTO 61 ...

Страница 62: ...ns minutos para tirar o máximo partido do produto ACESSÓRIOS E CONSUMÍVEIS Na loja web AEG encontrará tudo aquilo de que neces sita para manter os seus aparelhos AEG imaculados e a funcionarem na perfeição A par de uma vasta gama de acessórios projectados e concebidos de acordo com os pa drões de elevada qualidade que esperaria de utensílios de cozinha especializados a cestos de talheres de suport...

Страница 63: ...63 ÍNDICE 64 65 67 70 71 CONSELHOS E SUGESTÕES CARACTERÍSTICAS INSTALAÇÃO UTILIZAÇÃO MANUTENÇÃO ÍNDICE ...

Страница 64: ...tilize o aparelho de ma neira imprópria As chamas de forte intensidade não devem ficar descobertas enquanto o exaustor estiver a funcionar Regule sempre as chamas de maneira que não sobressaiam do fundo das pane las Mantenha as frigideiras sob controlo durante o uso o óleo excessivamente aquecido pode inflamar se No prepare alimentos flamejados sob o exaustor Perigo de incêndio Este aparelho não d...

Страница 65: ...CARACTERÍSTICAS 65 CARACTERÍSTICAS Dimensões ...

Страница 66: ...2 2 1 Chaminé inferior 8 1 Grade direccionada de saída do ar 9 1 Flange de redução 150 120 mm 10 1 Flange com válvula 16 1 Tampa filtrante Ref Qtd Componentes de instalação 7 2 12 Suportes de fixação da chaminé supe rior 11 7 Buchas 11a 2 Buchas SB 12 10 12a 7 Parafusos 4 2 x 44 4 12c 10 Parafusos 2 9 x 6 5 12e 2 Parafusos 2 9 x 9 5 Qtd Documentação 1 Manual de Instruções ...

Страница 67: ...3 mm acima da placa do fogão sobre a linha de referência vertical Com uma broca de ø 12 mm fure os pontos 1 marcados Com uma broca de ø 8 mm fure os pontos 2 e 3 marcados Introduza as buchas com suporte 11a nos orifícios 1 e aperte Introduza a bucha 11 nos furos 2 e 3 Apoie o suporte 7 2 1 como indicado a 1 2 mm de distância do tecto ou do limite superior alinhando o centro deste entalhes sobre a ...

Страница 68: ...uer obstáculo na fase de fecho bloqueia se durante 1 segundo e arranca novamente invertendo o movimento Se o painel não se abrir ou fechar no prazo de 5 segundos o motor bloqueia se Prima de novo a tecla para terminar o movimento Ligações SISTEMA DE EXAUSTÃO DO AR VERSÃO COM CONDUTA Quando instalar a versão com conduta ligue o ex tractor à chaminé utilizando um tubo flexível ou um tubo rígido de ø...

Страница 69: ...er Parágrafo UTILIZA ÇÃO para abrir o painel superior Retire os filtros antigordura Ver Parágrafo e Manutenção e assegure se de que o conector do cavo de alimentação está bem adaptado na tomada do aspirador Montagem da chaminé Chaminé superior Alargue ligeiramente as duas folhas laterais prenda as atrás dos suportes 7 2 1 e volte a fechá las completamente Fixe lateralmente aos suportes com os 4 pa...

Страница 70: ...F Activável com o motor a funcionar Activa o desligamento auto mático do motor e da iluminação com um diferimento de 30 Mostra o símbolo de um Relógio a piscar Desactiva se premindo a tecla G Faz o Reset do alarme de saturação dos filtros quando se prime a tecla em questão durante cerca de 2 segundos Após 100 horas de funcionamento mostra o símbolo que representa uma Gota para sinalizar a saturaçã...

Страница 71: ...rima a tecla G durante pelo menos 2 segun dos Limpeza dos filtros Se fechado abra o painel Ver UTILIZAÇÃO Tire os filtros um de cada vez empurrando os para a parte traseira do grupo ao mesmo tempo que puxa para baixo Lave os filtros evitando dobrá los e deixe os secar antes de os reinstalar A eventual alteração de cor da superfície do filtro que com o tempo se poderá verificar não prejudica de man...

Страница 72: ... D para activar desactivar os filtros de C A Acendimento do símbolo C Alarme de saturação do filtro de C A ACTIVADO Apagamento do símbolo C Alarme de saturação do filtro de C A DESACTIVADO SUBSTITUIÇÃO DO FILTRO ANTI CHEIROS DE CARVÃO ACTIVO Como apagar o sinal de alarme Prima a tecla G durante pelo menos 2 segundos Substituição do filtro Se fechado abre o painel Ver UTILIZAÇÃO Tire os filtros ant...

Страница 73: ...MANUTENÇÃO 73 Substituição do fusível O fusível está situado do lado superior di reito Rode o porta fusíveis como indicado e substitua o fusível por outro com as mesmas características do anterior ...

Страница 74: ......

Страница 75: ......

Страница 76: ...www aeg electrolux com shop 436004931_04 101122 ...

Отзывы: