background image

English

32

7.4 Display Information

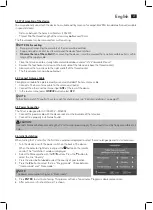
You can display additional information for the current channel (Programme position, channel name (if stored), color trans

-

fer system, and the television standard).
1.  Press the 

DISPLAY

 button to have the information displayed for a short time.

8. USB Mode

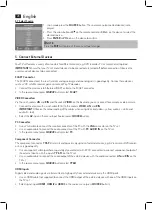
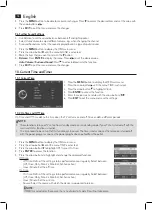
•  Connect your USB device directly at the USB port at the rear of the unit. 
•  Press 

MEDIA

. The USB menu is displayed.

•  Press 

/

 to select the playback mode and press 

ENTER

. to confirm. 


Only the selected file types are displayed. 

 NOTE: 

•  Press 

EXIT

 to return to playback selection mode.

•  For further operation observe the instructions at the bottom of the 

screen.

•  Press 


 to select the file to be played/displayed. The info 


window with additional information is displayed and playback starts.

•  Press 

 (17). If required, press 

DISPLAY

 to display the control menu.

•  Press 

/

 to navigate the control menu. Press 

ENTER

 to execute the selected function.

 NOTE: 

•  The control menu functions differ depending on the playback mode.
•  Press 

EXIT

 to hide the control menu. Press 

DISPLAY

 to display the control menu again.

Remote Control Operation

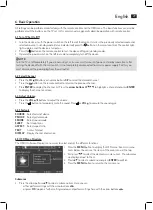
•  Press 

/

 to skip to the next/previous file.

•  For music/video data files: Press 

/

 to search within the file forward or back. Press 

 to return to normal playback 

mode.

•  Press the 


button to stop playback.

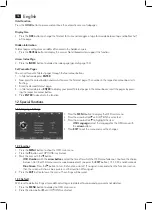
9. Set Picture and Sound

9.1 Change Picture Settings

Your TV set comes with 3 preset and one manually adjustable picture settings (

Standard, Mild, User 

and

 Dynamic

). Press 

the 

PMODE

 button to cycle through the options. Select 

User

 to access your user-defined picture settings.

Define Picture Mode

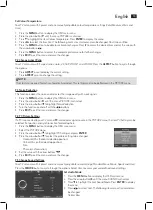
1.  Press the 

MENU

 button to display the OSD main menu.  

2.  Press the arrow button 

 until the menu 

PICTURE

 is activated.

3.  Press 

 to highlight the item 

Picture Mode

. Press 

ENTER

 to display 

the menu.

4.  Press 

/  to select item 

User

. The following items are activated and 

can be changed. 

Contrast / Brightness / Color / Sharpness 

and

 Tint  

(only activated for NTSC signals)

5.  Press the 

MENU

 button to be able to make more changes. Press 

 to access the desired item and set the value with 

the arrow buttons  / .

6.  Press the 

MENU

 button to access the complete picture menu for further changes.

7.  Press 

EXIT

 to exit the menu and save the changes.

Содержание CTV 3202 LCD

Страница 1: ...Bedienungsanleitung Garantie 02 Instruction Manual 22 8 cm 32 LCD FERNSEHER CTV 3202 LCD D 8 cm 32 LCD Fernseher GB 8 cm 32 LCD Television 18 01 2012 TH 1 1 1 ...

Страница 2: ...r Fernbedienung Beim Ziehen des Netzsteckers fassen Sie immer am Stecker an und nicht am Kabel Wählen Sie einen geeigneten Standort für das Gerät geeignet wäre eine trockene ebene rutschfeste Fläche auf der Sie das Gerät gut bedienen können Um eine Beschädigung zu vermeiden den Bildschirm nicht mit Lösungsmitteln in Berührung bringen Berühren Sie das Display nicht unnötig üben Sie keinen Druck auf...

Страница 3: ...S Hebt Tipps und Informationen für Sie hervor Inhaltsverzeichnis 1 Wichtige Sicherheitshinweise 2 2 Geräteübersicht 4 2 1 Bedienelemente und Anschlüsse 4 2 2 Rückansicht Anschluss 5 3 Fernbedienung 5 3 1 Tastenbelegung 5 3 2 Batterien einsetzen 6 4 Erste Schritte 6 4 1 Lieferumfang 6 4 2 Aufstellen des Gerätes 7 4 3 Wandmontage des Gerätes 7 4 4 Antennenkabel anschließen 7 4 5 Netzanschluss 7 4 6 ...

Страница 4: ...arantiebedingungen 19 16 Garantieabwicklung 20 17 Bedeutung des Symbols Mülltonne 21 2 Geräteübersicht 2 1 Bedienelemente und Anschlüsse 1 LCD Display 2 Betriebskontrollleuchte Betrieb blau Standby rot 3 Empfänger für die Fernbedienungssignale 4 VOL VOL Lautstärke regeln Im Menü eine Position nach rechts links Auswahl bestätigen 5 CH CH Kanal wählen nächster vorheriger Programmplatz Im Menü eine P...

Страница 5: ...0 VOL Lautstärke erhöhen oder verringern 11 TEXT Videotext aktivieren gleichzeitige Anzeige von TV Bild und Videotext Videotext deaktivieren 12 Schnellvorlauf bei USB Wiedergabe 13 FAV Schnellrücklauf bei USB Wiedergabe Favoritenliste einblenden 14 Zur nächsten Datei springen im USB Modus 15 Zur vorherigen Datei springen im USB Modus 16 Wiedergabe stoppen im USB Modus 17 Wiedergabe starten Wiederg...

Страница 6: ...ten die Batteriepole beim Transport mit Klebestreifen überdeckt werden Falls eine Batterie ausläuft die Flüssigkeit nicht in die Augen oder Schleimhäute reiben Bei Berührung die Hände waschen die Augen mit klarem Wasser spülen und bei anhaltenden Beschwerden einen Arzt aufsuchen ACHTUNG Ungleiche Batterietypen oder neue und gebrauchte Batterien dürfen nicht zusammen verwendet werden Batterien gehö...

Страница 7: ...fernen HINWEIS Wandmontage Bei einer Wandmontage entfällt die Montage des Standfußes Halten Sie rings um das Gerät einen Seitenabstand von mindestens 8 cm zur Belüftung ein Kabelreichweite beachten Zur Montage des Gerätes muss sichergestellt sein dass eine gut zugängliche Steck dose in Reichweite der Zuleitung vorhanden ist Legen Sie den Fernseher wie oben unter 4 2 Aufstellen des Gerätes beschrie...

Страница 8: ...uf der Fernbedienung oder CH am Gerät 3 Bestätigen Sie die Einstellung mit ENTER oder VOL am Gerät HINWEIS Wenn Sie keine Änderung vornehmen verlassen Sie das Menü mit EXIT 5 Externe Geräte anschließen Das Fernsehgerät ist mit einer Reihe von Anschlüssen ausgestattet an denen zahlreiche Geräte z B DVD Recorder PC s Kameras und Set Top Boxen angeschlossen werden können WICHTIG Achten Sie darauf das...

Страница 9: ... auch mit den Tasten am Gerät ausführen In der Anleitung wird in der Regel die Bedienung mit der Fernbedienung beschrieben 6 1 Fernseher ein und ausschalten Schalten Sie das Gerät mit dem Netzschalter links hinten am Gerät ein Es startet in der letzten eingestellten Be triebsart gewählten Quelle Wenn sich das Gerät im Standby Modus befindet Kontrollleuchte rot drücken Sie die Taste auf der Fernbed...

Страница 10: ...ück zum Hauptmenü Um einen anderen Punkt aus dem Hauptmenü zu wählen müssen Sie das aktive Untermenü verlassen Gehen Sie mit der Taste MENU zurück bis die Überschrift des Hauptmenüs z B Kanaleingabe markiert ist Menüs verlassen Gehen Sie mit der Taste MENU schrittweise in den Menüs zurück oder verlassen Sie das Menü mit der Taste EXIT Ihre Einstellungen werden gespeichert HINWEIS Die Dauer der Men...

Страница 11: ...chlauf sind die Sender in der Reihenfolge gespeichert in der sie gefunden wurden Sie können Sen der der Favoritenliste hinzufügen FAV oder die Reihenfolge ändern indem Sie Sender verschieben oder überspringen Sender verschieben 1 Drücken Sie die Taste MENU um das OSD Hauptmenü anzuzeigen 2 Wählen Sie im Menü KANALEINGABE mit der Taste Programme Bearbeiten und drücken ENTER 3 Markieren Sie mit den ...

Страница 12: ...ken Sie die Taste MENU um das OSD Hauptmenü anzuzeigen 2 Wählen Sie im Menü KANALEINGABE mit der Taste Programme Bearbeiten und drücken ENTER 3 Markieren Sie mit den Sender den Sie löschen wollen 4 Drücken Sie die rote Taste um das Programm zu löschen 5 Drücken Sie die Taste EXIT um das Menü zu verlassen 7 4 Empfangsinformationen anzeigen Sie können zum aktuell angezeigten Programm verschiedene Em...

Страница 13: ...te MENU um weitere Änderungen vornehmen zu können Rufen Sie den gewünschten Punkt mit auf und stellen Sie mit den Tasten den gewünschten Wert ein 6 Drücken Sie die Taste MENU wenn Sie das komplette Bildmenü für weitere Änderungen wieder aufrufen wollen 7 Drücken Sie die Taste EXIT um das Menü zu verlassen und die Einstellung zu speichern Farbtemperatur einstellen Ihr Fernseher hat 3 werkseitig vor...

Страница 14: ...die Einstellung zu speichern 9 5 Toneinstellungen ändern Ihr Fernseher hat 4 werkseitig vorgegebene und eine manuell einstellbare Toneinstellungen Standard Musik Film Sport und Benutzer Sie können diese Einstellungen durch Drücken der Taste SMODE auswählen Wenn Sie Benutzer wählen werden Ihre persönlichen Toneinstellungen abgerufen Audio Modus einstellen 1 Drücken Sie die Taste MENU um das OSD Hau...

Страница 15: ...altzeit 4 Öffnen Sie die Funktion mit ENTER 5 Mit den Pfeiltasten markieren und ändern Sie die angezeigten Funktionen Abschaltzeit Ausschalttimer Legen Sie fest ob die Einstellung nur einmal oder regelmäßig ausgeführt werden soll Wählen Sie zwischen Aus Einmal Täglich Mo Fr Mo Sa Sa So oder So Stunde Minute Stellen Sie die Abschaltzeit ein Einschaltzeit Einschalttimer Legen Sie fest ob die Einstel...

Страница 16: ...ld hinter dem Teletext erscheint ausschalten Farbige Tasten Bei fast allen Teletextseiten befinden sich am unteren Bildschirmrand farbige Textfelder rot grün gelb blau Mit den farbigen Tasten auf der Fernbedienung können Sie direkt zu den Themen Seiten springen die auf den farbigen Feldern angezeigt werden Seiten über die Zifferntasten aufrufen Die aktuelle dreistellige Seitennummer finden Sie in ...

Страница 17: ... FUNKTIONEN aktiviert ist 3 Markieren Sie mit der Taste den Punkt Menüsprache wählen mit den Pfeiltasten die Sprache für das OSD Menü 4 Drücken Sie die Taste EXIT um das Menü zu verlassen Die Einstel lungen werden gespeichert 12 2 Einblendungen 1 Drücken Sie die Taste MENU um das OSD Hauptmenü anzuzeigen 2 Drücken Sie die Taste bis FUNKTIONEN aktiviert ist 3 Markieren Sie mit der Taste den Punkt M...

Страница 18: ...ezifikationen des Fern sehers entspricht Überprüfen Sie ob die Einstellungen im PC Menü mit den Video Ausgangseinstellungen des PC übereinstimmen Stellen Sie die Werte neu ein Der Fernseher lässt sich nicht einschalten Überprüfen Sie ob das Netzkabel richtig an der Steckdose angeschlossen ist Überprüfen Sie ob der Netzschalter links hinten am Gerät eingeschaltet ist Kein Ton Überprüfen Sie ob die ...

Страница 19: ...hnische Änderungen vorbehalten Konformitätserklärung Hiermit erklärt die Firma ETV Elektro Technische Vertriebsgesellschaft mbH dass sich das Gerät CTV 3202 LCD in Über einstimmung mit den grundlegenden Anforderungen der europäischen Richtline für elektromagnetische Verträglichkeit 2004 108 EG und der Niederspannungsrichtlinie 2006 95 EG befindet 15 Garantiebedingungen 1 Gegenüber Verbrauchern gew...

Страница 20: ...portal www sli24 de Sie können sich dort direkt anmelden und erhalten alle Informationen zur weiteren Vorgehensweise Ihrer Reklamation Über einen persönlichen Zugangscode der Ihnen direkt nach Ihrer Anmeldung per E Mail übermittelt wird können Sie den Bearbeitungsablauf Ihrer Reklamation auf unserem Serviceportal online verfolgen Alternativ können Sie uns den Servicefall per E Mail hotline etv de ...

Страница 21: ...eräte ab die Sie nicht mehr benutzen werden Sie helfen damit die potenziellen Auswirkungen durch falsche Entsorgung auf die Umwelt und die menschliche Gesund heit zu vermeiden Sie leisten damit Ihren Beitrag zur Wiederverwertung zum Recycling und zu anderen Formen der Verwertung von Elekt ro und Elektronik Altgeräten Informationen wo die Geräte zu entsorgen sind erhalten Sie über Ihre Kommunen ode...

Страница 22: ...creen from solvents to avoid damage Do not touch the display unnecessarily do not put pressure on its surface and do not touch it with pointed or sharp objects Stop using the device if it does not work as usual Immediately disconnect from mains power supply and contact the authorised service centre if you notice odours or smoke During storms disconnect from mains power supply This is a protection ...

Страница 23: ...e of Delivery 26 4 2 Assemble Device 26 4 3 Wall mounting of the device 27 4 4 Connect Antenna Cable 27 4 5 Power Connection 27 4 6 Initial Installation 27 4 7 Select Source 28 5 Connect External Devices 28 6 Basic Operation 29 6 1 Turn TV Set On Off 29 6 2 Select Channel 29 6 3 Adjust Volume 29 6 4 Shortcuts 29 6 5 OSD Menu Structure 29 7 Search and Edit Channel 30 7 1 Auto Scan 30 7 2 Manual Cha...

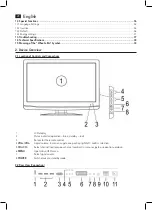
Страница 24: ...erview 2 1 Location of Controls and Connections 1 LCD display 2 Status indicator operation blue standby red 3 Sensor for the remote control 4 VOL VOL Adjust volume In menu navigate one position right left confirm selection 5 CH CH Select channel next previous channel number In menu navigate one position up down 6 MENU Open close OSD menu 7 Select signal source 8 POWER Switch device to standby mode...

Страница 25: ...t superimpose Teletext on TV picture deacti vate Teletext 12 Fast forward in USB playback 13 FAV Rewind in USB playback Blend in favorites list 14 Skip to next file in USB mode 15 Skip to the previous data file in USB mode 16 Stop playback in USB mode 17 Start playback stop playback in USB mode 18 REVEAL Display hidden Teletext information HOLD Hold Teletext page S TITLE If existing show subtitles...

Страница 26: ...from heat and direct sunlight Do not dispose of batteries by burning danger of explosion Remove exhausted batteries from the device Remove the batteries during longer periods of non use to avoid battery leakage Wash thoroughly after coming into contact with battery acid 4 Before Installation 4 1 Scope of Delivery After unpacking ensure that the following parts were included TV set Stand and fasten...

Страница 27: ...the other end to antenna input ANT at the rear of the device 3 In the source menu press SOURCE button select ATV NOTE To be able to watch TV you first have to search for channels see 4 6 Initial Installation on page 27 4 5 Power Connection The TV set is designed for AC 100 240 V 50 60 Hz Connect the power cable with the device socket on the backside of the television Connect to a properly installe...

Страница 28: ...le RCA to the sockets VIDEO LIN and RIN IMPORTANT Observe the colour coding of the cables when using AV cable video yellow audio L white and audio R red Select the AV input in the menu Input Source press SOURCE button PC Connector Use a VGA cable to connect the monitor connector of the PC with the VGA connector on the TV set Use an audio cable to connect the audio connector of the PC with PC AUDIO...

Страница 29: ...or numeric buttons 0 9 to select the desired channel Press the button on the remote control to return to the previous channel Press ENTER to display the channel list Press the arrow buttons to highlight a channel and press ENTER to display the channel on screen 6 3 Adjust Volume Press the VOL buttons to adjust the volume Press the button to temporarily mute the sound Press or VOL to unmute the sou...

Страница 30: ...isplayed 7 The window closes automatically after a few seconds or press EXIT to close it 7 2 Manual Channel Search 1 Press the MENU button to display the OSD main menu 2 Press in CHANNEL menu to select ATV Manual Tuning and press ENTER 3 Under Storage to press to select the position in the channel list for the new analogue channel 4 Press to highlight Search 5 Press to start the manual scan The ch...

Страница 31: ...o Favourite List Save your favourite channels in the favourite list Access the list with FAV 1 Press the MENU button to display the OSD main menu 2 Press in CHANNEL menu to select Programme Edit and press ENTER 3 Press to highlight the channel to be saved in the favourite list 4 Press the FAV button A heart icon is displayed behind the channel name 5 Press EXIT to exit the menu and save the change...

Страница 32: ...de the control menu Press DISPLAY to display the control menu again Remote Control Operation Press to skip to the next previous file For music video data files Press to search within the file forward or back Press to return to normal playback mode Press the button to stop playback 9 Set Picture and Sound 9 1 Change Picture Settings Your TV set comes with 3 preset and one manually adjustable pictur...

Страница 33: ... to display the OSD main menu 2 Press the arrow button until the menu PICTURE is activated 3 Press the arrow button to highlight Noise Reduction 4 Turn the function on and off with the buttons 5 Press EXIT to exit the menu and save the changes 9 4 PC Picture Settings If a PC is connected to your TV set and PC is selected as signal source in the PICTURE menu the item PC Setting can be selected Set ...

Страница 34: ...EXIT to exit the menu and save the settings 10 2 On Time and Off Time On Time and Off Time define the time when the TV set turns on and off You can define different periods NOTE These functions turn your TV set on from standby mode or into standby mode If your TV set is turned off with the main switch this functions is invalid The time needs to be set so that this function can be used The time is ...

Страница 35: ...ster It is transmitted with the TV signal and needs no further equip ment Not all stations offer Teletext Teletext information is generally divided into areas themes and pages Some themes cover several pages 2 3 page two of three others contain hidden information quiz answers VPS times etc Teletext On Mixed Operation Off Press the TEXT button on the remote control to cycle through the Teletext fun...

Страница 36: ...the function 12 Special Functions 12 1 Language Settings 1 Press the MENU button to display the OSD main menu 2 Press the arrow button until OPTIONS is activated 3 Press the arrow button to highlight the item OSD Language select the language for the OSD menu with the arrow buttons 4 Press EXIT to exit the menu and save the changes 12 2 Insertion 1 Press the MENU button to show the OSD main menu 2 ...

Страница 37: ...V set Check if the PC menu settings match the video output settings of the PC Set the values again TV set cannot be turned on Check if the mains plug sits properly in the wall outlet Check whether the power plug on the left back of the device is switched on No sound Check if the audio cables are properly connected Check the volume Volume too low Check the volume Set the volume Snowy image Check if...

Страница 38: ...s been tested according to all relevant current CE guidelines such as electromagnetic compatibility and low voltage directives and has been constructed in accordance with the latest safety regulations 15 Meaning of the Wheelie Bin Symbol Take care of our environment do not dispose of electrical applicances via the household waste Dispose of obsolete or defective electrical appliances via municipal...

Страница 39: ......
Страница 40: ...declaration 24 måneders garanti i henhold til garantierklæring 24 miesiące gwarancji na podstawie karty gwarancyjnej Záruka 24 mésíců podle prohlášení o záruce A garanciát lásd a használati utasításban Гарантийные обязательства смотри руководство пользователя Kaufdatum Händlerstempel Unterschrift Koopdatum Stempel van de leverancier Handtekening Date d achat cachet du revendeur signature Fecha de ...

Отзывы: