background image

2.7 

Disposal

WARNING!

Risk of injury or suffocation.

• Disconnect the appliance from the

mains supply.

• Cut off the mains cable and discard it.

• Remove the door catch to prevent

children and pets to get closed in the

appliance.

2.8 

Service

• To repair the appliance contact an

Authorised Service Centre.

• Use original spare parts only.

3. 

PRODUCT DESCRIPTION

3.1 

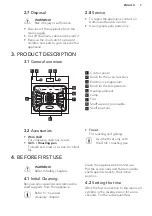
General overview

6

5

9

7

8

5

4

1

2

3

3

1

4

2

1

Control panel

2

Knob for the oven functions

3

Electronic programmer

4

Knob for the temperature

5

Heating element

6

Lamp

7

Fan

8

Shelf support, removable

9

Shelf positions

3.2 

Accessories

Wire shelf

For cookware, cake tins, roasts.

Grill- / Roasting pan

To bake and roast or as pan to collect

fat.

Trivet

For roasting and grilling.

Use the trivet only with

the Grill- / roasting pan.

4. 

BEFORE FIRST USE

WARNING!

Refer to Safety chapters.

4.1 

Initial Cleaning

Remove all accessories and removable

shelf supports from the appliance.

Refer to "Care and

cleaning" chapter.

Clean the appliance before first use.

Put the accessories and the removable

shelf supports back to their initial

position.

4.2 

Setting the time

After the first connection to the mains, all

symbols in the display are on for some

seconds. For the subsequent few

ENGLISH

7

Содержание BP200302

Страница 1: ...EN User Manual Oven BP200302 ...

Страница 2: ...ot find on ordinary appliances Please spend a few minutes reading to get the very best from it Visit our website for Get usage advice brochures trouble shooter service information www aeg com Register your product for better service www registeraeg com Buy Accessories Consumables and Original spare parts for your appliance www aeg com shop CUSTOMER CARE AND SERVICE Always use original spare parts ...

Страница 3: ...y and understand the hazards involved Do not let children play with the appliance Keep all packaging away from children Keep children and pets away from the appliance when it operates or when it cools down Accessible parts are hot If the appliance has a child safety device we recommend you activate it Cleaning and user maintenance shall not be made by children without supervision Children of less ...

Страница 4: ... all the packaging Do not install or use a damaged appliance Obey the installation instruction supplied with the appliance Always be careful when you move the appliance because it is heavy Always wear safety gloves Do not pull the appliance by the handle Keep the minimum distance from the other appliances and units Make sure that the appliance is installed below and adjacent safe structures The si...

Страница 5: ...t with water Do not apply pressure on the open door Do not use the appliance as a work surface or as a storage surface Open the appliance door carefully The use of ingredients with alcohol can cause a mixture of alcohol and air Do not let sparks or open flames to come in contact with the appliance when you open the door Do not put flammable products or items that are wet with flammable products in...

Страница 6: ...in operation The appliance becomes very hot and hot air is released from the front cooling vents Pyrolytic cleaning is a high temperature operation that can release fumes from cooking residues and construction materials as such consumers are strongly advised to provide good ventilation during and after each Pyrolytic cleaning provide good ventilation during and after the first use at maximum tempe...

Страница 7: ...ent 6 Lamp 7 Fan 8 Shelf support removable 9 Shelf positions 3 2 Accessories Wire shelf For cookware cake tins roasts Grill Roasting pan To bake and roast or as pan to collect fat Trivet For roasting and grilling Use the trivet only with the Grill roasting pan 4 BEFORE FIRST USE WARNING Refer to Safety chapters 4 1 Initial Cleaning Remove all accessories and removable shelf supports from the appli...

Страница 8: ...ing Preheat the empty appliance to burn off the remaining grease 1 Set the function and the maximum temperature 2 Let the appliance operate for 1 hour 3 Set the function and set the maximum temperature 4 Let the appliance operate for 15 minutes Accessories can become hotter than usual The appliance can emit an odour and smoke This is normal Make sure that the airflow in the room is sufficient 5 DA...

Страница 9: ...ast larger meat joints or poultry with bones on 1 shelf position Also to make gratins and to brown Bottom Heat To bake cakes with crispy bottom and to preserve food Meat To prepare very tender and juicy roasts Keep Warm To keep food warm Defrost To defrost frozen food Pyrolysis To activate the automatic pyrolytic cleaning of the oven This function burns off residual dirt in the oven 5 3 Display A ...

Страница 10: ...ND To set when the appliance must deactivate Use only when an oven function is set You can use Duration and End at the same time time delay if the appliance is to be activate and deactivate automatically later Press again and again to switch between the clock functions To confirm the settings of the clock functions press or wait 5 seconds for an automatic confirmation 6 2 Setting the DURATION or E...

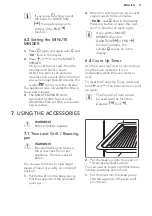
Страница 11: ... the MINUTE MINDER when the DURATION or END function operates the symbol comes on in the display 6 4 Count Up Timer Use the Count Up Timer to monitor how long the oven operates It is on immediately when the oven starts to heat To reset the Count Up Timer press and hold and The timer starts to count up again The Count Up Timer cannot be used with the functions Duration End 7 USING THE ACCESSORIES W...

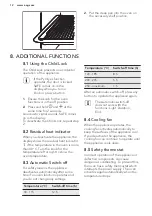
Страница 12: ...re 8 3 Automatic Switch off For safety reasons the appliance deactivates automatically after some time if an oven function operates and you do not change any settings Temperature C Switch off time h 30 115 12 5 Temperature C Switch off time h 120 195 8 5 200 245 5 5 250 maximum 1 5 After an automatic switch off press any button to operate the appliance again The Automatic switch off does not work ...

Страница 13: ...fore cooking Clean the moisture after each use of the appliance Do not put the objects directly on the appliance floor and do not put aluminium foil on the components when you cook This can change the baking results and cause damage to the enamel 9 3 Baking cakes Do not open the oven door before 3 4 of the set cooking time is up If you use two baking trays at the same time keep one empty level bet...

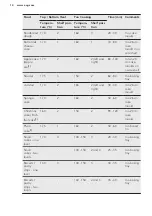
Страница 14: ...175 3 150 2 60 80 In a baking tray Jam tart 170 2 165 2 left and right 30 40 In a 26 cm cake mould Sponge cake 170 2 160 2 50 60 In a 26 cm cake mould Christmas cake Rich fruit cake1 160 2 150 2 90 120 In a 20 cm cake mould Plum cake1 175 1 160 2 50 60 In a bread tin Small cakes one level 170 3 140 150 3 20 30 In a baking tray Small cakes two levels 140 150 2 and 4 25 35 In a baking tray Biscuits ...

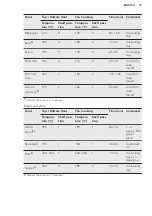
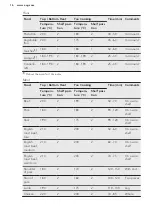
Страница 15: ...0 1 150 2 110 120 In a 24 cm cake mould Victoria sandwich1 170 1 160 1 50 60 In a 20 cm cake mould 1 Preheat the oven for 10 minutes Bread and pizza Food Top Bottom Heat Fan Cooking Time min Comments Tempera ture C Shelf posi tion Tempera ture C Shelf posi tion White bread1 190 1 190 1 60 70 1 2 pieces 500 gr per piece Rye bread 190 1 180 1 30 45 In a bread tin Pizza1 230 250 1 230 250 1 10 20 In ...

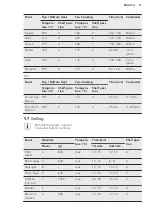
Страница 16: ...ood Top Bottom Heat Fan Cooking Time min Comments Tempera ture C Shelf posi tion Tempera ture C Shelf posi tion Beef 200 2 190 2 50 70 On a wire shelf Pork 180 2 180 2 90 120 On a wire shelf Veal 190 2 175 2 90 120 On a wire shelf English roast beef rare 210 2 200 2 50 60 On a wire shelf English roast beef medium 210 2 200 2 60 70 On a wire shelf English roast beef well done 210 2 200 2 70 75 On a...

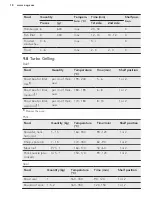
Страница 17: ...in Comments Tempera ture C Shelf posi tion Tempera ture C Shelf posi tion Trout Sea bream 190 2 175 2 40 55 3 4 fish Tuna fish Salmon 190 2 175 2 35 60 4 6 fillets 9 7 Grilling Preheat the empty oven for 3 minutes before cooking Food Quantity Tempera ture C Time min Shelf posi tion Pieces g 1st side 2nd side Fillet steaks 4 800 max 12 15 12 14 4 Beef steaks 4 600 max 10 12 6 8 4 Sausages 8 max 12 ...

Страница 18: ...eef or fillet medium1 per cm of thick ness 180 190 6 8 1 or 2 Roast beef or fillet well done1 per cm of thick ness 170 180 8 10 1 or 2 1 Preheat the oven Pork Food Quantity kg Temperature C Time min Shelf position Shoulder neck ham joint 1 1 5 160 180 90 120 1 or 2 Chop spare rib 1 1 5 170 180 60 90 1 or 2 Meat loaf 0 75 1 160 170 50 60 1 or 2 Pork knuckle pre cooked 0 75 1 150 170 90 120 1 or 2 V...

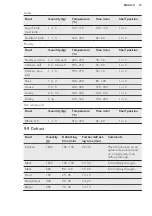
Страница 19: ... or 2 Goose 3 5 5 160 180 120 180 1 or 2 Turkey 2 5 3 5 160 180 120 150 1 or 2 Turkey 4 6 140 160 150 240 1 or 2 Fish steamed Food Quantity kg Temperature C Time min Shelf position Whole fish 1 1 5 210 220 40 60 1 or 2 9 9 Defrost Food Quantity g Defrosting time min Further defrost ing time min Comments Chicken 1000 100 140 20 30 Place the chicken on an upturned saucer placed on a large plate Turn...

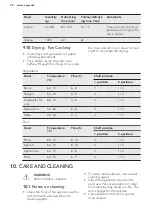
Страница 20: ...4 Peppers 60 70 5 6 3 1 4 Vegetables for sour 60 70 5 6 3 1 4 Mushrooms 50 60 6 8 3 1 4 Herbs 40 50 2 3 3 1 4 Fruit Food Temperature C Time h Shelf position 1 position 2 positions Plums 60 70 8 10 3 1 4 Apricots 60 70 8 10 3 1 4 Apple slices 60 70 6 8 3 1 4 Pears 60 70 6 9 3 1 4 10 CARE AND CLEANING WARNING Refer to Safety chapters 10 1 Notes on cleaning Clean the front of the appliance with a sof...

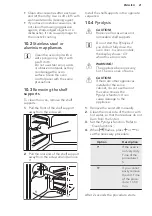
Страница 21: ...ve it 1 2 Install the shelf supports in the opposite sequence 10 4 Pyrolysis CAUTION Remove all accessories and removable shelf supports Do not start the Pyrolysis if you did not fully close the oven door In some models the display shows C3 when this error occurs WARNING The appliance becomes very hot There is a risk of burns CAUTION If there are other appliances installed in the same cabinet do n...

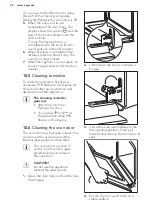
Страница 22: ...y PYR flashes in the display for 10 seconds after each activation and deactivation of the appliance The cleaning reminder goes out after the end of the Pyrolysis function if you press and at the same time while PYR flashes in the display 10 6 Cleaning the oven door The oven door has four glass panels You can remove the oven door and the internal glass panels to clean them The oven door can close i...

Страница 23: ...steps in the opposite sequence Make sure that you put the glass panels A B and C back in the correct sequence The middle panel B has a decorative frame The screen printing zone must face the inner side of the door Make sure that after the installation the surface of the glass panel frame B on the screen printing zones is not rough when you touch it A B C Make sure that you install the middle panel...

Страница 24: ...k if the oven is correctly connected to the electrical supply refer to the connec tion diagram if available The oven does not heat up The oven is deactivated Activate the oven The oven does not heat up The clock is not set Set the clock The oven does not heat up The necessary settings are not set Make sure that the settings are correct The oven does not heat up The automatic switch off is activate...

Страница 25: ...Customer Care Depart ment The display shows an error code that is not in this table There is an electrical fault Deactivate the oven with the house fuse or the safety switch in the fuse box and activate it again If the display shows the error code again contact the Customer Care De partment The appliance is activated and does not heat up The fan does not operate The display shows Demo The demo mod...

Страница 26: ...S N 12 INSTALLATION WARNING Refer to Safety chapters 12 1 Building In 594 16 573 21 548 min 550 20 600 min 560 558 589 114 594 3 5 558 21 548 min 550 20 589 594 114 16 573 590 min 560 594 3 5 12 2 Securing the appliance to the cabinet A B 12 3 Electrical installation The manufacturer is not responsible if you do not follow the safety precautions from the Safety chapters This appliance is supplied ...

Страница 27: ...ppliance contains features which help you save energy during everyday cooking General hints Make sure that the oven door is closed properly when the appliance operates and keep it closed as much as possible during the cooking Use metal dishes to improve the energy saving When possible put the food inside the oven without heating it up When the cooking duration is longer than 30 minutes reduce the ...

Страница 28: ... CONCERNS Recycle the materials with the symbol Put the packaging in applicable containers to recycle it Help protect the environment and human health and to recycle waste of electrical and electronic appliances Do not dispose appliances marked with the symbol with the household waste Return the product to your local recycling facility or contact your municipal office www aeg com 28 ...

Страница 29: ...ENGLISH 29 ...

Страница 30: ...www aeg com 30 ...

Страница 31: ...ENGLISH 31 ...

Страница 32: ...www aeg com shop 867318785 B 222015 ...

Отзывы: