background image

2

1

6.

Fit the appliance door on the upper

door hinge pin.

7.

Remove the lower hinge. Put over

the pin in the direction of the arrow.

8.

Unscrew and install the screw on the

opposite side.

9.

Install the lower hinge on the

opposite side leaving the position of

the door unchanged.

10.

Screw in the one screw in the place

set free on the other side as well as

the adjustable feet (2 pieces).

11.

Remove and install the handle on the

opposite side.

1

2

3

4

CAUTION!

Reposition, level the

appliance, wait for at least

four hours and then connect

it to the power socket.

Do a final check to make

sure that:

• All screws are tightened.

• The magnetic seal

adheres to the cabinet.

• The door opens and

closes correctly.

If the ambient temperature

is cold (i.e. in Winter), the

gasket may not fit perfectly

to the cabinet. In that case,

wait for the natural fitting of

the gasket.

In case you do not want to

carry out the above

mentioned operations,

contact the nearest

Authorised Service Centre.

The Authorised Service

specialist will carry out the

reversibility of the doors at

your cost.

8.6 

Electrical Connection

CAUTION!

Any electrical work required

to install this appliance

should be carried out by a

qualified electrician or

competent person.

WARNING!

This appliance must be

earthed.

The manufacturer declines

any liability should these

safety measures not be

observed.

The wires in the mains lead are coloured

in accordance with the following code:

www.aeg.com

14

Содержание ATB8101VNW

Страница 1: ...USER MANUAL EN User Manual Freezer ATB8101VNW ATB8101VNX ...

Страница 2: ...product for better service www registeraeg com Buy Accessories Consumables and Original spare parts for your appliance www aeg com shop CUSTOMER CARE AND SERVICE Always use original spare parts When contacting our Authorised Service Centre ensure that you have the following data available Model PNC Serial Number The information can be found on the rating plate Warning Caution Safety information Ge...

Страница 3: ...and user maintenance of the appliance without supervision Keep all packaging away from children and dispose of it appropriately 1 2 General Safety This appliance is intended to be used in household and similar applications such as Farm houses staff kitchen areas in shops offices and other working environments By clients in hotels motels bed and breakfast and other residential type environments Kee...

Страница 4: ...sing the door remove the plug from the power socket Do not install the appliance close to radiators or cookers ovens or hobs Do not install the appliance where there is direct sunlight Do not install this appliance in areas that are too humid or too cold When you move the appliance lift it by the front edge to avoid scratching the floor 2 2 Electrical connection WARNING Risk of fire and electric s...

Страница 5: ... the storage instructions on the packaging of frozen food 2 4 Care and cleaning WARNING Risk of injury or damage to the appliance Before maintenance deactivate the appliance and disconnect the mains plug from the mains socket This appliance contains hydrocarbons in the cooling unit Only a qualified person must do the maintenance and the recharging of the unit Regularly examine the drain of the app...

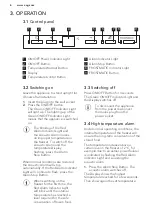
Страница 6: ...matically If the Red Alarm Indicator Light will continue to flash press the Alarm Stop Button When switching on the freezer for the first time the Red Alarm Indicator Light will blink until the internal temperature has reached a level required for the safe conservation of frozen food 3 3 Switching off Press ON OFF Button for 3 seconds The Green ON OFF Indicator Light and the Display switches off T...

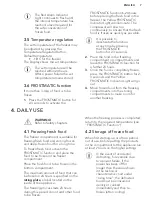
Страница 7: ... the Yellow FROSTMATIC Indicator Light will go out 4 Move frozen food from the freezing compartments into the storing compartments to make room for another freezing 4 DAILY USE WARNING Refer to Safety chapters 4 1 Freezing fresh food The freezer compartment is suitable for freezing fresh food and storing frozen and deep frozen food for a long time To freeze fresh food activate the FROSTMATIC funct...

Страница 8: ...en should be added during this period freeze only top quality fresh and thoroughly cleaned foodstuffs prepare food in small portions to enable it to be rapidly and completely frozen and to make it possible subsequently to thaw only the quantity required wrap up the food in aluminium foil or polythene and make sure that the packages are airtight do not allow fresh unfrozen food to touch food which ...

Страница 9: ... seals and wipe clean to ensure they are clean and free from debris 3 Rinse and dry thoroughly 4 If accessible clean the condenser and the compressor at the back of the appliance with a brush This operation will improve the performance of the appliance and save electricity consumption 6 4 Defrosting Your appliance is frost free This means that there is no build up of frost when it is in operation ...

Страница 10: ...the mains socket Connect a different electrical appliance to the mains sock et Contact a qualified elec trician The appliance is noisy The appliance is not suppor ted properly Check if the appliance stands stable Audible or visual alarm is on The cabinet has been re cently switched on Refer to Door Open Alarm or High Tempera ture Alarm The temperature in the ap pliance is too high Refer to Door Op...

Страница 11: ...er outlet to the evaporative tray Temperature cannot be set The FROSTMATIC function is switched on Switch off FROSTMATIC manually or wait until the function resets automatically to set the temperature Refer to FROSTMATIC function Door is misaligned or inter feres with ventilation grill The appliance is not level led Refer to Levelling The temperature in the ap pliance is too low too high The tempe...

Страница 12: ...NG Refer to Safety chapters 8 1 Positioning Install the appliance in a dry well ventilated indoors where the ambient temperature corresponds to the climate class indicated on the rating plate of the appliance Climate class Ambient temperature SN 10 C to 32 C N 16 C to 32 C ST 16 C to 38 C T 16 C to 43 C Some functional problems might occur for some types of models when operating outside of that ra...

Страница 13: ...overhanging wall unit the minimum distance between the top of the cabinet and the wall unit must be at least 100 mm Ideally however the appliance should not be positioned below overhanging wall units Accurate levelling is ensured by one or more adjustable feet at the base of the cabinet 100 mm 15 mm 15 mm 8 5 Door reversibility WARNING Before carrying out any operations remove the plug from the po...

Страница 14: ...he magnetic seal adheres to the cabinet The door opens and closes correctly If the ambient temperature is cold i e in Winter the gasket may not fit perfectly to the cabinet In that case wait for the natural fitting of the gasket In case you do not want to carry out the above mentioned operations contact the nearest Authorised Service Centre The Authorised Service specialist will carry out the reve...

Страница 15: ...late 5 Switch on the appliance The appliance is supplied with a 13 amp fuse B In the event of having to change the fuse in the plug supplied a 13 amp ASTA approved BS 1362 fuse must be used WARNING A cut off plug inserted into a 13 amp socket is a serious safety shock hazard Ensure that it is disposed of safely 9 TECHNICAL DATA 9 1 Technical data Height mm 850 Width mm 595 Depth mm 635 Rising time...

Страница 16: ...www aeg com shop 212001983 B 512017 ...

Отзывы: