Manual
Page 9 / 33- Revision 01
ARE I2 / RS 232 – Installation Guide
AEG
Identifikationssysteme GmbH
Söflinger Straße 100
D-89077 Ulm
Tel. ++49(0)731-933-1340/1877
Fax ++49(0)731-933-1855
e-mail: [email protected]
3
4
5
1
6
Cable
7
4.3.3
Mounting of the Power Supply Cable
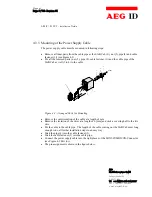
The power supply cable must be mounted in following steps:
•
Remove all inner parts from the cable pipe at the SAB Cab (1) ( nut (5), pipe(4) and cable
fastener (3)) (see Figure 4-2)
•
Put all the removed parts ( nut (5), pipe (4), cable fastener (3)) and the cable pipe of the
SAB Cab as well (1 to 4) to the cable.
Figure 4-2: Arranged Parts for Mounting
•
Remove the outer isolation of the cable at a length of 6cm .
•
Remove the isolation of the wires at a length of 6 [mm] and stick a covering hull to the litz
wire.
•
Put the cable to the cable pipe. The length of the cable coming out the SAB Cab must long
enough to do all further installation steps in an easy way.
•
Stick the pipe (4) into the cable fastener (3).
•
Stick the cable fastener (3) into the cable pipe.
•
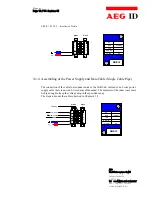
Connect the power supply cable into the right places of the MINI-COMBICON-Connector
(see Figure 4-2 Part (6)).
•
The pin assignment is shown in the figure below.

