background image

3. INSTALLATION

WARNING!

Refer to Safety chapters.

3.1 Before the installation

Before you install the hob, write down the

information below from the rating plate. The

rating plate is on the bottom of the hob.

Serial number ...........................

3.2 Built-in hobs

Only use the built-in hobs after you assemble

the hob into correct built-in units and work

surfaces that align to the standards.

3.3 Connection cable

• The hob is supplied with a connection

cable.

• To replace the damaged mains cable, use

the cable type: H05V2V2-F which

withstands a temperature of 90 °C or

higher. Contact an Authorised Service

Centre. The connection cable may only be

replaced by a qualified electrician.

3.4 Assembly

If you install the hob under a hood, please

see the installation instructions of the hood

for the minimum distance between the

appliances.

min.
50mm

min.
500mm

If the appliance is installed above a drawer,

the hob ventilation can warm up the items

stored in the drawer during the cooking

process.

Find the video tutorial "How to install your

AEG Induction Hob - Worktop installation" by

typing out the full name indicated in the

graphic below.

www.youtube.com/electrolux
www.youtube.com/aeg

How to install your AEG 

Induction Hob - Worktop installation

ENGLISH

7

Содержание 949 597 476 00

Страница 1: ...USER MANUAL EN User Manual Hob DE Benutzerinformation Kochfeld FR Notice d utilisation Table de cuisson IAE84411FB ...

Страница 2: ...E Always use original spare parts When contacting our Authorised Service Centre ensure that you have the following data available Model PNC Serial Number The information can be found on the rating plate Warning Caution Safety information General information and tips Environmental information Subject to change without notice CONTENTS 1 SAFETY INFORMATION 2 2 SAFETY INSTRUCTIONS 4 3 INSTALLATION 7 4...

Страница 3: ...all packaging away from children and dispose of it appropriately WARNING Keep children and pets away from the appliance when it operates or when it cools down Accessible parts become hot during use If the appliance has a child safety device it should be activated Children shall not carry out cleaning and user maintenance of the appliance without supervision 1 2 General Safety WARNING The appliance...

Страница 4: ...m power supply In either case contact the Authorised Service Centre If the supply cord is damaged it must be replaced by the manufacturer an authorized Service or similarly qualified persons in order to avoid a hazard WARNING Use only hob guards designed by the manufacturer of the cooking appliance or indicated by the manufacturer of the appliance in the instructions for use as suitable or hob gua...

Страница 5: ...onnect the appliance to a socket Do not use multi plug adapters and extension cables Make sure not to cause damage to the mains plug if applicable or to the mains cable Contact our Authorised Service Centre or an electrician to change a damaged mains cable The shock protection of live and insulated parts must be fastened in such a way that it cannot be removed without tools Connect the mains plug ...

Страница 6: ... the glass glass ceramic Always lift these objects up when you have to move them on the cooking surface This appliance is for cooking purposes only It must not be used for other purposes for example room heating 2 4 Care and cleaning Clean the appliance regularly to prevent the deterioration of the surface material Switch off the appliance and let it cool down before cleaning Do not use water spra...

Страница 7: ...tands a temperature of 90 C or higher Contact an Authorised Service Centre The connection cable may only be replaced by a qualified electrician 3 4 Assembly If you install the hob under a hood please see the installation instructions of the hood for the minimum distance between the appliances min 50mm min 500mm If the appliance is installed above a drawer the hob ventilation can warm up the items ...

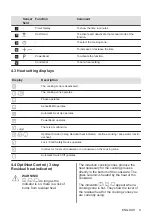
Страница 8: ...plays indicators and sounds tell which functions operate Sensor field Function Comment 1 ON OFF To activate and deactivate the hob 2 Lock Child Safety Device To lock unlock the control panel 3 SenseBoil To activate and deactivate the function The indicators above the symbol show the progress of the function 4 Pause To activate and deactivate the function 5 Heat setting display To show the heat set...

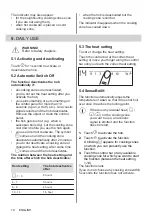
Страница 9: ... malfunction OptiHeat Control 3 step Residual heat indicator continue cooking keep warm resid ual heat Lock Child Safety Device operates Incorrect or too small cookware or no cookware on the cooking zone Automatic Switch Off operates 4 4 OptiHeat Control 3 step Residual heat indicator WARNING As long as the indicator is on there is a risk of burns from residual heat The induction cooking zones pro...

Страница 10: ...s automatically after 2 minutes you do not deactivate a cooking zone or change the heat setting After some time comes on and the hob deactivates The relation between the heat setting and the time after which the hob deactivates Heat setting The hob deactivates after 1 3 6 hours 4 7 5 hours 8 9 4 hours 10 14 1 5 hour 5 3 The heat setting To set or change the heat setting Touch the control bar at th...

Страница 11: ...er 3 seconds comes on To deactivate the function change the heat setting 5 7 PowerBoost This function makes more power available to the induction cooking zones The function can be activated for the induction cooking zone only for a limited period of time After this time the induction cooking zone automatically sets back to the highest heat setting Refer to Technical data chapter To activate the fu...

Страница 12: ...ouch to activate the function comes on The heat setting is lowered to 1 To deactivate the function touch The previous heat setting comes on 5 10 Lock You can lock the control panel while cooking zones operate It prevents an accidental change of the heat setting Set the heat setting first To activate the function touch comes on for 4 seconds The Timer stays on To deactivate the function touch The p...

Страница 13: ...ps flashing or reduce the heat setting of the cooking zone selected last The cooking zones will continue operating with the reduced heat setting Change the heat settings of the cooking zones manually if necessary Refer to the illustration for possible combinations in which power can be distributed among the cooking zones 5 14 Hob Hood It is an advanced automatic function which connects the hob to ...

Страница 14: ...hat time the system deactivates the fan automatically and prevents you from accidental activation of the fan for the next 30 seconds Operating the fan speed manually You can also operate the function manually To do that touch when the hob is active This deactivates automatic operation of the function and allows you to change the fan speed manually When you press you raise the fan speed by one When...

Страница 15: ...e of different materials a sandwich construction humming you use a high power level clicking electric switching occurs hissing buzzing the fan operates The noises are normal and do not indicate any malfunction 6 3 Hints Tips for SenseBoil The function works best for boiling water and preparing potatoes It does not work with cast iron and non stick cookware e g with a ceramic coating Enamelled stee...

Страница 16: ... the procedure 5 7 Steam vegetables fish meat 20 45 Add a couple of tablespoons of liquid 7 9 Steam potatoes 20 60 Use max l of water for 750 g of po tatoes 7 9 Cook larger quantities of food stews and soups 60 150 Up to 3 l of liquid plus ingredients 9 12 Gentle fry escalope veal cordon bleu cutlets rissoles sausages liver roux eggs pancakes doughnuts as neces sary Turn halfway through 12 13 Heav...

Страница 17: ...ace at an acute angle and move the blade on the surface Remove when the hob is sufficiently cool limescale rings water rings fat stains shiny metallic discoloration Clean the hob with a moist cloth and a non abrasive detergent After cleaning wipe the hob dry with a soft cloth Remove shiny metallic discoloration use a solution of water with vinegar and clean the glass surface with a cloth 8 TROUBLE...

Страница 18: ...ing is set The highest heat setting has the same power as the function The heat setting changes be tween two levels Power management operates Refer to Daily use The sensor fields become hot The cookware is too large or you put it too near to the controls Put large cookware on the rear zones if possible There is no sound when you touch the panel sensor fields The sounds are deactivated Activate the...

Страница 19: ...er 30 seconds connect the hob again If the problem continues speak to an Authorised Service Centre You can hear a constant beep noise The electrical connection is incor rect Disconnect the hob from the electrical supply Ask a qualified electrician to check the installation 8 2 If you cannot find a solution If you cannot find a solution to the problem yourself contact your dealer or an Authorised S...

Страница 20: ...ft rear Right front Right rear 21 0 cm 21 0 cm 21 0 cm 21 0 cm Energy consumption per cooking zone EC electric cooking Left front Left rear Right front Right rear 179 6 Wh kg 177 0 Wh kg 188 8 Wh kg 177 0 Wh kg Energy consumption of the hob EC electric hob 180 6 Wh kg For European Union according to EU 66 2014 For Belarus according to STB 2477 2017 Annex A For Ukraine according to 742 2019 EN 6035...

Страница 21: ...terials with the symbol Put the packaging in relevant containers to recycle it Help protect the environment and human health by recycling waste of electrical and electronic appliances Do not dispose of appliances marked with the symbol with the household waste Return the product to your local recycling facility or contact your municipal office ENGLISH 21 ...

Страница 22: ...aeg com Um Zubehör Verbrauchsmaterial und Original Ersatzteile für Ihr Gerät zu kaufen www aeg com shop KUNDENDIENST UND SERVICE Verwenden Sie immer Original Ersatzteile Halten Sie folgende Angaben bereit wenn Sie sich an einen autorisierten Kundendienst wenden Modell PNC Seriennummer Die Daten finden Sie auf dem Typenschild Warnungs Sicherheitshinweise Allgemeine Informationen und Empfehlungen In...

Страница 23: ...r unter 8 Jahren und Personen mit schweren Behinderungen oder Mehrfachbehinderung sollten vom Gerät ferngehalten werden wenn sie nicht ständig beaufsichtigt werden Kinder sollten beaufsichtigt werden um sicherzustellen dass sie nicht mit dem Gerät Halten Sie sämtliches Verpackungsmaterial von Kindern fern und entsorgen Sie es ordnungsgemäß WARNUNG Halten Sie Kinder und Haustiere von dem Gerät fern...

Страница 24: ...de wie Messer Gabeln Löffel und Deckel sollten nicht auf die Oberfläche des Kochfelds gelegt werden da diese heiß werden können Verwenden Sie das Gerät nicht bevor es in den Einbauschrank gesetzt wird Reinigen Sie das Gerät nicht mit einem Dampfstrahlreiniger Schalten Sie das Kochfeld nach dem Gebrauch aus und verlassen Sie sich nicht auf die Topferkennung Hat die Glaskeramik Glasoberfläche einen ...

Страница 25: ...eöffnet wird Jedes Gerät besitzt Kühlgebläse auf seiner Unterseite Ist das Gerät über einer Schublade installiert Lagern Sie keine kleinen Papierstücke oder blätter die eingezogen werden können in der Schublade da sie die Kühlgebläse beschädigen oder das Kühlsystem beeinträchtigen können Halten Sie einen Abstand von mindestens 2 cm zwischen dem Geräteboden und den Teilen die in der Schublade gelag...

Страница 26: ...ennzeichnungen und Schutzfolien falls zutreffend Dieses Gerät ist ausschließlich zur Verwendung im Haushalt in Innenräumen bestimmt Nehmen Sie keine technischen Änderungen am Gerät vor Vergewissern Sie sich dass die Lüftungsöffnungen nicht blockiert sind Lassen Sie das Gerät während des Betriebs nicht unbeaufsichtigt Schalten Sie die Kochzone nach jedem Gebrauch aus Legen Sie kein Besteck bzw kein...

Страница 27: ...ie sich zur Reparatur des Geräts an den autorisierten Kundendienst Dabei dürfen ausschließlich Originalersatzteile verwendet werden Bezüglich der Lampe n in diesem Gerät und separat verkaufter Ersatzlampen Diese Lampen müssen extremen physikalischen Bedingungen in Haushaltsgeräten standhalten wie z B Temperatur Vibration Feuchtigkeit oder sollen Informationen über den Betriebszustand des Gerätes a...

Страница 28: ...dbelüftung die in der Schublade aufbewahrten Gegenstände während des Garvorgangs aufwärmen Sie finden das Video Tutorial So installieren Sie Ihr AEG Induktionskochfeld Arbeitsflächeninstallation indem Sie den vollständigen Namen eingeben der in der folgenden Grafik angegeben ist www youtube com electrolux www youtube com aeg How to install your AEG Induction Hob Worktop installation 4 GERÄTEBESCHR...

Страница 29: ... über dem Symbol zeigen den Fort schritt der Funktion an 4 Pause Ein und Ausschalten der Funktion 5 Kochstufenanzeige Zeigt die Kochstufe an 6 Kochzonen Anzeigen des Timers Zeigt an für welche Kochzone die Zeit eingestellt wur de 7 Timer Anzeige Zeigt die Zeit in Minuten an 8 Hob Hood Ein und Ausschalten des manuellen Modus der Funkti on 9 Auswählen der Kochzone 10 Erhöhen oder Verringern der Zeit...

Страница 30: ...durch die Hitze des Kochgeschirrs erhitzt Die Anzeigen erscheinen wenn eine Kochzone heiß ist Sie zeigen den Restwärmegrad der Kochzonen an die Sie gerade verwenden Die Anzeige kann ebenso erscheinen für die benachbarten Kochzonen auch wenn Sie sie nicht benutzen wenn heißes Kochgeschirr auf die kalte Kochzone gestellt wird wenn das Kochfeld ausgeschaltet ist aber die Kochzone noch heiß ist Die An...

Страница 31: ... in der Kochzone die Sie benutzen möchten noch Restwärme vorhanden ertönt ein Signal und die Funktion startet nicht 1 Schalten Sie das Gerät durch die Berührung von ein 2 Berühren Sie zum Einschalten der Funktion Bei den Kochzonen für die Sie die Funktion derzeit verwenden können blinkt 3 Berühren Sie die Einstellskala der verfügbaren Kochzone für die Sie die Funktion starten möchten zwischen Koch...

Страница 32: ...nzelnen Kochvorgangs einzustellen Stellen Sie zuerst die Kochstufe für die Kochzone und erst danach die Funktion ein Auswählen der Kochzone Berühren Sie wiederholt bis die Anzeige der gewünschten Kochzone erscheint Einschalten der Funktion Berühren Sie des Timers um die Zeit einzustellen 00 99 Minuten Wenn die Kontrolllampe der Kochzone anfängt zu blinken wird die Zeit heruntergezählt So wird die ...

Страница 33: ...chstufe versehentlich geändert wird Stellen Sie zuerst die Kochstufe ein Einschalten der Funktion Berühren Sie leuchtet 4 Sekunden auf Der Timer bleibt eingeschaltet Ausschalten der Funktion Berühren Sie Die vorherige Kochstufe wird angezeigt Diese Funktion wird auch ausgeschaltet sobald das Kochfeld ausgeschaltet wird 5 11 Kindersicherung Diese Funktion verhindert ein versehentliches Einschalten ...

Страница 34: ... gewählten Kochstufe und der reduzierten Kochstufe Warten Sie bis das Display aufhört zu blinken oder verringern Sie die Kochstufe der zuletzt ausgewählten Kochzone Die Kochzonen arbeiten mit der reduzierten Kochstufe weiter Ändern Sie bei Bedarf die Kochstufen der Kochzonen manuell Siehe Abbildung für mögliche Kombinationen wie die Leistung unter den Kochzonen verteilt werden kann 5 14 Hob Hood D...

Страница 35: ... um die Dunstabzugshaube direkt über ihr Bedienfeld einzustellen Wenn Sie nach Kochende das Kochfeld ausschalten kann die Dunstabzugshaube noch eine gewisse Zeit in Betrieb sein Nach dieser Zeit schaltet das System den Lüfter automatisch aus Während der folgenden 30 Sekunden kann der Lüfter nicht wieder eingeschaltet werden Manuelles Einstellen der Lüftergeschwindigkeit Sie können den Lüfter auch ...

Страница 36: ...l der von der Kochzone erzeugten Leistung Verwenden Sie aus Sicherheitsgründen und für optimale Kochergebnisse nicht mehr Kochgeschirr als in der Spezifikation der Kochzonen angegeben Vermeiden Sie es Kochgeschirr während des Kochvorgangs in die Nähe des Bedienfelds zu stellen Dies könnte sich auf die Funktionsweise des Bedienfelds auswirken oder die Kochfeldfunktionen versehentlich aktivieren Sie...

Страница 37: ...et sich die Kochzonenheizung vor dem Signal des Kurzzeitmessers ab Die Abschaltzeit hängt von der eingestellten Kochstufe und der Gardauer ab 6 5 Anwendungsbeispiele für das Garen Das Verhältnis zwischen der Kochstufe und dem Energieverbrauch der Kochzone ist nicht linear Bei einer höheren Kochstufe steigt der Energieverbrauch nicht proportional an Das bedeutet dass eine Kochzone die auf eine mitt...

Страница 38: ...Sie die Dunstabzugshaube vor direktem Sonnenlicht Stellen Sie kein Halogenlicht auf die auf die Dunstabzugshaube Decken Sie das Bedienfeld des Kochfelds nicht ab Unterbrechen Sie den Signalfluss zwischen dem Kochfeld und der Dunstabzugshaube nicht z B mit der Hand einem Kochgeschirrgriff oder großen Topf Siehe Abbildung Die abgebildete Dunstabzugshaube ist nur beispielhaft Andere ferngesteuerte Ge...

Страница 39: ... Sie das Kochfeld mit einem feuchten Tuch und nicht scheuernden Reinigungsmittel Wischen Sie das Kochfeld nach der Reinigung mit einem weichen Tuch trocken Entfernen Sie metallisch schimmernde Verfärbungen Benutzen Sie für die Reinigung der Glasoberfläche ein mit einer Lösung aus Essig und Wasser angefeuchtetes Tuch 8 FEHLERSUCHE WARNUNG Siehe Kapitel Sicherheitshinweise 8 1 Was zu tun ist wenn St...

Страница 40: ...echseln Sie die Kochzone oder be dienen Sie die Dunstabzugshaube ma nuell Automatisches Aufheizen funktio niert nicht Die Kochzone ist heiß Lassen Sie die Kochzone abkühlen Die höchste Kochstufe ist eingestellt Die höchste Kochstufe hat die gleiche Leistung wie die Funktion Die Kochstufe schaltet zwischen zwei Stufen hin und her Power Management ist eingeschal tet Siehe Täglicher Gebrauch Die Sens...

Страница 41: ...akti vitäten und wählen Sie eine freie Kochzone ohne Restwärme und eine Zahl werden ange zeigt Es ist ein Fehler im Kochfeld aufge treten Schalten Sie das Kochfeld aus und nach 30 Sekunden wieder ein Wenn erneut erscheint trennen Sie das Kochfeld von der Spannungsversor gung Schalten Sie nach 30 Sekunden das Kochfeld wieder ein Wenn das Problem weiterhin besteht wenden Sie sich an ein autorisierte...

Страница 42: ...fügig von den Daten in der Tabelle abweichen Sie ändert sich je nach Material und Abmessungen des Kochgeschirrs Verwenden Sie für optimale Kochergebnisse kein Kochgeschirr dessen Durchmesser größer als der in der Tabelle angegebene Wert ist 10 ENERGIEEFFIZIENZ 10 1 Produktinformationen Modellbezeichnung IAE84411FB Kochfeldtyp Einbau Kochfeld Anzahl der Kochfelder 4 Heiztechnik Induktion Durchmesse...

Страница 43: ...te Menge Decken Sie Kochgeschirr wenn möglich mit einem Deckel ab Stellen Sie Kochgeschirr auf die Kochzone bevor Sie sie einschalten Stellen Sie kleineres Kochgeschirr auf die kleineren Kochzonen Stellen Sie das Kochgeschirr mittig auf die Kochzone Nutzen Sie die Restwärme um die Speisen warm zu halten oder zu schmelzen 11 UMWELTTIPPS Recyceln Sie Materialien mit dem Symbol Entsorgen Sie die Verp...

Страница 44: ... appareil www aeg com shop SERVICE ET ASSISTANCE À LA CLIENTÈLE N utilisez que des pièces de rechange d origine Avant de contacter notre centre de service agréé assurez vous de disposer des informations suivantes Modèle PNC numéro de série Ces informations figurent sur la plaque signalétique Avertissement Consignes de sécurité Informations générales et conseils Informations environnementales Sous ...

Страница 45: ...t de l appareil à moins d être surveillés en permanence Veillez à ce que les enfants ne jouent pas avec l appareil Ne laissez pas les emballages à la portée des enfants et jetez les convenablement AVERTISSEMENT tenez les enfants et les animaux éloignés de l appareil lorsqu il est en cours de fonctionnement ou lorsqu il refroidit Les parties accessibles deviennent chaudes en cours d utilisation Si ...

Страница 46: ...encastrée N utilisez pas de nettoyeur à vapeur pour nettoyer l appareil Après utilisation mettez toujours à l arrêt la table de cuisson à l aide de la manette de commande et ne vous fiez pas à la détection des récipients Si la surface vitrocéramique en verre est fissurée mettez à l arrêt l appareil et débranchez le Si l appareil est branché à l alimentation secteur directement en utilisant une boî...

Страница 47: ...ans le tiroir Ôtez tout panneau de séparation installé dans le meuble sous l appareil 2 2 Branchement électrique AVERTISSEMENT Risque d incendie ou d électrocution Tous les raccordements électriques doivent être effectués par un électricien qualifié L appareil doit être relié à la terre Avant toute intervention assurez vous que l appareil est débranché Assurez vous que les paramètres figurant sur ...

Страница 48: ...rs de pacemakers doivent rester à une distance minimale de 30 cm des zones de cuisson à induction lorsque l appareil est en fonctionnement Lorsque vous placez des aliments dans de l huile chaude cela peut éclabousser AVERTISSEMENT Risque d incendie et d explosion Les graisses et les huiles lorsqu elles sont chauffées peuvent dégager des vapeurs inflammables Tenez les flammes ou les objets chauds à...

Страница 49: ...lessure ou d asphyxie Contactez votre service municipal pour obtenir des informations sur la marche à suivre pour mettre l appareil au rebut Débranchez l appareil de l alimentation électrique Coupez le câble d alimentation au ras de l appareil et mettez le au rebut 3 INSTALLATION AVERTISSEMENT Reportez vous aux chapitres concernant la sécurité 3 1 Avant l installation Avant d installer la table de...

Страница 50: ...angés dans le tiroir durant la cuisson Consultez le tutoriel vidéo Comment installer votre table de cuisson à induction AEG Installation du plan de travail en tapant le nom complet indiqué dans le graphique ci dessous www youtube com electrolux www youtube com aeg How to install your AEG Induction Hob Worktop installation 50 FRANÇAIS ...

Страница 51: ... fonctionner l appareil Les affichages les voyants et les signaux sonores indiquent les fonctions activées Touche sensiti ve Fonction Commentaire 1 MARCHE ARRÊT Pour allumer et éteindre la table de cuisson 2 Touches Verrouil Dispositif de sécurité enfant Pour verrouiller ou déverrouiller le bandeau de com mande 3 SenseBoil Pour activer et désactiver la fonction Les indicateurs au dessus du symbole...

Страница 52: ...er un niveau de cuisson 4 3 Indicateurs de niveau de cuisson Afficheur Description La zone de cuisson est désactivée La zone de cuisson est activée Pause est activé SenseBoil est activé Montée en température automatique est activé PowerBoost est activé chiffre Une anomalie de fonctionnement s est produite OptiHeat Control Voyant de chaleur résiduelle à trois niveaux continuer la cuis son maintien ...

Страница 53: ...table de cuisson automatiquement si toutes les zones de cuisson sont désactivées vous ne réglez pas le niveau de cuisson après avoir allumé la table de cuisson vous avez renversé quelque chose ou placé un objet sur le bandeau de commande pendant plus de 10 secondes une casserole un torchon etc Un signal sonore retentit et la table de cuisson s éteint Enlevez l objet ou nettoyez le bandeau de comma...

Страница 54: ...t et la fonction ne démarre pas Pour désactiver la fonction appuyez sur la fonction se désactive et le niveau de cuisson redescend à 0 ou touchez le bandeau de sélection et ajustez le niveau de cuisson manuellement La fonction Pause et le fait de soulever le récipient désactivent la fonction SenseBoil 5 5 Utilisation des zones de cuisson Posez le récipient au centre de la zone de cuisson souhaitée...

Страница 55: ...durée de fonctionnement de la zone de cuisson sélectionnée Pour sélectionner la zone de cuisson appuyez sur à plusieurs reprises jusqu à ce que l indicateur d une zone de cuisson apparaisse Pour activer la fonction appuyez sur la touche du minuteur apparaît Lorsque le voyant de la zone de cuisson commence à clignoter le minuteur démarre L affichage indique en alternance et la durée écoulée en minu...

Страница 56: ...de nouveau activée 5 12 OffSound Control Activation et désactivation des signaux sonores Éteignez la table de cuisson Appuyez sur pendant 3 secondes L affichage s allume puis s éteint Appuyez sur pendant 3 secondes ou apparaît Appuyez sur la touche du minuteur pour choisir l une des options suivantes les signaux sonores sont désactivés les signaux sonores sont activés Pour confirmer le réglage att...

Страница 57: ... la fonction Pour activer automatiquement la fonction réglez le mode automatique sur H1 H6 À l origine la table de cuisson est réglée sur H5 La hotte réagit dès que vous allumez la table de cuisson La table de cuisson détecte automatiquement la température du récipient et ajuste la vitesse du ventilateur Modes automatiques Éclairage automati que Faire bouillir1 Faire fri re2 Mode H0 Arrêt Arrêt Ar...

Страница 58: ...le mode automatique sur H1 H6 L éclairage de la hotte s éteint 2 minutes après la mise hors tension de la table de cuisson 6 CONSEILS AVERTISSEMENT Reportez vous aux chapitres concernant la sécurité 6 1 Récipients de cuisson Pour les zones de cuisson à induction un champ électromagnétique puissant crée très rapidement la chaleur dans le récipient Utilisez les zones de cuisson à induction avec un r...

Страница 59: ...é et les trois quarts du récipient avec de l eau froide du robinet en laissant un espace vide de 4 cm depuis le bord du récipient N utilisez pas moins d un litre ni plus de 5 litres d eau Assurez vous que le poids total de l eau ou de l eau et des pommes de terre est compris entre 1 et 5 kg Si vous souhaitez faire cuire des pommes de terre veillez à les couvrir entièrement d eau mais n oubliez pas...

Страница 60: ...qu à 3 litres de liquide plus les ingrédients 9 12 Faire revenir escalopes cordons bleus de veau côtelettes rissolettes saucisses foie roux œufs crêpes beignets au besoin Retournez à la moitié du temps 12 13 Cuisson à température élevée des pommes de terre rissolées filets steaks 5 15 Retournez à la moitié du temps 14 Faire bouillir de l eau cuire des pâtes griller de la viande goulasch bœuf brais...

Страница 61: ...lles de plastique le sucre et les aliments contenant du sucre car la saleté peut endommager la table de cuisson Veillez à ne pas vous brûler Tenez le racloir spécial incliné sur la surface vitrée et faites glisser la lame du racloir pour enlever les salissures Une fois que la table de cuisson a suffisamment refroidi enlevez traces de calcaire et d eau projections de graisse décolorations métalliqu...

Страница 62: ...a fonctionné que peu de temps ou le capteur est en dommagé Si la zone a eu assez de temps pour chauffer faites appel à un service après vente agréé Hob Hood ne fonctionne pas Vous avez recouvert le bandeau de commande Retirez l objet du bandeau de com mande Vous utilisez un très grand récipient qui bloque le signal Utilisez un plus petit récipient changez la zone de cuisson ou faites fonction ner ...

Страница 63: ...marre pas Aucune zone de cuisson n est prête à être utilisée avec SenseBoil Il y a de la chaleur résiduelle sur les zo nes de cuisson que vous souhaitez choisir ou celles qui sont encore utili sées Terminez vos activités de cuisson pré cédentes et choisissez une zone de cuisson libre sans chaleur résiduelle et un chiffre s affichent Une erreur s est produite dans la ta ble de cuisson Mettez à l ar...

Страница 64: ...re gauche 2300 3200 10 125 210 Avant droite 2300 3200 10 125 210 Arrière droite 2300 3200 10 125 210 La puissance des zones de cuisson peut légèrement différer des données du tableau Elle dépend de la matière et des dimensions du récipient Pour des résultats de cuisson optimaux utilisez des récipients qui ne dépassent pas le diamétre de la zone de cuisson 10 RENDEMENT ÉNERGÉTIQUE 10 1 Informations...

Страница 65: ...ls suivants Si vous faites chauffer de l eau ne faites chauffer que la quantité dont vous avez réellement besoin Si possible couvrez toujours les récipients de cuisson avec un couvercle pendant la cuisson Activez toujours la zone de cuisson après avoir posé le récipient dessus Placez les plus petits récipients sur les plus petites zones de cuisson Posez directement le récipient au centre de la zon...

Страница 66: ...66 ...

Страница 67: ...67 ...

Страница 68: ...www aeg com shop 867372355 A 302021 ...

Отзывы: