background image

2.

Connect the wire coloured blue to

the terminal either marked with the

letter “N“ or coloured black.

3.

Connect the wire coloured brown to

the terminal either marked with the

“L“ or coloured red.

4.

Check that no cut, or stray strands of

wire is present and the cord clamp

(

E

) is secure over the outer sheath.

Make sure the electricity supply

voltage is the same as that indicated

on the appliance rating plate.

5.

Switch on the appliance.

The appliance is supplied with a 13 amp

fuse (

B

). In the event of having to change

the fuse in the plug supplied, a 13 amp

ASTA approved (BS 1362) fuse must be

used.

WARNING!

A cut off plug inserted into a

13 amp socket is a serious

safety (shock) hazard. Ensure

that it is disposed of safely.

3.4 

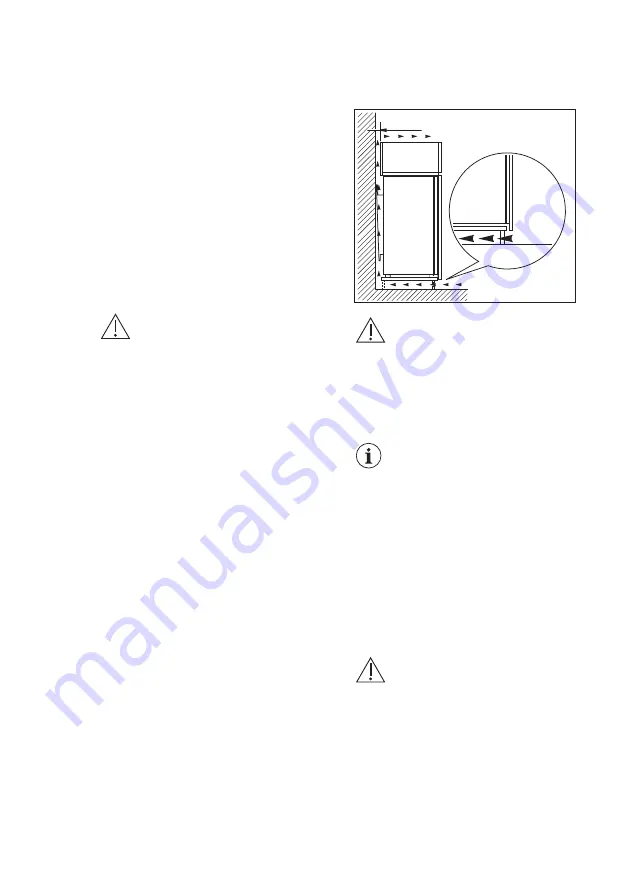
Ventilation requirements

The airflow behind the appliance must

be sufficient.

5 cm

min.

200 cm

2

min.

200 cm

2

CAUTION!

Refer to the assembly

instructions for the

installation.

4. 

OPERATION

4.1 

Switching on

1.

Insert the plug into the wall socket.

2.

Turn the Temperature regulator

clockwise to a medium setting.

4.2 

Switching off

To turn off the appliance, turn the

temperature regulator to the "O"

position.

4.3 

Temperature regulation

The temperature is regulated

automatically.

1.

Turn the Temperature regulator

toward lower settings to obtain the

minimum coldness.

2.

Turn the Temperature regulator

toward higher settings to obtain the

maximum coldness.

A medium setting is

generally the most suitable.

However, the exact setting

should be chosen keeping in

mind that the temperature

inside the appliance

depends on:

• room temperature,

• how often the door is

opened,

• the quantity of food

stored,

• the location of the

appliance.

CAUTION!

If the ambient temperature

is high or the appliance is

fully loaded, and the

appliance is set to the lowest

temperatures, it may run

continuously causing frost to

form on the rear wall. In this

case the dial must be set to

a higher temperature to

allow automatic defrosting

and therefore reduced

energy consumption.

ENGLISH

7

Содержание 933025070

Страница 1: ...USER MANUAL EN User Manual Refrigerator SFE5822VAF ...

Страница 2: ...product for better service www registeraeg com Buy Accessories Consumables and Original spare parts for your appliance www aeg com shop CUSTOMER CARE AND SERVICE Always use original spare parts When contacting our Authorised Service Centre ensure that you have the following data available Model PNC Serial Number The information can be found on the rating plate Warning Caution Safety information Ge...

Страница 3: ...appliance Children shall not carry out cleaning and user maintenance of the appliance without supervision Keep all packaging away from children and dispose of it appropriately 1 2 General Safety This appliance is intended to be used in household and similar applications such as Farm houses staff kitchen areas in shops offices and other working environments By clients in hotels motels bed and break...

Страница 4: ...he appliance At first installation or after reversing the door wait at least 4 hours before connecting the appliance to the power supply This is to allow the oil to flow back in the compressor Before carrying out any operations on the appliance e g reversing the door remove the plug from the power socket Do not install the appliance close to radiators or cookers ovens or hobs Do not expose the app...

Страница 5: ...ondenser They are hot Do not remove or touch items from the freezer compartment if your hands are wet or damp Do not freeze again food that has been thawed Follow the storage instructions on the packaging of frozen food Wrap the food in any food contact material before putting it in the freezer compartment 2 4 Internal lighting WARNING Risk of electric shock The type of lamp used for this applianc...

Страница 6: ...ect operation can only be guaranteed within the specified temperature range If you have any doubts regarding where to install the appliance please turn to the vendor to our customer service or to the nearest Authorised Service Centre 3 3 Electrical Connection CAUTION Any electrical work required to install this appliance should be carried out by a qualified electrician or competent person WARNING ...

Страница 7: ...nstallation 4 OPERATION 4 1 Switching on 1 Insert the plug into the wall socket 2 Turn the Temperature regulator clockwise to a medium setting 4 2 Switching off To turn off the appliance turn the temperature regulator to the O position 4 3 Temperature regulation The temperature is regulated automatically 1 Turn the Temperature regulator toward lower settings to obtain the minimum coldness 2 Turn t...

Страница 8: ...due to a power failure if the power has been off for longer than the value shown in the technical characteristics chart under rising time the defrosted food must be consumed quickly or cooked immediately and then re frozen after cooling 5 3 Thawing Deep frozen or frozen food prior to being used can be thawed in the refrigerator compartment or at room temperature depending on the time available for...

Страница 9: ... not be kept in the refrigerator if not packed Butter and cheese place in a special airtight container or wrap in an aluminium foil or a polythene bag to exclude as much air as possible Bottles close with a cap and place on the door bottle shelf or if available on the bottle rack 6 5 Hints for freezing Freeze only top quality fresh and thoroughly cleaned food products For more efficient freezing a...

Страница 10: ...arly 1 Clean the inside and accessories with lukewarm water and some neutral soap 2 Regularly check the door seals and wipe them clean to ensure they are clean and free from debris 3 Rinse and dry thoroughly 4 If accessible clean the condenser and the compressor at the back of the appliance with a brush This will improve the performance of the appliance and save electricity consumption 7 4 Cleanin...

Страница 11: ...e wall socket 2 Remove any stored food wrap it in several layers of newspaper and put it in a cool place WARNING Do not touch frozen goods with wet hands Hands can freeze to the goods 3 Leave the door open In order to speed up the defrosting process place a pot of warm water in the freezer compartment In addition remove pieces of ice that break away before defrosting is complete 4 When defrosting ...

Страница 12: ...on chap ter Many food products to be frozen were put in at the same time Wait a few hours and then check the temperature again The room temperature is too high Refer to climate class chart on the rating plate Food products placed in the appliance were too warm Allow food products to cool to room temperature before storing The door is not closed cor rectly Refer to Closing the door There is too muc...

Страница 13: ...before storage Many food products are stored at the same time Store less food products at the same time The thickness of the frost is greater than 4 5 mm Defrost the appliance The door has been opened often Open the door only if neces sary There is no cold air circula tion in the appliance Make sure that there is cold air circulation in the appli ance There is too much con densed water on the rear...

Страница 14: ... to the lamp cover 6 Connect the plug to the mains socket 7 Open the door Make sure that the light switches on 8 3 Closing the door 1 Clean the door gaskets 2 If necessary adjust the door Refer to assembly instructions 3 If necessary replace the defective door gaskets Contact the Authorised Service Centre 9 TECHNICAL DATA 9 1 Product information sheet Trade Mark AEG Model SFE5822VAF 933025070 Cate...

Страница 15: ...cal noise emissions dB A re1 pW 37 Built in appliance Y N Yes This appliance is intended to be used exclusively for the storage of wine Y N No 9 2 Additional technical data Dimensions of the ap pliance Height 815 mm Width 596 mm Depth 550 mm Voltage 230 240 V Frequency 50 Hz The technical information is situated in the rating plate on the external or internal side of the appliance and on the energ...

Страница 16: ...www aeg com shop 211625094 A 102019 ...

Отзывы: