background image

17

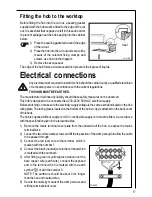
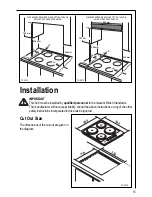
Fitting the hob to the worktop

Before fitting the hob into the cut out, a sealing gasket
supplied with the hob must be fitted to the edge of the cut
out. It is essential that no gaps are left in this seal in order
to prevent spillage near the hob seeping into the cabinet
below.

1) Place the sealing gasket all around the edge

of the cut out.

2) Place the hob into the cut out and secure it by

means of the relevant fixing clamps and
screws, as shown in the diagram.

3) Remove the excess seal

The edge of the hob forms a double seal which prevents the ingress of liquids.

)

)

)

)

)

Electrical connections

Any electrical work required to install this hob should be carried out by a qualified electrician
or competent person, in accordance with the current regulations.

THIS HOB MUST BE EARTHED.

The manufacturer declines any liability should these safety measures not be observed.
This hob is designed to be connected to a 230-240V 50Hz AC electrical supply.
Before switching on, make sure the electricity supply voltage is the same as that indicated on the hob
rating plate. The rating plate is located on the bottom of the hob. A copy is attached on the back cover
of this book.
The hob is supplied without supply cord. A 3 core flexible supply cord must be fitted, in accordance
with the specification given in the relevant tables.
1) Remove the mains terminal cover plate from the underside of the hob, to expose the mains

terminal block.

2) Loosen the two cable clamp screws and lift the top section of the clamp enough to allow the cable

to be passed through.

3) Connect the red (live) wire to the terminal  which is

marked with the number 1.

4) Connect the black (neutral) wire to the terminal which

is marked with the number 4.

5) After fitting a green or yellow/green sleeve over the

bare copper wire (earth wire), connect the exposed
end to the terminal which is marked with the earth
symbol 

 or with the number 5.

NOTE: The earth wire should be about 2 cm. longer
than the live and neutral wires.

6) Secure the cable by means of the clamp screws and

refit the terminal block cover.

FO 0488

FO 0199

a

Seal

Содержание 116 K

Страница 1: ...AUS ERFAHRUNG GUT 116 K Electric Built In Hob Operating Instructions ...

Страница 2: ...2 ...

Страница 3: ...Childrenshouldbekeptawayuntilithascooled z Childrencanalsoinjurethemselvesbypullingpansorpotsoffthehob During Use z This hob is intended for domestic cooking only It is not designed for commercial or industrialpurposes z Itisimportanttonotethattheplatemaysmokealittleandproduceaslightlyunpleasant odourwhenusedforthefirsttime Thisisquitenormalandwilldisappearafterafew minutes z Takecarewhenfryingfoo...

Страница 4: ...his hob should only be repaired or serviced by an authorised Service Engineer and only genuine approved spare parts should be used z Thishobcanbebuilt ininfurnitureunitsplacednearhigherwallsorunits provided thatoneofthesidesisadjacenttoanunitwiththesameheight z Donotusethishobifitisincontactwithwater Donotoperatethehobwithwethands z Ensure the control knobs are in the OFF position when not in use ...

Страница 5: ...ller 14 Important safety requirements 14 Installation 15 Cut Out Size 15 Electrical connections 17 Wiring diagram 18 Contents This appliance is manufactured according to the following EEC directives 73 23 EEC 90 683 EEC 93 68 EEC 89 336 EEC 90 396 EEC currentedition U Guide to Use the instructions ThefollowingsymbolswillbefoundinthetexttoguideyouthroughouttheInstructions SafetyInstructions Stepbys...

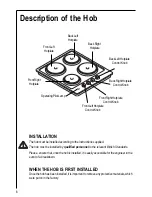
Страница 6: ...ngPilotLamp INSTALLATION The hob must be installed according to the instructions supplied The hob must be installed by qualified personnel to the relevant British Standards Please ensure that once the hob is installed it is easily accessible for the engineer in the event of a breakdown WHEN THE HOB IS FIRST INSTALLED Once the hob has been installed it is important to remove any protective material...

Страница 7: ...mance of the hob Itisimportanttonotethattheplatemaysmokeandproduceaslightlyunpleasantodourwhen used for the first time This is quite normal and will disappear after a short while For best cooking zone regulation refer to the followingtable Boiling To parboil select setting 3 and bring the water to the boil and then turn back to 1 to finish for boiling use higher or lower settingsasrequired Frying ...

Страница 8: ...s or to fry eggs Slow Dried vegetables frozen food fruit boiling water or milk Medium 2 Boiledpotatoes freshvegetables pâtés soups broths pancakes or fish High Larger stews meat roll fish omelettes steaks Fast 3 Steaks escalopes and frying Suggestions for the correct setting of the plates are given in the following table ...

Страница 9: ...you finish cooking and the final stage will be completedontheaccumulatedheat Similarly stews etc cooked in well covered saucepans cook at lower temperature which is more economical Ensurepansarelargeenoughtoavoidliquids being split onto the plates Never leave the plates on without a pan on them or with an empty pan on them Take care never to lean or reach over a hot electric plate Always point pan...

Страница 10: ...use Hob Brite or Bar Keepers Friend The Hotplates Spills onto the actual plate should be removed using warm water and a soft brush nylon or plastic scourer To keep the plates looking as new hotplate conditioner can be purchased frommosthardwarestores e g 4Hob byHomeCareProducts followthemanufacturer s instructionforuse Alternatively wipe the plates with a drop of olive oil on a kitchen towel to av...

Страница 11: ...ect control knob has been turned Check the plate is clean and dry Check the cooking pan is the correct size fortheplate Checkthecookingpanhasaflatbottom Check the setting is correct for the type of cooking If after all these checks your hob still does not operate correctly contact your localAEG Service Force Centre Please note that it will be necessary to provide proof of purchase for any in guara...

Страница 12: ...0 5 929 929 Your call will be routed to your local Service Force Centre For the address of your local Service Force Centre and further information about Service Force please visit the website at www serviceforce co uk CUSTOMER CARE For general enquiries concerning your AEG appliance and for further information on AEG products contact our Customer Care Department by letter or telephone at the addre...

Страница 13: ...ssorplastic Costsincurredforcallstoputrightanappliancewhichisimproperlyinstalledorcallstoappliancesoutside theUnitedKingdom Appliancesfoundtobeinusewithinacommercialenvironment plusthosewhicharesubjecttorental agreements Products of AEG manufacture which are not marketed by AEG European Guarantee If you should move to another country within Europe then your guarantee moves with you to your new hom...

Страница 14: ...desOfPractice B S 6172 B S 5440 Par 2 and B S 6891 Current Editions Location This hob has been registered as a ClassY appliance according to Fire Risk Regulations Minimumdistancesdetailedbelowmustbeobserved Thehobmaybelocatedinakitchen akitchen dinerorbedsittingroom butnotinabathroom or shower room Beforemakingthecutoutintheworktopensurethatthereisaminimumdistanceof55mm between the rear edge of th...

Страница 15: ...MPORTANT This hob must be installed byqualified personnel to the relevant British Standards The manufacturer will not accept liability should the above instructions or any of the other safety instructions incorporated in this book be ignored Cut Out Size The dimensions of the cut out are given in thediagram 650 mm 400 mm 400 mm 100 mm 50 mm 50 mm 55 mm 600 mm 700 mm FO 0813 FO 2225 550 470 580 500...

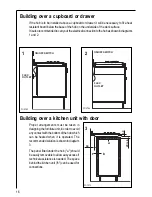
Страница 16: ...gram 3 The panel fitted under the hob a should be easily removable to allow easy access if technical assistance is needed The space behind the kitchen unit b can be used for connections Building over a cupboard or drawer If the hob is to be installed above a cupboard or drawer it will be necessary to fit a heat resistant board below the base of the hob on the underside of the work surface Itisalso...

Страница 17: ... 50HzAC electrical supply Beforeswitchingon makesuretheelectricitysupplyvoltageisthesameasthatindicatedonthehob ratingplate Theratingplateislocatedonthebottomofthehob Acopyisattachedonthebackcover ofthisbook The hob is supplied without supply cord A3 core flexible supply cord must be fitted in accordance withthespecificationgivenintherelevanttables 1 Remove the mains terminal cover plate from the ...

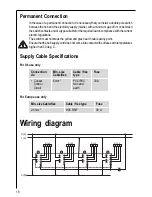
Страница 18: ...ween the hob and the electricity supply mains with a minimum gap of 3 mm between theswitchcontactsandofatypesuitablefortherequiredloadincompliancewiththecurrent electricregulations The switch must not break the yellow and green earth cable at any point Ensurethatthehobsupplycorddoesnotcomeintocontactwithsurfaceswithtemperatures higher than 50 deg C Supply Cable Specifications 2 1 3 4 P1 P2 1 2 1 3...

Страница 19: ...19 ...
Страница 20: ...world s No 1 choice The Electrolux Group is the world s largest producer of powered appliances for kitchen cleaning and outdoor use More than 55 million Electrolux Group products such as refrigerators cookers washing machines vacuum cleaners chain saws and lawn mowers are sold each year to a value of approx USD 14 billion in more than 150 countries around the world ...

Отзывы: