background image

28

Baking, Broiling and Toasting

Advantium Oven

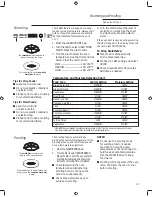
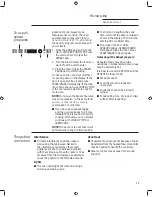
1.  Press the CONV BAKE/BROIL pad.
2.  Press the dial to select BAKE.
3.   Turn the dial to set the oven temperature 

and press to enter.

To bypass preheating:
1.   When the prompt shows PREHEAT THE 

OVEN? turn the dial to NO. Press the dial 

or press START/PAUSE to begin cooking.

2.   Place the food in the oven, turn the dial  

to set the cook time and press to enter.


 The oven starts cooking immediately. 

When cooking is complete, the oven  

will signal and turn off.

To preheat:
1.   When the prompt shows PREHEAT THE 

OVEN? turn the dial to YES. Press the dial 

or press START/PAUSE to begin cooking.


 The oven starts preheating immediately. 

Do not place the food in the oven. (You 

will be prompted to enter the cook time, 

after the oven is preheated.)

2.   When the oven is finished preheating,  

it will signal. If you do not open the door 

within 1 hour, the oven will turn off 

automatically. Open the oven door and, 

using caution, place the food in the oven.

3.   Close the oven door. Turn the dial to set 

the cook time and press to enter and start 

cooking. When cooking is complete, the 

oven will signal and turn off.

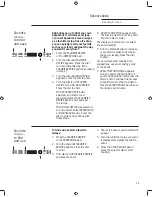
You may change the oven temperature during 

preheating by pressing the POWER/TEMP  

pad and turning the dial to select the new 

temperature.
If the oven door is opened during cooking,  

PAUSE will appear in the display. Close the  

door and press START/PAUSE.
Cook times are shown in minutes and can  

be a maximum of 179 minutes. Time can be 

changed during cooking by turning the dial.

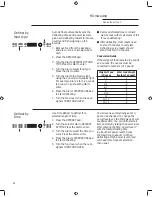
1.  Press the CONV BAKE/BROIL pad.
2.   Turn the dial to BROIL or TOAST and press 

to enter. 

To bypass preheating:
1.   When the prompt shows PREHEAT THE 

OVEN? turn the dial to NO. Press the dial 

or press START/PAUSE to begin cooking.

2.   Place the food in the oven, turn the dial  

to set the cook time and press to enter.


 Press the dial to start cooking. When 

cooking is complete, the oven will signal 

and turn off.

To preheat:
1.   When the prompt shows PREHEAT THE 

OVEN?  turn the dial to YES. Press the dial 

or press START/PAUSE to begin cooking.


 The oven starts preheating immediately. 

Do not place the food in the oven. (You 

will be prompted to enter the cook time, 

after the oven is preheated.)

2.   When the oven is finished preheating,  

it will signal. If you do not open the door 

within 1 hour, the oven will turn off 

automatically. Open the oven door and, 

using caution, place the food in the oven.

3.   Close the oven door. Turn the dial to set 

the cook time and press to ente r and 

start cooking. When cooking is complete,  

the oven will signal and turn off.

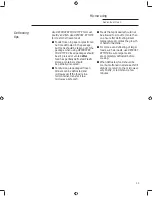
If the oven door is opened during cooking, 

PAUSE will appear in the display. Close the door 

and press START/PAUSE.

How to 

Bake

How to 

Broil or 

Toast

Baking, 

Broiling 

and 

Toasting

Baking allows you to cook foods the same way as  

a conventional oven, using a heating element to raise 

the temperature of the air inside the oven. Any oven 

temperature from 250°F to 450°F may be set.
Broiling allows you to broil foods in the same way as  

a conventional oven.
Toasting allows you to toast foods the same way as  

a conventional oven.
A fan gently circulates heated air throughout the oven, 

over and around the food. Because the heated air is 

kept constantly moving, not permitting a layer of cooler 

air to develop around the food, some foods  

cook slightly faster than in regular oven cooking.
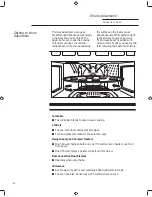
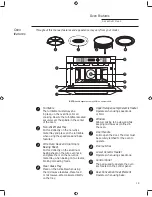
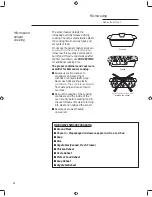
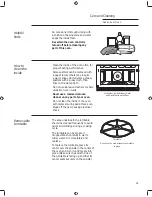
Before you begin, make sure the turntable is in place. 

Use the non-stick metal tray at all times when baking.

CAUTION!

 When baking, remember that 

the oven, door and dishes will be very hot!

¡PRECAUCIÓN!

 ¡Cuando hornee, 

recuerde que el horno, compuerta  

y los platos estarán muy calientes!

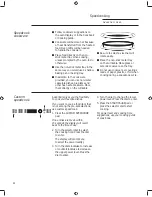
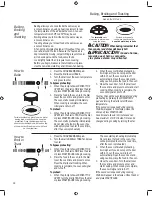
The turntable must  

always be in place when  

using the oven.

Put food or oven-safe 

cookware directly on the 

non-stick metal tray to bake.

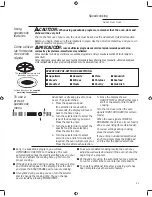
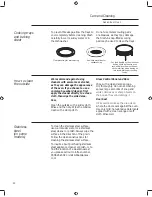
For two-level baking, place food in a metal 

baking dish or directly on the non-stick 

metal tray. Place the aluminum baking 

sheet or your baking dish with food on top 

of the wire rack. Stand the rack with food 

on the metal tray. 

Содержание ZSC1000

Страница 1: ...Owner s Manual Advantium 120V Speedcook Oven For Models ZSC1000 ZSC1001 ZSC1201 ZSC1202 49 40736 MFL38211634 01 15 GE monogram com...

Страница 2: ...ockout 38 Clock 17 36 Delay Start 36 Display ON OFF 36 Help 37 Reminder 36 Review 36 Scroll speed 36 Timer 38 Care and Cleaning Cleaning the inside 39 Cleaning the outside 40 Cooking trays and baking...

Страница 3: ...people who serviced your appliance Explain why you are not pleased In most cases this will solve the problem NEXT if you are still not pleased write all the GHWDLOV LQFOXGLQJ RXU SKRQH QXPEHU WR Mana...

Страница 4: ...ing instructions in the Care and Cleaning of the Oven section of this manual To reduce the risk of fire in the oven cavity R QRW RYHUFRRN IRRG DUHIXOO DWWHQG DSSOLDQFH ZKHQ paper plastic or other comb...

Страница 5: ...e para el fin previsto como se describe en este manual No utilice qu micos ni vapores corrosivos en este aparato Este horno est espec ficamente dise ado para calentar secar o cocinar alimentos y bebid...

Страница 6: ...CTIONS When microwaving place all foods and containers on the clear glass tray Do not pop popcorn in your oven unless in a special microwave popcorn accessory or unless you use popcorn labeled for use...

Страница 7: ...voltaico apriete el bot n t ctil CANCEL OFF BORRAR APAGAR y corrija el problema Horno Advantium INSTRUCCIONES DE SEGURIDAD IMPORTANTES Cuando utilice el microondas coloque WRGRV ORV DOLPHQWRV FRQWHQH...

Страница 8: ...ing or toasting Cookware will become hot Oven mitts will be needed to handle the cookware Do not use coverings containers or cooking roasting bags made of foil plastic wax or paper when speedcooking D...

Страница 9: ...s cuando se hornea asa calienta activa o tuesta algo Los recipientes de cocina se tornar n muy calientes Se requerir n guantes de cocina protectores para manipular los recipientes de cocina No utilice...

Страница 10: ...nt plastic wrap so steam can escape Not all plastic wrap is suitable for use in microwave ovens Check the package for proper use Boilable cooking pouches and tightly closed plastic bags should be slit...

Страница 11: ...ar cortando la envoltura pl stica para que pueda escapar el vapor No todas las cubiertas pl sticas son adecuadas SDUD KRUQRV PLFURRQGDV HD HQ OD FDMD ODV instrucciones correspondientes Se deben cortar...

Страница 12: ...ecause of potential safety hazards under certain conditions we strongly recommend against the use of an adapter plug However if you still elect to use an adapter where local codes permit a TEMPORARY C...

Страница 13: ...ivo sobre el adaptador y conduce finalmente a una falla de la terminal del adaptador con conexi n a tierra Deber solicitar a un electricista calificado el reemplazo del tomacorriente de 2 cables por u...

Страница 14: ...t food is thoroughly cooked Stir food to distribute the heat evenly Be careful to prevent scalding when warming formula The container may feel cooler than the formula really is Always test the formula...

Страница 15: ...a tapa Aseg rese de cocinar bien toda la comida del beb Remueva los alimentos para distribuir el calor uniformemente Tenga cuidado de evitar las escaldaduras al calentar la f rmula El recipiente puede...

Страница 16: ...Foods cook evenly and fast retaining their natural moisture Getting to know Advantium Turntable The turntable rotates to ensure even cooking Controls The oven control contains preset recipes Turn and...

Страница 17: ...food category you want Press the dial to enter it 4 Turn the dial to select the specific food Press the dial to enter it 5 Turn the dial to select the amount size and or doneness if required the oven...

Страница 18: ...sserole egg 7x11 Coffee Cake French Toast Pancakes frozen Hashbrown Patties Rolls refrigerated Sausage Biscuit Sausage Strudel frozen Sweet Rolls Danish Turnovers Waffles frozen Desserts Brownies Cake...

Страница 19: ...rack and place them on the non stick metal tray when baking on two levels broiling or toasting foods Clear Glass Tray Place on the turntable when using the microwave features Place food or microwave...

Страница 20: ...is pad to reheat servings of previously cooked foods or a plate of leftovers FAVORITE RECIPE Press this pad to add edit change or remove a recipe from the memory TIMER Press this pad to set the minute...

Страница 21: ...place when using the oven Put food directly on the non stick metal tray to speedcook SPEEDCOOK PRE SET FOOD SELECTIONS Appetizers Desserts Pizza Sandwich Breads Entrees Potatoes Seafood Breakfast Meat...

Страница 22: ...ad or the selector dial to start cooking Use this time saving feature for cooking repetitive items like cookies or appetizers NOTE The last program used is stored for two hours Resume feature 1 If you...

Страница 23: ...tom Select a lower setting for less browning on the bottom 1 Press the SPEEDCOOK pad and turn the dial to select FOOD MENU or FAVORITE RECIPE or press CUSTOM SPEEDCOOK to manually set power level and...

Страница 24: ...t cooking For power level and cooking time suggestions use your cooking guide or cook book Speedcook cookware Follow cookware suggestions on the oven display or in the Cookbook or Cooking guide Cookwa...

Страница 25: ...o enter and continue with these steps 5 SELECT COOK TIME appears Turn the dial to select the cooking time Press the dial to enter The display will prompt you to select the power level s 6 Turn the dia...

Страница 26: ...ettings appear 5 Press the dial to edit 6 The display will prompt you to select the power level s and edit the name Turn the dial and press to enter the appropriate settings For power level and cookin...

Страница 27: ...is on Lights When the oven is on light may be visible around the door or outer case The halogen lights will dim and cycle on and off during a speedcook cycle sometimes even at full power levels This i...

Страница 28: ...ill signal and turn off To preheat 1 When the prompt shows PREHEAT THE OVEN turn the dial to YES Press the dial or press START PAUSE to begin cooking The oven starts preheating immediately Do not plac...

Страница 29: ...MEDIUM 160 195 F HIGH 195 230 F 4 Turn the dial to select the level of moisture you want See the chart and tips below Press the dial to enter If the oven door is opened during warming PAUSE will appea...

Страница 30: ...ave COOK DEFROST or REHEAT pad If no selection is made within 15 seconds the display will revert back to the time of day 2 Turn the dial to find the food you want to cook defrost or reheat Press the d...

Страница 31: ...ve power level s 1 First follow directions for COOK BY TIME COOK BY TIME 1 2 DEFROST BY TIME or EXPRESS 2 Press the POWER TEMP pad 3 Turn the dial clockwise to increase and counterclockwise to decreas...

Страница 32: ...ng Large roasts should stand for about 30 minutes Conversion Guide If the weight of food is stated in pounds and ounces the ounces must be converted to tenths 1 of a pound Weight of Food Enter Food We...

Страница 33: ...d be partially uncovered Family size prepackaged frozen dinners can be defrosted and microwaved If the food is in a foil container transfer it to a microwave safe dish Foods that spoil easily should n...

Страница 34: ...rs and cover them with lids or vented plastic wrap Never use tight sealing plastic FRQWDLQHUV WKH FDQ SUHYHQW VWHDP from escaping and cause food to overcook Be sure the outside of the cooking containe...

Страница 35: ...e oven is too hot then it will automatically change to time cooking To shorten or lengthen the cook time wait until the time countdown shows in the display Then turn the dial to add or subtract time I...

Страница 36: ...llow the display directions to set the Delay Start time and feature you wish to delay Beeper Volume 8VH WKLV IHDWXUH WR DGMXVW WKH YROXPH of the beeper You can even turn it off Press the OPTIONS pad t...

Страница 37: ...Heat Broil Child Lockout Cancel Off Cook Cook by Time Cook by Food Type Custom Speed Cook Defrost Defrost by Food Type Defrost by Time Defrost by Weight Delay Start Express Cook Favorite Recipe Help H...

Страница 38: ...from too much heat inside the oven cavity It automatically turns on at low speed if it senses too much heat The fan will automatically turn off when the internal parts are cool It may stay on for 30...

Страница 39: ...performance Some spatters can be removed with a paper towel others may require a warm soapy cloth Remove greasy spatters with a sudsy cloth then rinse with a damp cloth Do not use abrasive cleaners or...

Страница 40: ...m baking sheet on the wire oven rack and place them on the non stick metal tray when baking on two levels broiling or toasting foods Clear glass tray for microwaving Non stick metal tray for speedcook...

Страница 41: ...owave COOKING The oven makes Clicks and fans blowing These sounds are normal unusual sounds are normal The relay while cooking board is turning the components on and off Smoke comes out Food is high i...

Страница 42: ...start START PAUSE pad Press START PAUSE not pressed after entering cooking selection Another selection already Press CANCEL OFF entered in oven and CANCEL OFF pad not pressed to cancel it Size quantit...

Страница 43: ...ervice Contracts In the USA 800 626 2224 In Canada 800 561 3344 You can have the secure feeling that GE Consumer Service will still be there after your ZDUUDQW H SLUHV 3XUFKDVH D FRQWUDFW ZKLOH RXU ZD...

Страница 44: ...ible for a trip charge or you may be required to bring the product to an Authorized GE Service Location for service In Alaska the warranty excludes the service calls to your home Some states do not al...

Отзывы: