Advantech TPC-100W Series Скачать руководство пользователя страница 18

TPC-100W Series User Manual

6

1.4

Dimensions and Cutout 


Содержание TPC-100W Series

Страница 1: ...User Manual TPC 100W Series 7 10 1 15 6 Touch Panel Computer with ARM Cortex A53 Processor...

Страница 2: ...ium Cd Hexavalent chromium Cr 6 Polybrominated biphenyls PBB Polybrominated diphenyl ethers PBDE 1 0 1 wt 0 01 wt Note 1 Exceeding 0 1 wt and exceeding 0 01 wt indicate that the content of the restric...

Страница 3: ...ollowing models TPC 107W TPC 107W N31A TPC107WN31A2101 T TPC107WN31A2102 T TPC107WN31A2103 T TPC107WN31A2201 T TPC107WN31A2202 T TPC107WN31A2203 T TPC107WN31A2204 T TPC107WN31A2205 T TPC107WN31A2206 T...

Страница 4: ...s testing most customers never need to use our repair service If an Advantech product is defective it will be repaired or replaced free of charge during the warranty period For out of warranty repairs...

Страница 5: ...from Advantech Please contact your local supplier for ordering information Test conditions for passing also include the equipment being operated within an industrial enclosure In order to protect the...

Страница 6: ...prevent hardware damage and data losses For example Batteries are at risk of exploding if incorrectly installed Do not attempt to recharge force open or heat the battery Replace the battery only with...

Страница 7: ...service personnel 14 If any of the following occurs have the equipment checked by service person nel The power cord or plug is damaged Liquid has penetrated the equipment The equipment is malfunctioni...

Страница 8: ...TPC 100W Series User Manual viii 1 2 3 4 5 6 7 8 9 10 11 12 13 14 15 20 C 4 F 60 C 140 F 16 17 IEC 704 1 1982 70dB A 18 19 IEC 704 1 20 21 30 10 22 2 2 1 23...

Страница 9: ...ftungs ffnungen d rfen niemals Gegenst nde oder Fl ssigkeiten in das Ger t gelangen Dies k nnte einen Brand bzw elektrischen Schlag aus l sen 13 ffnen Sie niemals das Ger t Das Ger t darf aus Gr nden...

Страница 10: ...damage To avoid electrical shock always disconnect the power from your PC chassis before you work on it Don t touch any components on the CPU card or other cards while the PC is on Disconnect power b...

Страница 11: ...xpress Module Installation 12 2 4 System Power On 13 2 4 1 Cabinet Installation and Earth Grounding Setup 14 Chapter 3 Linux Yocto 17 3 1 ARM Yocto 3 0 18 3 2 ARM Yocto 3 0 Software Support 18 3 2 1 S...

Страница 12: ...TPC 100W Series User Manual xii...

Страница 13: ...Chapter 1 1 General Information...

Страница 14: ...10 1 16 9 WXGA LCD wide screen with PCAP multi touch 15 6 HD WXGA LCD wide screen with PCAP multi touch 15 6 FHD LCD wide screen with PCAP multi touch Up to 2GB LPDDR4 RAM 16GB eMMC storage onboard 10...

Страница 15: ...compliant with IEC60068 2 27 1 2 6 EMC and Safety EMC CE FCC Class B BSMI Safety CB UL CCC Category Item 7 10 1 15 6 HD 15 6 FHD LCD Display Type WSGA TFT LCD WXGA TFT LCD WXGA TFT LCD FHD TFT LCD Ma...

Страница 16: ...mounting apparatus to avoid risk of injury Le capot arri re du TPC 100 dispose de quatre trous de montage VESA 100 x 100 mm Le kit de montage VESA doit tre install l aide de 4 vis M4x10L Veuillez uti...

Страница 17: ...es vis dans chaque attachez les et attachez les Ces vis vont pousser le panneau de montage et fixer le unit 3 L paisseur de panneau de montage sugg r e est inf rieure 6 mm 0 236 Insert the screws into...

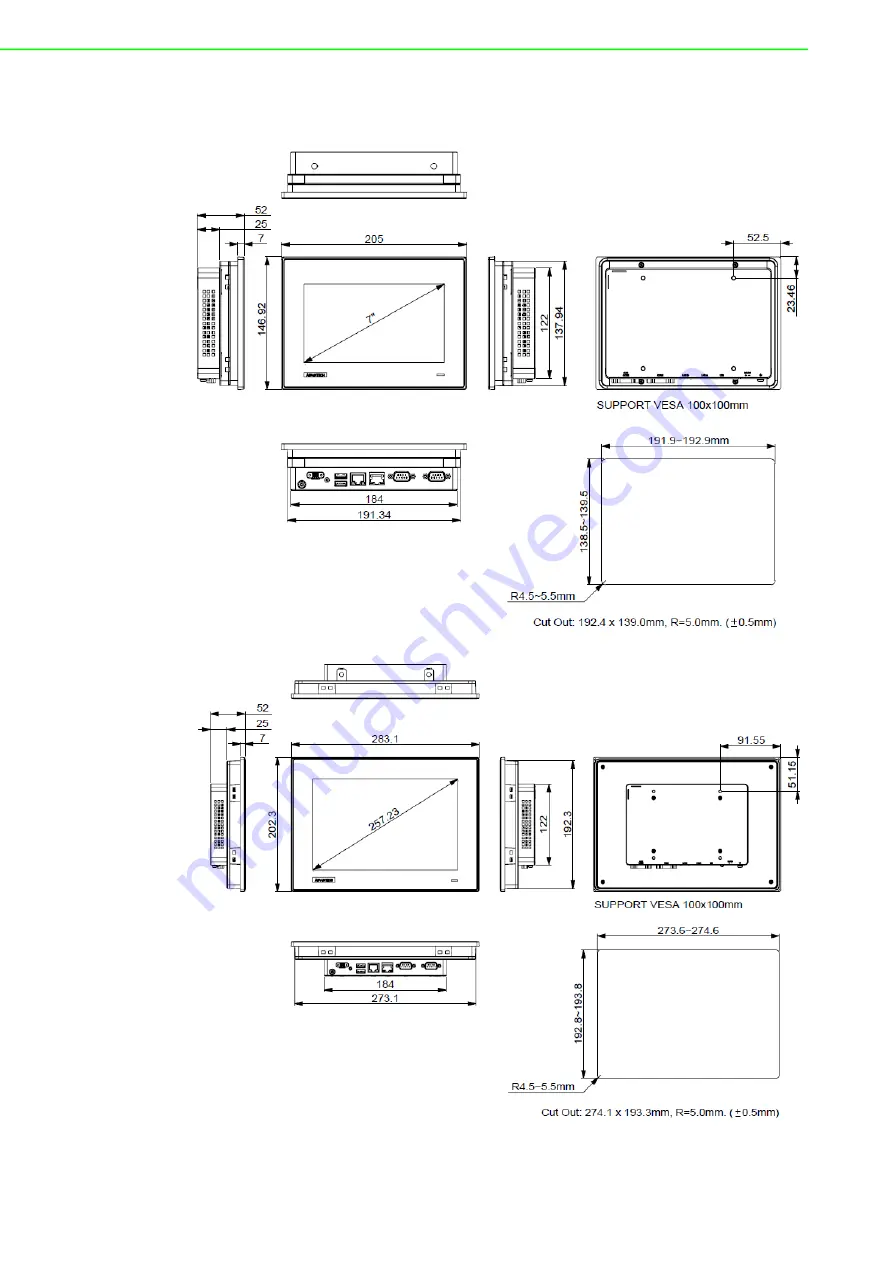
Страница 18: ...TPC 100W Series User Manual 6 1 4 Dimensions and Cutout...

Страница 19: ...7 TPC 100W Series User Manual Chapter 1 General Information LED Indicator Off dark ON Blue Standby orange...

Страница 20: ...TPC 100W Series User Manual 8...

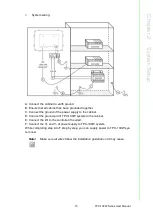
Страница 21: ...Chapter 2 2 System Setup...

Страница 22: ...e and moisture may impact the unprotected unit Additionally damaged packag ing indicates that ambient conditions have already had a massive impact on the device Therefore please use the original packa...

Страница 23: ...wering on please open the rear bracket and select the correct mode Configuration can be set via the switch on the TPC 100W rear board as shown below The default setting is RS232 mode and eMMC Boot Kin...

Страница 24: ...tallation TPC 100W provides 1 M 2 E key Express slot and allows users to expend functions like Wi F and Bluetooth type modules Open the rear bracket and configure the MINI PCI Express module on MINI P...

Страница 25: ...l be complied with ES1 and PS2 LPS requirements output rating is 24 Vdc minimum 0 83A with minimum operating temperature 60 C and has to be evaluated according to IEC UL 60950 1 and or IEC UL 62368 1...

Страница 26: ...circumstance TPC 100W system could have the best performance such as EMI immunity ESD immunity Surge immunity and also system isolation If the TPC 100W system is embedded in the cabinet the TPC 100W...

Страница 27: ...the ground of the power supply to the cabinet D Connect the ground pin of TPC 100W system to the cabinet E Connect the I O to the controller if needed F Connect the V and V of power supply to TPC 100W...

Страница 28: ...TPC 100W Series User Manual 16...

Страница 29: ...Chapter 3 3 Linux Yocto...

Страница 30: ...shared technologies software stacks configurations and best practices used to create these tailored Linux images 3 2 ARM Yocto 3 0 Software Support 3 2 1 System Default Software ARM Yocto 3 0 support...

Страница 31: ...ironment that can use uncompress and dd command Below uses ubuntu 18 04 as example 2 Use tar Jxvf filename to uncompress the file to img format 3 Use sudo dd if imgfile of SDpartition to burn the img...

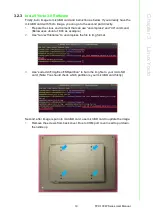
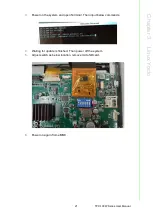
Страница 32: ...TPC 100W Series User Manual 20 2 Insert microSD card then adjust switch as below order red remark...

Страница 33: ...l Chapter 3 Linux Yocto 3 Power on the system and open Terminal Then input below commands 4 Waiting for update is finished Then power off the system 5 Adjust switch as below location remove microSD ca...

Страница 34: ...iguration and Connection of WIFI Module Configure by Command mode 1 Check the WIFI device exists Or you can use below command to check If the WIFI node exists the WIFI driver works normally 2 Enable W...

Страница 35: ...EDR Bus USB BD Address 00 1A 7D DA 71 13 ACL MTU 310 10 SCO MTU 64 8 UP RUNNING RX bytes 574 acl 0 sco 0 events 30 errors 0 TX bytes 368 acl 0 sco 0 commands 30 errors 0 1 2 3 4 systemctl status bluet...

Страница 36: ...1B D8 88 Attempting to pair with 98 39 8E 1B D8 88 CHG Device 98 39 8E 1B D8 88 Connected yes Request confirmation agent Confirm passkey 117022 yes no 1 2 3 4 5 bluetooth connect 98 39 8E 1B D8 88 Att...

Страница 37: ...echnologies net connman technology p2p Name P2P Type p2p Powered False Connected False Tethering False net connman technology wifi Name WiFi Type wifi Powered True Connected False Tethering False net...

Страница 38: ...1a7638bc_hidden_managed_psk KOALXA AP 2 4 wifi_88da1a7638bc_4b4f414c58412d41502d322e34_managed_psk PCCWS_GDCN wifi_88da1a7638bc_50434357535f4744434e_managed_psk ChinaNet APUU wifi_88da1a7638bc_4368696...

Страница 39: ...e time from the NTP server Reset RTC hardware clock time use current system time Reset system time use RTC hardware clock time Set system time zone use Taipei time sh 5 0 date s 2021 10 07 09 00 00 sh...

Страница 40: ...ata cangen cansend to send data The can gen will send random data ID and cansend will send specific data ID to CAN BUS Send message 123 R to can0 Receive message from can0 HW DEVICE MODE Fintek CAN0 c...

Страница 41: ...htness Value 100 sh 5 0 echo 100 sys class backlight lvds_backlight 0 brightness sh 5 0 echo out sys class gpio gpio85 direction sh 5 0 echo out sys class gpio gpio86 direction sh 5 0 echo 1 sys class...

Страница 42: ...TPC 100W Series User Manual 30...

Страница 43: ...Appendix A A Pin Assignments...

Страница 44: ...nterface for input or output devices 10 PCM_SYNC 11 SDIO _CMD 12 PCM_OUT 13 SDIO _DATA0 14 PCM_IN 15 SDIO _DATA1 16 Reserved NC 17 SDIO _DATA2 18 GND 19 SDIO _DATA3 20 Reserved NC 21 SDIO _WAKE 22 Res...

Страница 45: ...ix A Pin Assignments A 2 COM Port 9 Pin Com Port Connector COM1 9 Pin Com Port Connector COM2 CAN Pin RS232 RS422 RS485 1 D 2 RX RX D 3 TX TX 4 5 GND GND GND 6 RX 7 RTS TX 8 CTS 9 Pin RS485 CAN 1 D 2...

Страница 46: ...TPC 100W Series User Manual 34 CAN BUS Pin define COM2 Pin define CAN BUS terminal CN2 COM2 terminal CN4 CN2 1 2 CN2 2 3 120 ohm terminal default CN4 1 2 default CN4 2 3 120 ohm terminal...

Страница 47: ...35 TPC 100W Series User Manual Appendix A Pin Assignments...

Страница 48: ...e subject to change without notice No part of this publication may be reproduced in any form or by any means such as electronically by photocopying recording or otherwise without prior written permiss...

Отзывы: