background image

47

PPC-6150A/6170A User Manual

Chapter 4

S

oftware

C

onfiguration

4.2.3

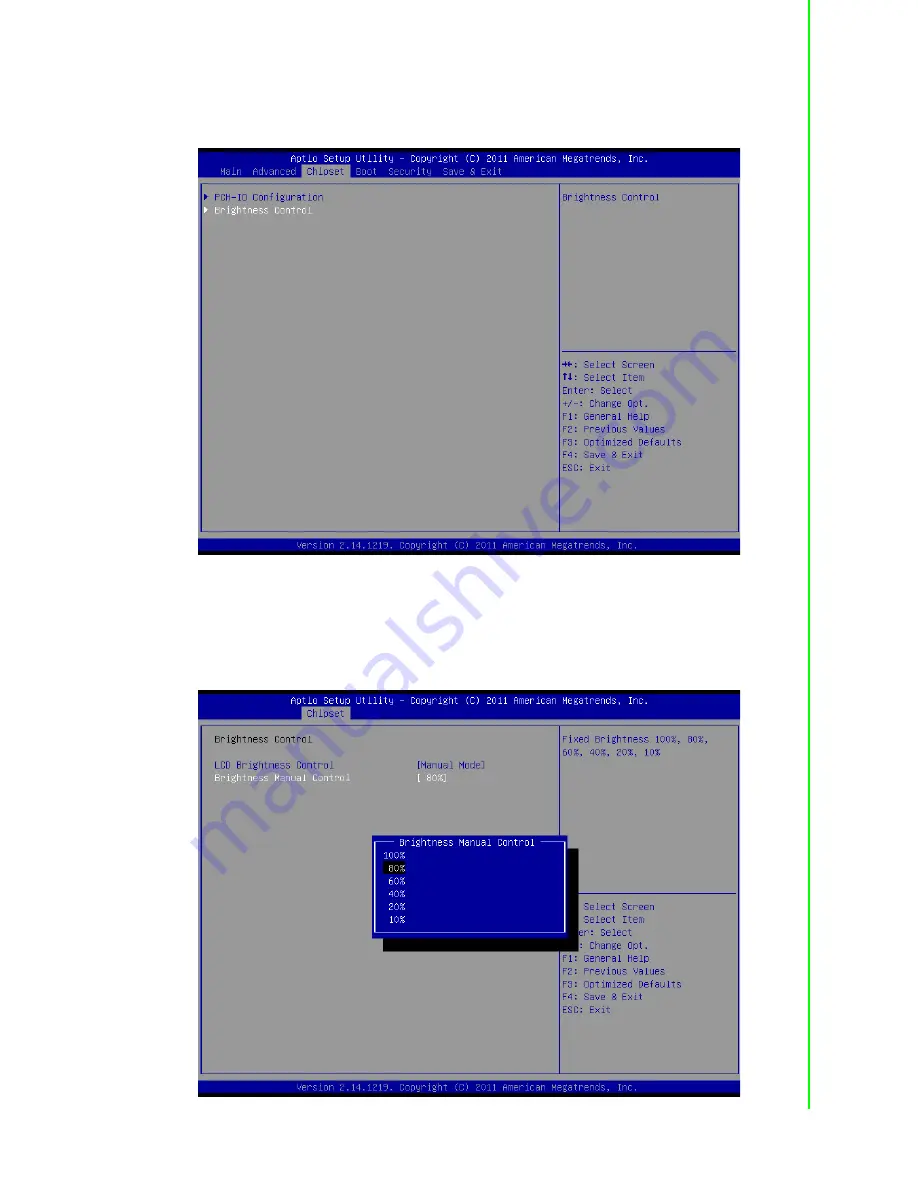
Display Brightness Adjustment 

Select “Chipset” under “Brightness Control”.

A.Manual Adjustment Mode

“LCD Brightness Control” is configured as “Manual Mode” by default. 

Select “Brightness Manual Control” under “Brightness Control”, and there will be 6
options:

Содержание PPC-6150A

Страница 1: ...User Manual PPC 6150A 6170A Intel Core i5 processor based microcomputer with 15 17 color TFT LCD display four additional GbE ports...

Страница 2: ...dvantech assumes no liability under the terms of this warranty as a consequence of such events Because of Advantech s high quality control standards and rigorous testing most of our customers never ne...

Страница 3: ...ble protection against harmful interference when the equipment is operated in a commercial environment This equipment generates uses and can radiate radio frequency energy and if not installed and use...

Страница 4: ...r pour any liquid into an opening This may cause fire or electrical shock 13 Never open the equipment For safety reasons the equipment should be opened only by qualified service personnel 14 If one of...

Страница 5: ...ays disconnect the power from your PC chassis before you work on it Don t touch any components on the CPU card or other cards while the PC is on Disconnect power before making any configuration change...

Страница 6: ...PPC 6150A 6170A User Manual vi...

Страница 7: ...2 Side view 11 Figure 2 3 Location of I O interfaces 12 2 2 HDMI Specifications 13 Figure 2 4 13 Figure 2 5 13 2 3 Install Memory Card 14 Figure 2 6 After removing rear cover 14 Figure 2 7 14 Figure...

Страница 8: ...M PORT DIO Switch and PIN Definition 38 Figure 3 4 COM ports 38 3 3 External Port DIO and COM Port Switch 40 Figure 3 5 40 Figure 3 6 40 Figure 3 7 41 3 4 Touchscreen Control Source Configuration 41 F...

Страница 9: ...Chapter 1 1 General Information This chapter gives background information on PPC 6150A 6170A panel PC Sections include Introduction Specifications Dimensions...

Страница 10: ...ese func tions greatly improve the product reliability and are able to satisfy most users needs 1 2 Specifications 1 2 1 Specification Comparison Product PPC 6150A PPC 6170A LCD Specification 15 LCD 1...

Страница 11: ...el i350 I O Ports 2 x COM port 1 x isolated RS 232 422 485 1 x RS232 1 x GPIO RS 232 8 channels TTL level 3 x USB3 0 2 x USB2 0 2 4 x Gigabit Ethernet ports 1 x D SUB VGA ports 1 x HDMI ports 1 x Line...

Страница 12: ...Light Transmission 81 3 Controller COM interface use COM5 as controller source Touchscreen Lifecycle 36 000 000 times Operation Temperature 0 50 C 32 122 F Storage Temperature 20 60 C 4 140 F Relativ...

Страница 13: ...Test Software Test Configuration Test System Power W Burn in 7 0 Memory Transcend DDR3 1600 SODIMM 8GBx1 HDD Seagate ST250LT003 9YG141C 500 250GB SATA 2 5 IO COM Port RS232 loopback x5 USB3 0 device x...

Страница 14: ...A 6170A User Manual 6 1 3 Dimensions PPC 6150A Figure 1 1 PPC 6150A dimensions Fixed VESA screw specification M4 screw depth 7 5 mm Max Warning Use suitable mounting apparatus to avoid risk of injury...

Страница 15: ...6170A User Manual Chapter 1 General Information PPC 6170A Figure 1 2 PPC 6170A dimensions Fixed VESA screw specification M4 screw depth 7 5 mm Max Warning Use suitable mounting apparatus to avoid ris...

Страница 16: ...PPC 6150A 6170A User Manual 8...

Страница 17: ...etup Sections include Quick Installation Guide HDMI Specifications Install Memory Install ODD Install HDD Install Mini SATA and Wireless LAN Card Install Riser Card Panel Mount Bracket Installa tion P...

Страница 18: ...ctors and ports which are illus trated in the figures below When you place the panel PC upright on the desktop its front panel appears as shown in Figure 2 1 Figure 2 1 Front panel 1 Light sense 2 LAN...

Страница 19: ...e 2 2 Side view Red rectangle indicates VESA screw hole 1 Air outlet 2 Antenna hole 3 Panel Mount Bracket hole 10 in PPC 6170A 8 in PPC 6150A 4 Slim type optical drive bay 5 Loudspeaker dual 6 Air inl...

Страница 20: ...2 USB 2 0 x 2 D HDMI E VGA F Cable clip x 2 G Gigabit Ethernet x 2 H Expansion Slots x 2 I Line out Mic in J USB 3 0 x 1 K DIO RS 232 by swapping pin header L Isolated RS 232 422 485 selected through...

Страница 21: ...tallation Setup 2 2 HDMI Specifications 1 When using HDMI interface please purchase cables of above 9 mm long see Figure 2 4 or imperfect contact may happen Figure 2 4 2 Please insert the cable by the...

Страница 22: ...0A User Manual 14 2 3 Install Memory Card 1 Remove rear cover of the panel PC See Fig 2 6 Figure 2 6 After removing rear cover 2 Remove the two screws of the riser card see Fig 2 7 and pull out the ca...

Страница 23: ...l the screws in the reinforced board including the three screws beside the fan see Fig 2 8 and the one in I O stop plate Figure 2 8 4 Remove the reinforced board see Fig 2 9 Figure 2 9 5 Remove CPU fa...

Страница 24: ...the thermal pads of CPU QM77 and memory and stick them in the correct locations see Fig 2 11 then install the CPU cooler to complete the memory installation Figure 2 11 2 4 Install ODD 1 Remove the f...

Страница 25: ...out ODD module fix it onto the iron bracket and connect the ODD cable to the corresponding interface See Fig 2 13 Figure 2 13 2 5 Install HDD 2 5 1 Install HDD1 1 Please follow the procedures 1 4 in...

Страница 26: ...racket See Fig 2 15 Figure 2 15 4 Take out the 4 screws lock HDD onto the U type bracket screws can be found in the accessory box 4 x M3X4 and insert HDD cable into HDD module See Fig 2 16 Figure 2 16...

Страница 27: ...nect HDD cable to the mainboard See Fig 2 18 Figure 2 18 2 5 2 Install HDD2 1 Please follow the procedures 1 4 in Section 2 3 2 Take out the U type bracket 4 black washers 4 transparent washers and 2...

Страница 28: ...s shown in Fig 2 20 Please make sure the transparent washer U card is fixed in the U iron bracket or HDD may be damaged easily Figure 2 20 4 Take out 4 M3 4 screws fix the HDD lock onto U type iron br...

Страница 29: ...er Manual Chapter 2 System Installation Setup 5 Lock the hold down clamp onto U type iron bracket with the 4 M3 4 screws and fix the HDD onto HDD2 iron bracket Figure 2 22 6 Connect the HDD cable See...

Страница 30: ...following installation procedures are only for professional technicists reference The screws needed in this process can be found in the accessory box 1 Please follow the procedures in Section 2 3 2 Un...

Страница 31: ...al Chapter 2 System Installation Setup 3 Unplug the cables beside the IO as shown below and remove the 2 hexagonal screws in VGA of I O back plate Then vertically pull out MIO board See Fig 2 25 Figur...

Страница 32: ...short card 2 6 1 Install Mini SATA 1 Insert Mini SATA card into PCIE slot and fix it with two M2x 6 See Fig 2 17 Figure 2 26 2 6 2 Install Wireless LAN Long Card 1 First take down wireless LAN card a...

Страница 33: ...Installation Setup 2 Fixed the antenna onto the bracket See Fig2 28 Figure 2 28 3 Lock the bracket with antenna onto M B frame the wiring method is shown as Fig 2 29 The antenna receiver is locked ont...

Страница 34: ...X 6 screws from the accessory box and insert the wireless LAN card into MIO 5290 CN28 slot Figure 2 31 Note Long card and Mini SATA slot share one slot Users need to configure the port as PCIE by BIO...

Страница 35: ...e wiring method of the long card is shown as Fig 2 32 Figure 2 32 2 6 3 Install Wireless LAN Short Card 1 Follow the procedures in Section 2 6 2 and install the antenna to the machine 2 Take out one M...

Страница 36: ...own as Fig 2 34 Figure 2 34 4 Reinstall MIO mainboard lock the screws and return back the cables according to Procedure 3 6 then check if all cables are correctly connected which is shown as Fig2 35 2...

Страница 37: ...6 Connect the USB cable See Fig2 36 Figure 2 36 7 Lock the reinforced board and connect the fan cable and check if the left sys tem fan cable is connected well See Fig 2 37 Figure 2 37 8 Lock the rein...

Страница 38: ...need to configure PPCIEx1 interface as PCIE x1 Mode 1 Remove the rear cover of panel PC 2 Insert the riser card into the slot and lock the two screws See Figure 2 38 Figure 2 38 3 Remove the card slo...

Страница 39: ...31 PPC 6150A 6170A User Manual Chapter 2 System Installation Setup 2 8 Panel Mount Bracket Installation Please follow the figures below Figure 2 40 Panel Panel...

Страница 40: ...er cable into the power interface Figure 2 41 2 Lock the power cable bracket onto the machine which is shown as the figure below 2 M3X5 2 screws Figure 2 42 3 When using power bracket please select th...

Страница 41: ...Chapter 3 3 Jumper Configuration Sections include Jumper Connectors Peripheral COM Port DIO Switch and Pin Definitions Peripheral DIO and COM Port Switch Touchscreen Control Source Configuration...

Страница 42: ...CN3 ATX POWER SYS1FAN1 3PIN FAN CN4 CN5 SATA POWER CN7 Backlight enable CN6 CN8 Backlight connector CN11 USB for touch CN9 Light sense CN23 COM3 Internal CN12 DIO CN13 LCD size select CN15 Touch CN18...

Страница 43: ...n Configuration Function 1 3 2 4 Default P3 RI 5 7 P4 5 V COM1 Pin9 10 maximum 0 5 A 7 9 P5 12 V COM1 Pin9 10 maximum 0 25 A 6 8 P6 5 V COM3 Pin9 10 maximum 0 5 A 8 10 P7 12 V COM3 Pin9 10 maximum 0 2...

Страница 44: ...PPC 6150A 6170A User Manual 36 3 1 2 MIO 5290 Top Figure 3 2 MIO 5290 front view Bottom Figure 3 3 MIO 5290 rear view...

Страница 45: ...N2 Power FAN CN18 ATX 4PIN 12V POWER CN14 LVDS J3 LVDS Power select J4 DDR3 POWER select CN13 USB CN28 Full Mini PCIE or Mini SATA Selected by BIOS CN29 Half Mini PCIE J1 Images For Clear CMOS Configu...

Страница 46: ...witch and PIN Definition Open the rear cover before configuration Figure 3 4 COM ports K DIO RS 232 by swapping pin header L Isolated RS 232 422 485 selected through BIOS M RS 232 x 1 J4 Images For DD...

Страница 47: ...n chapter 2 This port is designed with isolation function 1000 VDC DIO 1 Operation voltage 5 V 10 2 8 bit parallel input and output port 3 Control signal is SMBUS External COM PORT DIO PIN definition...

Страница 48: ...igure the external port as DIO default Figure 3 5 2 Configure the external port as COM port See Fig 3 6 a Configure JP1 and JP2 as shown in Fig 3 6 This configuration will change touchscreen s control...

Страница 49: ...nnect the cable to COM port See Fig 3 7 Figure 3 7 3 4 Touchscreen Control Source Configuration Open the rear cover first 1 Use COM port to control touchscreen Default Take down DIO cable and configur...

Страница 50: ...PPC 6150A 6170A User Manual 42 2 Use USB to control touchscreen Take down DIO cable and configure JP JP2 as shown in the figure below then insert the DIO cable Figure 3 9...

Страница 51: ...Chapter 4 4 Software Configuration Sections include Install Drivers BIOS Setup Program...

Страница 52: ...dows 7 and Windows XP systems can be used in all drivers except VGA Intel RAID_AHCI All drivers needed to install during RAID assembly PPC Backlight Adjustment Tool Customers can use this program to a...

Страница 53: ...r Manual Chapter 4 Software Configuration 4 2 BIOS Setup 4 2 1 Enter BIOS Start the computer and press Delete key to enter BIOS Press F4 to save and exit after any configuration or the configuration w...

Страница 54: ...PPC 6150A 6170A User Manual 46 4 2 2 ATX AT Mode Setup 1 Select PCH IO Configuration under Chipset 2 Configure Restore AC Power Loss as Power On...

Страница 55: ...ration 4 2 3 Display Brightness Adjustment Select Chipset under Brightness Control A Manual Adjustment Mode LCD Brightness Control is configured as Manual Mode by default Select Brightness Manual Cont...

Страница 56: ...ent Mode LCD Brightness Control is configured as Dynamic Mode that is auto sensor adjustment mode Then the machine will automatically adjust the LCD brightness from sensor points 4 2 4 COM 232 422 485...

Страница 57: ...49 PPC 6150A 6170A User Manual Chapter 4 Software Configuration 2 Then Select Serial Port 2 Configuration 3 Then you can select the operation mode of COM2 by Serial Port2 Mode...

Страница 58: ...PPC 6150A 6170A User Manual 50 4 2 5 MiniPCIE MiniSATA Configuration Method 1 Select Chipset under PCH IO Configuration 2 Then select Mini Card M SATA...

Страница 59: ...ual Chapter 4 Software Configuration 3 Enter and select Mini PCIE type Mini Card CN28 is of Mini PCIE interface M SATA CN28 is of Mini SATA interface 4 2 6 RAID Function Configuration 1 Select SATA Co...

Страница 60: ...PPC 6150A 6170A User Manual 52 2 Then select RAID in SATA Mode Selection 4 2 7 PCIE RI Wakeup 1 Select Chipset under PCH IO Configuration...

Страница 61: ...figuration 2 Select Wake on PCIE RI as Enabled under PCH IO Configuration 3 Open wake on LAN function in the system A Open wake on LAN function in windows 7 Right click Computer and select Manage to e...

Страница 62: ...work adapters and 2 network devices will appear Select any device with wake on LAN function and right click to select Properties Select Power Management and remember to check Wake on Magic Packet and...

Страница 63: ...tion B Open wake on LAN function in windows XP Right click Computer and select Manage to enter management interface then select Network adapters and 2 network devices will appear Select any device wit...

Страница 64: ...PPC 6150A 6170A User Manual 56 Select Power Management and remember to check Wake on Magic Packet and Wake on Magic Packet from power off state...

Страница 65: ...Appendix A A PCI PCIE Images Dual HDD RAID Function Configuration...

Страница 66: ...slot optional PCM 918 2 PCI32 slot optional PCM 920 1 PCIEX1 1 PCI32 slot default The total current load provided by the expansion slot is as follows Note The size of PCI and PCIE card can not exceed...

Страница 67: ...oltage of 12 V 5 V and 3 3 V can not exceed 25 W A 2 Dual HDD RAID A 2 1 Windows XP Dual HDD RAID System Installation Procedures 1 Enter BIOS and set SATA mode as RAID 2 Please press Ctrl I to enter R...

Страница 68: ...6170A User Manual 60 4 Select Create Volume after mode configuration and you ll be reminded that RAID HDD data will be erased Press Y to confirm selecting RAID mode 5 Select Exit and press Y to exit t...

Страница 69: ...61 PPC 6150A 6170A User Manual Appendix A PCI PCIE Images Dual HDD RAID Function Configuration 6 Then it will boot from CD ROM Press F6 to wait loading RAID driver...

Страница 70: ...PPC 6150A 6170A User Manual 62 7 You can press S to select the driver when loading driver appears Please select Intel R Mobile Express Chipset SATA RAID Controller and press Enter to continue...

Страница 71: ...63 PPC 6150A 6170A User Manual Appendix A PCI PCIE Images Dual HDD RAID Function Configuration 8 Press Enter to continue 9 Press Enter to prepare installing system...

Страница 72: ...PPC 6150A 6170A User Manual 64 10 Press F8 to agree starting installation 11 It will appear the total HDD size after RAID configuration then you can create partition by your favorite...

Страница 73: ...al HDD RAID System Installation Procedures The preparation procedures of Windows 7 installation is the same as that of Windows XP Users need to configure dual HDD as RAID mode and then start installat...

Страница 74: ...PPC 6150A 6170A User Manual 66 2 You can create partition by your favorite and continue installation 3 Click Next to continue and complete the installation...

Страница 75: ...67 PPC 6150A 6170A User Manual Appendix A PCI PCIE Images Dual HDD RAID Function Configuration...

Страница 76: ...tions are subject to change without notice No part of this publication may be reproduced in any form or by any means electronic photocopying recording or otherwise without prior written permis sion of...

Отзывы: