background image

PCI/ PCI Express-Communication

 User Manual

36

4.4.2

Configuring a Port

You can choose to configure a specific port (or to configure all ports) before running
your test. Just click a Com Port Tab to select the port you want to configure, and then

click the 

Port Setup


 button or use the 

Port/Setup 

menu command (or if you want

to configure all ports at once, just click the 

All Ports Setup


 button or access the

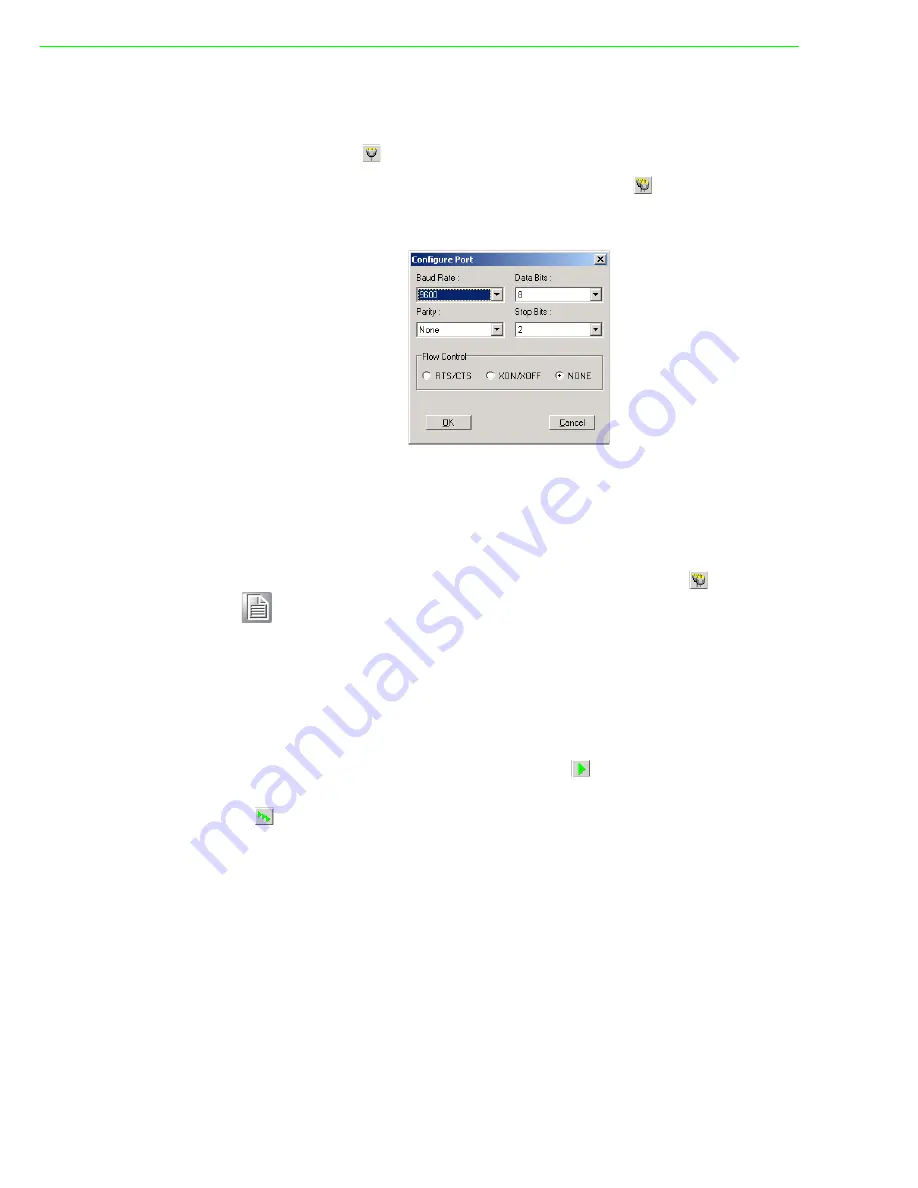
All Ports/Setup menu command) to bring up the Configure Port dialog box such as
below.

Figure 4.5 Test Information on the Performance Listing Area

In the 

Configure Port 

dialog box, you can configure the Baud Rate, Data bits, Parity,

Stop Bits and the flow control mode for that specific port (or for all ports). After you
have configured all the settings you want to change, click

 OK

 to make this configura-

tion active.

Run the Test

After you have completed the configuration of the port(s), you can now start the test

on the port you have selected by clicking the 

Run


 button or accessing the 

Port/

Run

 menu command (or you want to run all ports at once, just click the 

All Ports

Run


 button or access 

All Ports/Run

 menu command).

Once the test is started, you can see relevant test information of port performance on
the 

performance listing area

.

Note!

When using 

All Ports Setup 

button or 

All Ports/ Setup


menu com-

mand to configure settings for all ports, you must take care to stop any 
ports
that are running test in order to configure them. If you do not stop the 
test running on a specific port, it won’t be configured at all. That is, you 
get to configure only the ports that have been stopped.

Содержание PCI-1602UP

Страница 1: ...User Manual PCI PCI Express COMM Series User Manual Industrial Serial Communication Cards ...

Страница 2: ...er installation Advantech assumes no liability under the terms of this warranty as a consequence of such events Because of Advantech s high quality control standards and rigorous testing most of our customers never need to use our repair service If an Advantech product is defec tive it will be repaired or replaced at no charge during the warranty period For out of warranty repairs you will be bill...

Страница 3: ...reasonable protection against harmful interference when the equipment is operated in a commercial environment This equipment generates uses and can radiate radio frequency energy and if not installed and used in accordance with the instruction manual may cause harmful interference to radio communications Opera tion of this equipment in a residential area is likely to cause harmful interference in ...

Страница 4: ...ith the table please contact your dealer immediately Item XXXXXXXX Box XXXXXXXXX Warning Warnings indicate conditions which if not observed can cause personal injury Caution Cautions are included to help you avoid damaging hardware or losing data e g There is a danger of a new battery exploding if it is incorrectly installed Do not attempt to recharge force open or heat the battery Replace the bat...

Страница 5: ...ur any liquid into an opening This may cause fire or electrical shock 13 Never open the equipment For safety reasons the equipment should be opened only by qualified service personnel 14 If one of the following situations arises get the equipment checked by service personnel 15 The power cord or plug is damaged 16 Liquid has penetrated into the equipment 17 The equipment has been exposed to moistu...

Страница 6: ...ucts from damage To avoid electrical shock always disconnect the power from your PC chassis before you work on it Don t touch any components on the CPU card or other cards while the PC is on Disconnect power before making any configuration changes The sudden rush of power as you connect a jumper or install a card may damage sensitive elec tronic components ...

Страница 7: ...reen 15 Figure 2 10PCI 1622C Silk Screen 15 Figure 2 11PCIe 1620A B Silk Screen 16 Figure 2 12PCIe 1622A B Silk Screen 16 2 3 Jumper Settings 17 2 3 1 How to Set Jumpers 17 Figure 2 13How to Set Jumpers 17 2 3 2 Default Settings 17 Table 2 1 PCI 1601 1602 1612 1622 and PCIe 1622 Settings 17 Figure 2 14PCI 1603 Default Settings 18 2 3 3 Mode Selection by Jumper DIP Settings 18 Figure 2 15PCI 1612 S...

Страница 8: ...ar and Message Logo Area 37 4 5 1 Status Bar Messages 37 4 5 2 Message Logo Messages 38 Appendix 5 Pin Assignments and Wiring 39 5 1 Pin assignments 40 5 1 1 PCI 1601A B PCI 1602 40 Table 5 1 PCI 1601A B and PCI 1602 Male DB9 on bracket 40 5 1 2 PCI 1602UP 40 Table 5 2 PCI 1602UP Male DB9 on cable 40 Table 5 3 PCI 1602UP Female DB25 on bracket 41 5 1 3 PCI 1603 41 Table 5 4 PCI 1603 Male DB9 on br...

Страница 9: ...18 Terminal or PC DTE Connections 50 Table 5 19 Modem Connections 50 Table 5 20 Terminal without Handshake 51 5 2 2 RS 422 Signal Wiring 51 Table 5 21 RS 422 DB9 Pin Assignment 51 5 2 3 RS 485 Signal Wiring 52 Figure 5 1 RS 485 Wiring Topology 52 Appendix A Scale of Connectors 53 A 1 Connector Size Comparrison 54 Figure A 1 DB9 Male 54 Figure A 2 DB25 Female 54 Figure A 3 DB25 Male 55 Figure A 4 D...

Страница 10: ...PCI PCI Express Communication User Manual x ...

Страница 11: ...Chapter 1 1 Introduction ...

Страница 12: ... is stan dard designed to replace earlier PCI bus Thus PCI Express has numerous improve ments such as higher maximum system bus throughput less I O pin more detailed error detection and reporting mechanism and smaller physical footprint Although at the hardware level PCI slots and PCIe slots are not interchangeable at the software level PCI Express preserves compatibility with PCI device drivers a...

Страница 13: ...s specifications are compliant for IRQ All ports use the same IRQ assigned by PCI PCIe Plug and Play Data bits 5 6 7 8 Stop bits 1 1 5 2 Parity None Even Odd Mark and Space Speed bps Bus interface Models PCI bus specification 2 2 PCI 1601A B PCI 1602 PCI 1610A B PCI 1612A B PCI 1620A B PCI bus specification 2 2 PCI 1602UP PCI 1603 PCI 1604UP PCI 1610C PCI 1612C PCI 1622C PCI Express bus specificat...

Страница 14: ...CIe 1622B C 8 V V PCI Express PCIe 1620A B 8 V PCIe 1622A B 8 V V V 1 RS 232 TxD RxD RTS CTS DTR DSR DCD GND 2 RS 422 Tx Tx Rx Rx RTS RTS CTS CTS 3 RS 485 Data Data GND 4 Current loop Tx Tx Rx Rx TxD RxD Rx Rx RTS RTS CTS CTS GND RI for PCI 1603 PCI 1604UP PCI 1610A B C_RS 232 TxD RxD Rx Rx RTS RTS CTS CTS GND for PCI 1602UP_RS 422 Size Model 170 x 110 mm PCIe 1620A B PCIe 1622A B 185 x 100 mm PCI...

Страница 15: ...onous full duplex Baud rate 50 921 6 kbps Transmission Distance 1000 m Table 1 2 Power Consumption Model Typical Max PCI 1601A B 220 mA 5V 270 mA 5V PCI 1602 250 mA 5V 300 mA 5V PCI 1602UP 300 mA 5V PCI 1603 250 mA 5V 300 mA 5V PCI 1604UP 300 mA 5V PCI 1610A B 60 mA 12V 150 mA 5V 80 mA 12V 180 mA 5V PCI 1610C 750 mA 5V PCI 1612A B 270 mA 5V 338 mA 5V PCI 1612C 758 mA 5V 803 mA 5V PCI 1620A B 114mA...

Страница 16: ...Comm Card PCI 1610B 4 port RS 232 PCI Comm Card w Surge PCI 1610C 4 port RS 232 UPCI Comm Card w Surge Isolation PCI 1612A 4 port RS 232 422 485 PCI Comm Card PCI 1612B 4 port RS 232 422 485 PCI Comm Card w Surge PCI 1612C 4 port RS 232 422 485 PCI Comm Card w Surge Isolation PCI 1620A 8 port RS 232 PCI Comm Card PCI 1620B 8 port RS 232 PCI Comm Card w Surge PCI 1622B 8 port RS 422 485 PCI Comm Ca...

Страница 17: ...e Communication Cards Selection Guide Model Name Form Factor All are Universal architecture Ports Comm Interface Support Protection Surge Isolation PCI 1601 A 2 RS 422 485 B 1000VDC PCI 1602 2500VDC PCI 1602UP Low Profile Universal 1000VDC 2500VDC PCI 1603 RS 232 Current Loop 2500VDC PCI 1604UP Low Profile Universal RS 232 1000VDC 2500VDC PCI 1610 A 4 RS 232 B 1000VDC C 1000VDC 2500VDC PCI 1612 A ...

Страница 18: ...PCI PCI Express Communication User Manual 8 ...

Страница 19: ...Chapter 2 2 Hardware Configuration ...

Страница 20: ... shipping carton and packing material for further inspections by the carrier After inspection we will make arrangements to repair or replace the unit When you handle the communication card remove it from its protective packaging by grasping the rear metal panel Keep the anti vibration pack aging for further storage as the card was removed from the PC Warning Discharge your body s static electric c...

Страница 21: ...11PCI PCI Express Communication User Manual Chapter 2 Hardware Configuration 2 2 Jumper and Switch Locations Figure 2 1 PCI 1601A B Silk Screen Figure 2 2 PCI 1602 Silk Screen ...

Страница 22: ...PCI PCI Express Communication User Manual 12 Figure 2 3 PCI 1602UP Silk Screen Figure 2 4 PCI 1603 Silk Screen ...

Страница 23: ...13PCI PCI Express Communication User Manual Chapter 2 Hardware Configuration Figure 2 5 PCI 1604UP Silk Screen Figure 2 6 PCI 1610A B PCI 1612A B Silk Screen ...

Страница 24: ...PCI PCI Express Communication User Manual 14 Figure 2 7 PCI 1610 1612C Silk Screen Figure 2 8 PCI 1620A B Silk Screen ...

Страница 25: ...15PCI PCI Express Communication User Manual Chapter 2 Hardware Configuration Figure 2 9 PCI 1622B Silk Screen Figure 2 10 PCI 1622C Silk Screen ...

Страница 26: ...PCI PCI Express Communication User Manual 16 Figure 2 11 PCIe 1620A B Silk Screen Figure 2 12 PCIe 1622A B Silk Screen ...

Страница 27: ...you would connect either pins 1 and 2 or 2 and 3 You may find a pair of needle nose pliers useful for setting the jumpers If you have any doubts about the best hardware configuration for your application contact your local distributor or sales representative before you make any changes Figure 2 13 How to Set Jumpers 2 3 2 Default Settings The board is shipped with default settings If you need to c...

Страница 28: ...PCI 1603 Default Settings 2 3 3 Mode Selection by Jumper DIP Settings 2 3 3 1 RS 232 422 485 Selection for PCI 1612A B C RS 232 Selection compatible for PCI 1610A B C Should you wish to configure the PCI 1612A B C to operate in the RS 232 mode the bottom two pins of the 12 3 pin jumper should be connected For RS 422 RS 485 mode selection the upper two pins of the 12 3 pin jumper should be connecte...

Страница 29: ... can set each port individually for either RS 422 the default or RS 485 opera tion See section 2 2 Jumper and Switch Locations for help to locate the jumpers Figure 2 17 RS 422 485 Selection by Jumper Setting 2 3 3 4 PCI 1603 RS 232 Current loop Mode Selection For RS 232 mode operations the jumpers will be set as the default mode The jump ers on the 10 2 pin jumper must be set to A B C D and E Fig...

Страница 30: ...de Jumper Setting C and D are set to be passive Rx and F is set to be passive Tx Figure 2 21 Passive Mode Jumper Setting You may configure both Tx and Rx on one port to operate in the same mode or you can configure each Tx and Rx on one port to operate in different modes If you set PCI 1603 to the current loop mode plug the card to your device and turn on the device both LEDs Rx1 and Rx2 on top co...

Страница 31: ...ct a mode before beginning RS 422 applications 2 3 3 6 Terminator setup for PCI 1601 1602 1612 1622 You can install terminator resistors if necessary to match impedance Each signal line Tx Rx has a separate resistor Especially in fields with serious electric noise installing terminal resistors is helpful to stabilize communications Make sure that both sides of the RS 485 communication ports are in...

Страница 32: ...r will install PCI PCIe Communication card automatically see chapter 3 3 and 3 4 and 3 5 9 Test your COM port and verify if COM port could work normally see chapter 4 10 Refer to the pin assignment and cabling for further information see chapter 5 Note We strongly recommend that you install the software driver before you install the hardware into your system since this will guarantee a smooth and ...

Страница 33: ...Chapter 3 3 Driver Setup Installation ...

Страница 34: ...ting system such as multiprocess and multithread pure 32 bit Windows 2K XP Vista 7 and oth ers as afore indicated device drivers are provided for the PCI PCIe communication cards All these drivers conform to the Win32 COMM API standard 3 2 1 Steps for Operating System Driver Setup Before you install the card into your system we recommend you install the driver first Follow the steps below for the ...

Страница 35: ...ser Manual Chapter 3 Driver Setup Installation 3 After the setup program is launched you ll see the following Screen 4 Click the Continue button and the catalogue select page appears Then click the Installation button for installation ...

Страница 36: ...PCI PCI Express Communication User Manual 26 5 Choose the driver you want to install then click the hyperlink ...

Страница 37: ...apter 3 Driver Setup Installation 3 3 Driver Uninstall 1 Insert the ICOM DVD and click the driver you want to uninstall 2 Choose Modify radio button if you want to save another driver Or choose Remove radio button to remove all installed components ...

Страница 38: ...PCI PCI Express Communication User Manual 28 ...

Страница 39: ...Chapter 4 4 ICOM Tools ...

Страница 40: ...yperlink in the installation window to launch the ICOM Tools setup program The setup program will copy the program files to the destination folder you choose or to the default installation path i e C Program Files Advantech ICOM Tools A program folder will be created in your Start Pro grams menu Later you can just access the program through Start Program Advan tech PCI Comm Tools COM Examine Tool ...

Страница 41: ...ansmitted which are expected to appear on the receiving end Using the loopback mode you can check the integrity of received data and find whether any error occurred on the transmission line The active loopback and passive loopback must work in pair to enable the loop back mode When a port operates as active loopback mode it will send data first and Port Select Selects the port s you want to perfor...

Страница 42: ...ack This indicates that the RTS can no longer be toggled on off since it is controlled by driver itself 4 3 5 Message Logo On the Message Logo area you can see the relevant messages about the port s you have selected For information about specific messages in this area please refer to Section 4 5 Messages on the Status Bar and Message Logo area 4 3 6 Tx Slide Bar The Tx Slide Bar allows you to con...

Страница 43: ...33PCI PCI Express Communication User Manual Chapter 4 ICOM Tools ...

Страница 44: ...ection 4 5 Messages on the Status Bar and Message Logo area 4 4 4 4 Using the ICOM Tools Utility To launch the ICOM Tools testing utility access Start Programs Advantech PCI Comm Tools COM Examine Tools to start the port testing utility 4 4 1 4 4 1 Port Selection Follow the steps below to make your port selection 1 Launch ICOM Tools You will first see the Program Window such as Figure 4 1 Since yo...

Страница 45: ...lick the checkbox or double click the name s of the port s to select deselect port s to perform the test on The port s you selected will immediately appear in the Selected Port field Figure 4 3 Ports You Select Will Appear in the Selected Port Checkbox Group Click OK to bring up the ICOM Tools User Interface such as below Figure 4 4 Figure 4 4 ICOM Tools User Interface ...

Страница 46: ...t or for all ports After you have configured all the settings you want to change click OK to make this configura tion active Run the Test After you have completed the configuration of the port s you can now start the test on the port you have selected by clicking the Run button or accessing the Port Run menu command or you want to run all ports at once just click the All Ports Run button or access...

Страница 47: ...rt If you want to close a port just select the Com Port tab and click Port Close button or access Port Close menu command to close the port 4 4 4 Exit the ICOM Tools utility To exit the ICOM Tools utility simply access Port Exit menu command or click the Close button on the upper right corner of the program window 4 5 Messages on Status Bar and Message Logo Area Messages appearing on the Status Ba...

Страница 48: ... starting transmitting stop Rx Starting Rx Stopped Receiving starting receiving stop Break Error A break event has been detected on the port Framing Error A timing error i e from start bit to stop bit has been detected on the port Port I O Error An incorrect I O event has been detected on the port Rx Overrun Received data has been overwritten before being processed Rx Buffer Full Error The buffer ...

Страница 49: ...Chapter 5 5 Pin Assignments and Wiring ...

Страница 50: ...85 modes 5 1 2 PCI 1602UP The following tables and figures show the pin assignments of 1 female DB25 connec tor on the bracket to two male DB9 for PCI 1602UP card in RS 422 and RS 485 modes Table 5 1 PCI 1601A B and PCI 1602 Male DB9 on bracket Pin RS 422 RS 485 1 Tx Data 2 Tx Data 3 Rx 4 Rx 5 GND GND 6 RTS 7 RTS 8 CTS 9 CTS Table 5 2 PCI 1602UP Male DB9 on cable Pin RS 422 RS 485 1 Tx Data 2 Tx D...

Страница 51: ... loop modes Table 5 3 PCI 1602UP Female DB25 on bracket Pin RS 422 RS 485 Pin RS 422 RS 485 1 2_Tx 2_Data 14 2_RTS 2 2_Tx 2_Data 15 2_RTS 3 2_Rx 16 2_CTS 4 2_Rx 17 2_CTS 5 2_GND 2_GND 18 6 19 7 20 8 21 9 1_Tx 1_Data 22 1_RTS 10 1_Tx 1_Data 23 1_RTS 11 1_Rx 24 1_CTS 12 1_Rx 25 1_CTS 13 1_GND 1_GND Table 5 4 PCI 1603 Male DB9 on bracket Pin RS 232 Current Loop 1 DCD TxD 2 RxD TxD 3 TxD RxD 4 DTR RxD...

Страница 52: ...DB9 for PCI 1604UP card in RS 232 modes Table 5 5 PCI 1604UP Male DB9 on cable Pin RS 232 1 DCD 2 RxD 3 TxD 4 DTR 5 GND 6 DSR 7 RTS 8 CTS 9 RI Table 5 6 PCI 1604UP Female DB25 on bracket Pin RS 232 Pin RS 232 1 2_DCD 14 2_DSR 2 2_RxD 15 2_RTS 3 2_TxD 16 2_CTS 4 2_DTR 17 2_RI 5 GND 18 6 19 7 20 8 21 9 1_DCD 22 1_DSR 10 1_RxD 23 1_RTS 11 1_TxD 24 1_CTS 12 1_DTR 25 1_RI 13 GND ...

Страница 53: ...ow the pin assignments of 1 female DB37 connec tor on the bracket to male DB9 DB25 for PCI 1610A B C cards in RS 232 modes Table 5 7 PCI 1610A B C Male DB9 on cable Pin RS 232 1 DCD 2 RxD 3 TxD 4 DTR 5 GND 6 DSR 7 RTS 8 CTS 10 RI Table 5 8 PCI 1610A B C Male DB25 on cable Pin RS 232 2 TxD 3 RxD 4 RTS 5 CTS 6 DSR 7 GND 8 DCD 20 DTR 22 RI ...

Страница 54: ... 1 20 3_RI 2 3_DCD 21 3_DTR 3 3_GND 22 3_DSR 4 3_CTS 23 3_RTS 5 3_RxD 24 3_TxD 6 4_RI 25 4_DCD 7 4_DTR 26 4_GND 8 4_DSR 27 4_CTS 9 4_RTS 28 4_RxD 10 4_TxD 29 2_RI 11 2_DCD 30 2_DTR 12 2_GND 31 2_DSR 13 2_CTS 32 2_RTS 14 2_RxD 33 2_TxD 15 1_RI 34 1_DCD 16 1_DTR 35 1_GND 17 1_DSR 36 1_CTS 18 1_RTS 37 1_RxD 19 1_TxD ...

Страница 55: ... 232 RS 422 RS 485 1 DCD Tx Data 2 RxD Tx Data 3 TxD Rx 4 DTR Rx 5 GND GND GND 6 DSR RTS 7 RTS RTS 8 CTS CTS 10 RI CTS Table 5 11 PCI 1612A B C Male DB25 on cable Pin RS 232 Pin RS 232 Pin RS 232 1 1_TxD 16 1_CTS 31 1_DCD 2 1_RxD 17 1_DTR 32 1_RI 3 1_RTS 18 1_DSR 33 1_GND 4 19 34 5 1_TxD 20 2_CTS 35 2_DCD 6 2_RxD 21 2_DTR 36 2_RI 7 2_RTS 22 2_DSR 37 2_GND 8 23 38 9 3_TxD 24 3_CTS 39 3_DCD 10 3_RxD...

Страница 56: ...Data 24 3_TxD 3_RxD 6 4_RI 4_CTS 25 4_DCD 4_TxD 4_Data 7 4_DTR 4_RxD 26 4_GND 4_GND 4_GND 8 4_DSR 4_RTS 27 4_CTS 4_CTS 9 4_RTS 4_RTS 28 4_RxD 4_TxD 4_Data 10 4_TxD 4_RxD 29 2_RI 2_CTS 11 2_DCD 2_TxD 2_Data 30 2_DTR 2_RxD 12 2_GND 2_GND 2_GND 31 2_DSR 2_RTS 13 2_CTS 2_CTS 32 2_RTS 2_RTS 14 2_RxD 2_TxD 2_Data 33 2_TxD 2_RxD 15 1_RI 1_CTS 34 1_DCD 1_TxD 1_Data 16 1_DTR 1_RxD 35 1_GND 1_GND 1_GND 17 1...

Страница 57: ...35 6_RX 6_TX 6_D 5 2_DCD 2_TX 2_D 36 6_DSR 6 3_TX 3_RX 37 6_DCD 6_TX 6_D 7 3_DTR 3_RX 38 7_TX 7_RX 8 4_RX 4_TX 4_D 39 7_DTR 7 RX _ 9 4_DSR 40 GND GND GND 10 4_DCD 4_TX 4_D 41 8_TX 8_RX 11 5_RX 5_TX 5_D 42 8_DTR 8_RX 12 5_DSR 43 1_CTS 13 5_DCD 5_TX 5_D 44 1_RTS 14 6_TX 6_RX 45 GND GND GND 15 6_DTR 6_RX 46 2_CTS 16 7_RX 7_TX 7_D 47 2_RTS 17 7_DSR 48 3_CTS 18 7_DCD 7_TX 7_D 49 3_RTS 19 8_RX 8_TX 8_D ...

Страница 58: ...B C PCIe 1620A B and PCIe 1622A B Male DB9 on cable Pin RS 232 RS 422 RS 485 1 DCD TX D 2 RxD TX D 3 TxD RX 4 DTR RX 5 GND GND GND 6 DSR 7 RTS 8 CTS Table 5 15 PCI 1620A B C PCIe 1620A B and PCIe 1622A B Male DB25 on cable Pin RS 232 RS 422 RS 485 1 TX D 2 TxD TX D 3 RxD RX 4 RTS RX 5 CTS GND GND 6 DSR 7 GND 8 DCD 20 DTR Table 5 16 PCI 1622B C Male DB9 on cable Pin RS 422 RS 485 1 TxD Data 2 TxD D...

Страница 59: ...5_TxD 5_Data 11 4_RTS 50 4_TxD 4_Data 12 4_RTS 51 4_TxD 4_Data 13 52 3_GND 3_GND 14 3_RTS 53 3_TxD 3_Data 15 3_RTS 54 3_TxD 3_Data 16 2_RTS 55 2_TxD 2_Data 17 2_RTS 56 2_TxD 2_Data 18 57 1_GND 1_GND 19 1_RTS 58 1_TxD 1_Data 20 1_RTS 59 1_TxD 1_Data 21 8_CTS 60 8_RxD 22 8_CTS 61 8_RxD 23 7_CTS 62 7_RxD 24 7_CTS 63 7_RxD 25 64 6_GND 6_GND 26 6_CTS 65 6_RxD 27 6_CTS 66 6_RxD 28 5_CTS 67 5_RxD 29 5_CT...

Страница 60: ...the device being communicated with or controlled Examples include modems DSU s digital service units printers and lab factory equipment In some situations you may be able to get by with just three lines data on TXD a sig nal ground and a handshaking line Examples are printer or plotter connections trou bleshooting and situations where you require only one wire communication Table 5 18 Terminal or ...

Страница 61: ...an transmit and receive data simultaneously full duplex The connections are as follows Terminator Resistors Setup The signals DSR DTR and DCD are shorted internally on the PCI 1601 1602 1611 1612 1622 cards when operating in RS 422 mode A user can solder in termination resistors if necessary for impedance matching The card has two mounting spaces for termination resistors but no resistors are inst...

Страница 62: ... This means a user can build an RS 485 network with just two wires This RS 485 control is completely trans parent to the user The software written for half duplex RS 232 works without any modification Figure 5 1 RS 485 Wiring Topology Termination Resistor Setup You can install termination resistors if necessary for impedance matching The card has mounting spaces for termination resistors but no re...

Страница 63: ...Appendix A A Scale of Connectors ...

Страница 64: ...PCI PCI Express Communication User Manual 54 A 1 Connector Size Comparrison Figure A 1 DB9 Male Figure A 2 DB25 Female ...

Страница 65: ...55PCI PCI Express Communication User Manual Appendix A Scale of Connectors Figure A 3 DB25 Male Figure A 4 DB37 Female ...

Страница 66: ...PCI PCI Express Communication User Manual 56 Figure A 5 DB62 Female ...

Страница 67: ...57PCI PCI Express Communication User Manual Appendix A Scale of Connectors ...

Страница 68: ...ations are subject to change without notice No part of this publication may be reproduced in any form or by any means electronic photocopying recording or otherwise without prior written permis sion of the publisher All brand and product names are trademarks or registered trademarks of their respective companies Advantech Co Ltd 2014 ...

Отзывы: