Advantech FPM-8192V Скачать руководство пользователя страница 31

23

FPM-8192V/8232V User Manual

Chapter 3

O

perating

the
LCD
Display

3.7.3

PIP Control Item Menu

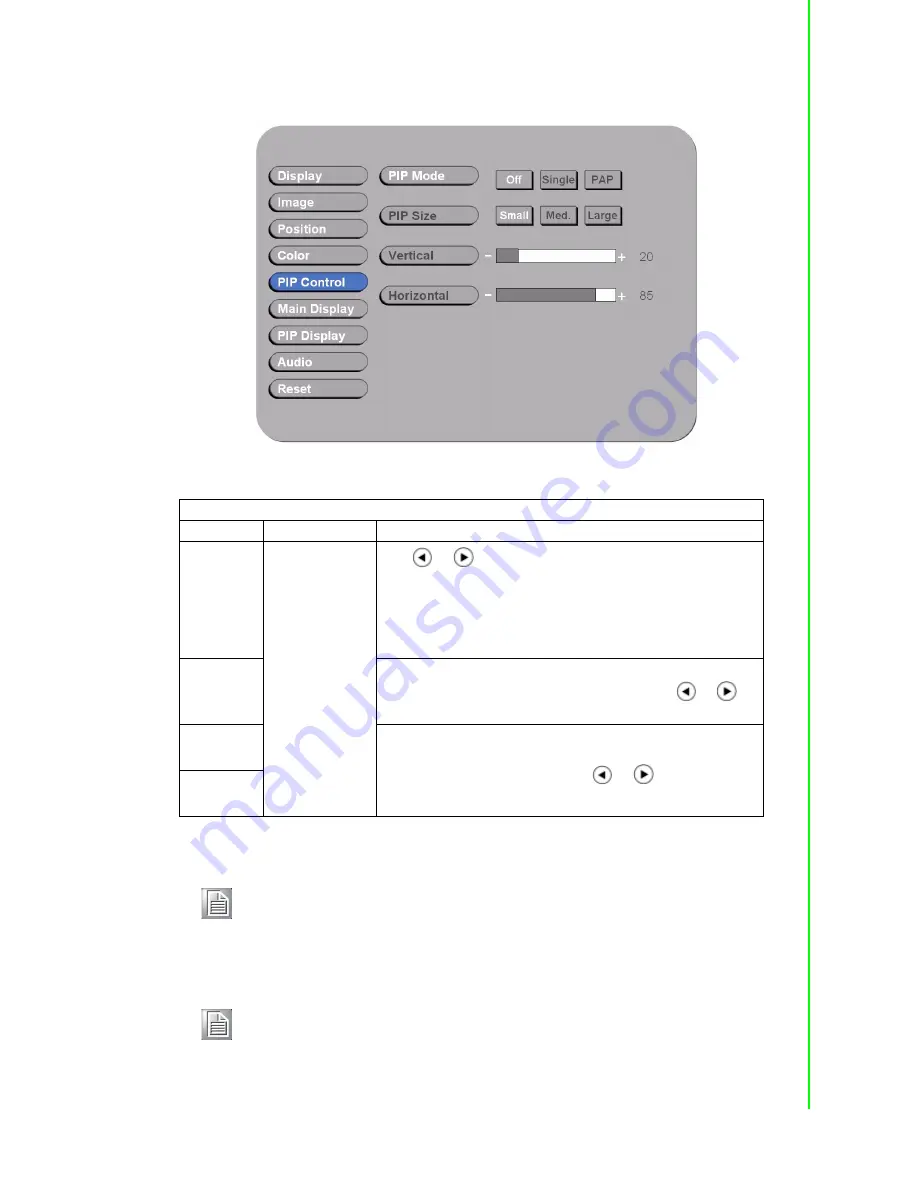
Figure 3.11 PIP Control Item Menu

PIP Control Item Menu
Menu

Input Source

Description and Usage

Mode

VGA 
DVI 
Composite S-
Video

Use “

” / “

” to change the Mode value to be 

Off, Single,


or

 PAP**

In 

Off 

mode, the Main display fills the entire screen. 

In 

Single

 mode, a PIP display floats over the screen. 

In 

PAP

 mode, the screen is divided into two side-by-side dis-

play areas.

Size

PIP Size can be altered only when

 Single PIP

 mode is 

selected. To configure the PIP display size, use “

” / “

” to 

change the value to 

Small, Medium 

or

 Large

.

Vertical**

Both vertical and horizontal PIP position can be altered only 
when Single PIP mode is selected. Configure the PIP Vertical 

and Horizontal Position, by using “

” / “

” to change the 

value using the slider bar. 

Horizontal

Note!

For PAP mode:
When selecting “PAP” mode, the display area is now divided into two 
parts. The left window displays the Main output, while the right window 
displays the PIP output. Each window is half size of the total display 
area. Each input is scaled down to fit the window. 

Note!

For PIP mode: 
Note that the PIP screen can have any position on the screen. This can 
be achieved by adjusting both Horizontal and Vertical positions. 

Содержание FPM-8192V

Страница 1: ...User Manual FPM 8192V 8232V 19 23 Marine Grade Monitors...

Страница 2: ...tion Advantech assumes no liability under the terms of this warranty as a consequence of such events Because of Advantech s high quality control standards and rigorous testing most of our customers ne...

Страница 3: ...case the user will be required to correct the interference at his own expense FCC Class B Note This equipment has been tested and found to comply with the limits for a Class B digital device pursuant...

Страница 4: ...to protect yourself from harm and the products from damage To avoid electrical shock always disconnect the power from your PC chassis before you work on it Don t touch any components on the CPU card...

Страница 5: ...liquid into an opening This may cause fire or electrical shock 13 Never open the equipment For safety reasons the equipment should be opened only by qualified service personnel 14 If one of the follow...

Страница 6: ...FPM 8192V 8232V User Manual vi...

Страница 7: ...Function 15 Figure 3 2 OSD Menu 16 3 6 Display Item Menu 17 Figure 3 3 Display Item Menu 17 3 7 Image Item Menu 18 Figure 3 4 Image Item Menu VGA 18 Figure 3 5 Image Item Menu DVI 18 Figure 3 6 Image...

Страница 8: ...tive Display Optional 35 E 1 Transflective Display 36 E 2 Features 36 E 3 Transflective Brightness Testing 37 E 3 1 Dark Room Testing Instructions 37 E 3 2 Environment Outdoor Readability Measure 38 E...

Страница 9: ...Chapter 1 1 General Information...

Страница 10: ...yper dimming technology that can control backlight brightness lin early from nearly 0 to 100 by a dimming knob In the night vision it s very suitable for marine applications Sunlight Readable Optional...

Страница 11: ...mechanical design and electronic component we can make it for you 1 1 2 Basic Construction of Marine Bridge System Display Figure 1 1 Basic Construction Approved Marine Displays Advantech s Marine Br...

Страница 12: ...th X and Y axis measurements The flexible coversheet acts only as a voltage measuring probe This means the touchscreen will continue working properly even with non uniformity in the cover sheet s cond...

Страница 13: ...pposite side gather and direct the waves to the receiving transducer which reconverts them into an electrical signal a digital map of the touchscreen surface When you touch the screen you absorb a por...

Страница 14: ...FPM 8192V 8232V User Manual 6...

Страница 15: ...Chapter 2 2 Installation...

Страница 16: ...wall mount ing etc For panel flush mounting is normally for a ship s wheelhouse use it s easy to follow few steps to fix the display product in customer s fixture Check the mechanical and mounting co...

Страница 17: ...ual Chapter 2 Installation 2 Use M4x 15mm bolts to drill through the fixture into the mounting holes on the rear side of IP65 front bezel The quantity of mounting screws based on draw ing 3 Check the...

Страница 18: ...FPM 8192V 8232V User Manual 10 Note VESA and wall mount with mounting kit by special request...

Страница 19: ...t Please make sure the right way to protect the knob 2 2 2 Cable Connection Precaution Make sure to use qualified shielded signal cable to connect to Marine products These cables including RGB DVI RS2...

Страница 20: ...FPM 8192V 8232V User Manual 12...

Страница 21: ...Chapter 3 3 Operating the LCD Display...

Страница 22: ...o adjusting color balance Figure 3 1 OSD User Controls The Dimming Knob The TFT LCD display support hyper dimming function to adjust brightness from nearly 0 to 100 via a easy to use VR knob Power On...

Страница 23: ...l 3 3 Auto Adjustment Function When OSD Menu and PIP is disabled press will perform the screen Auto Adjustment When PIP is enabled it switches the image in the Main Display to the PIP Display and vice...

Страница 24: ...t is very easy to select by the other navigation keys to adjust Following the direction as below 1 Press Up and Down to select each function 2 Press to enter the sub menu and press to exit 3 Press Up...

Страница 25: ...3 Display Item Menu Display Item Menu Menu Input Source Description and Usage Brightness VGA DVI Composite S Video Adjust brightness only used in brightness knob Adjustment is no response here Contras...

Страница 26: ...FPM 8192V 8232V User Manual 18 3 7 Image Item Menu Figure 3 4 Image Item Menu VGA Figure 3 5 Image Item Menu DVI...

Страница 27: ...Only Initiate this to have the monitor logic to choose the best settings for the current input signal Phase Adjust Phase to optimize the display quality by using to change the value Clock Select Clock...

Страница 28: ...de the input image is centered on the screen In Fill mode the input image is stretched compressed to fill the available display area 2 In Aspect mode the input image is stretched compressed by the sam...

Страница 29: ...Zoom Horizontal is unavailable until the user performs a Zoom In action Using to select either Left or Right to change the current Horizontal Pan setting Pan set tings will be lost at power down Zoom...

Страница 30: ...hen User Preset is selected the values of the Red Green and Blue sliders below are used to determine color set tings R Press to adjust the Red color to obtain the desired color settings G Press to adj...

Страница 31: ...configure the PIP display size use to change the value to Small Medium or Large Vertical Both vertical and horizontal PIP position can be altered only when Single PIP mode is selected Configure the P...

Страница 32: ...Main Display Item Menu Figure 3 12 Main Display Item Menu Press and to select the Main Display main source including VGA DVI Composite and S Video mode Press to choose Select 3 7 5 PIP Display Item Me...

Страница 33: ...nd Usage Volume VGA DVI Composite S Video To adjust the volume use to change the value of the slider bar to increase or decrease the volume Balance To configure the audio balance either left or right...

Страница 34: ...m Menu Menu Input Source Description and Usage Factory Reset VGA DVI Composite S Video To reset all settings to factory defaults open the Factory Reset Item Use to select the Yes option and press WARN...

Страница 35: ...Appendix A A Cleaning the Monitor...

Страница 36: ...o scratching Do not use ketone type material ex Ace tone Ethyl alcohol toluene ethyl acid or Methyl chloride to clear the panel It may permanently damage the panel and void the warranty 5 If it is sti...

Страница 37: ...Appendix B B Troubleshooting...

Страница 38: ...e appropriate position not at the minimum The screen is not synchronized Check if the signal cable is firmly seated in the socket Check if the output level matches the input level of your computer Mak...

Страница 39: ...Appendix C C Supported Modes...

Страница 40: ...VESA 10 800x600 75 VESA 11 1024x768 60 VESA 12 1024x768 70 VESA 13 1024x768 75 VESA 14 1280x768 60 15 1152x864 75 16 1280x960 60 VESA 17 1280x1024 60 VESA 18 1280x1024 60 HP 19 1280x1024 70 NCD 20 128...

Страница 41: ...Appendix D D RS 232 Command Code Optional...

Страница 42: ...EFT 0x04 0x12 0x05 0xE5 0x00 04 RIGHT 0x04 0x12 0x06 0xE4 0x00 05 ENTER 0x04 0x12 0x07 0xE3 0x00 06 EXIT 0x04 0x12 0x08 0xE2 0x00 07 SWAP 0x04 0x12 0x0A 0xE0 0x00 08 SOURCE 0x04 0x12 0x0E 0xDC 0x00 09...

Страница 43: ...Appendix E E Transflective Display Optional...

Страница 44: ...nditions 3 Ultimate indoor color saturation brightness and viewing angle 4 Full mechanical and electrical are compliant with the existent system 5 Power saving and backlight life preserving in outdoor...

Страница 45: ...e the brightness lamp level change it is necessary to wait for 30 minutes at least to ensure the brightness in the labs room in homoge neous or consistent 6 All testing are applied to naked LCD withou...

Страница 46: ...mbient light is too low we might not be able to see the clear LCD screen image In order to be sunlight readable both brightness and contrast ratio to the ambient light are needed to be in proper range...

Страница 47: ...ective LCD they have lower reflectance rate than traditional resistive and capacitive touchscreen that have coating on them Since our technology is based on transflective principle the glass or sensor...

Страница 48: ...tions are subject to change without notice No part of this publication may be reproduced in any form or by any means electronic photocopying recording or otherwise without prior written permis sion of...

Отзывы: