background image

13

DS-570 User Manual

Chapter 2

H

ardware

Installation

2.4

Hardware Installation

2.4.1

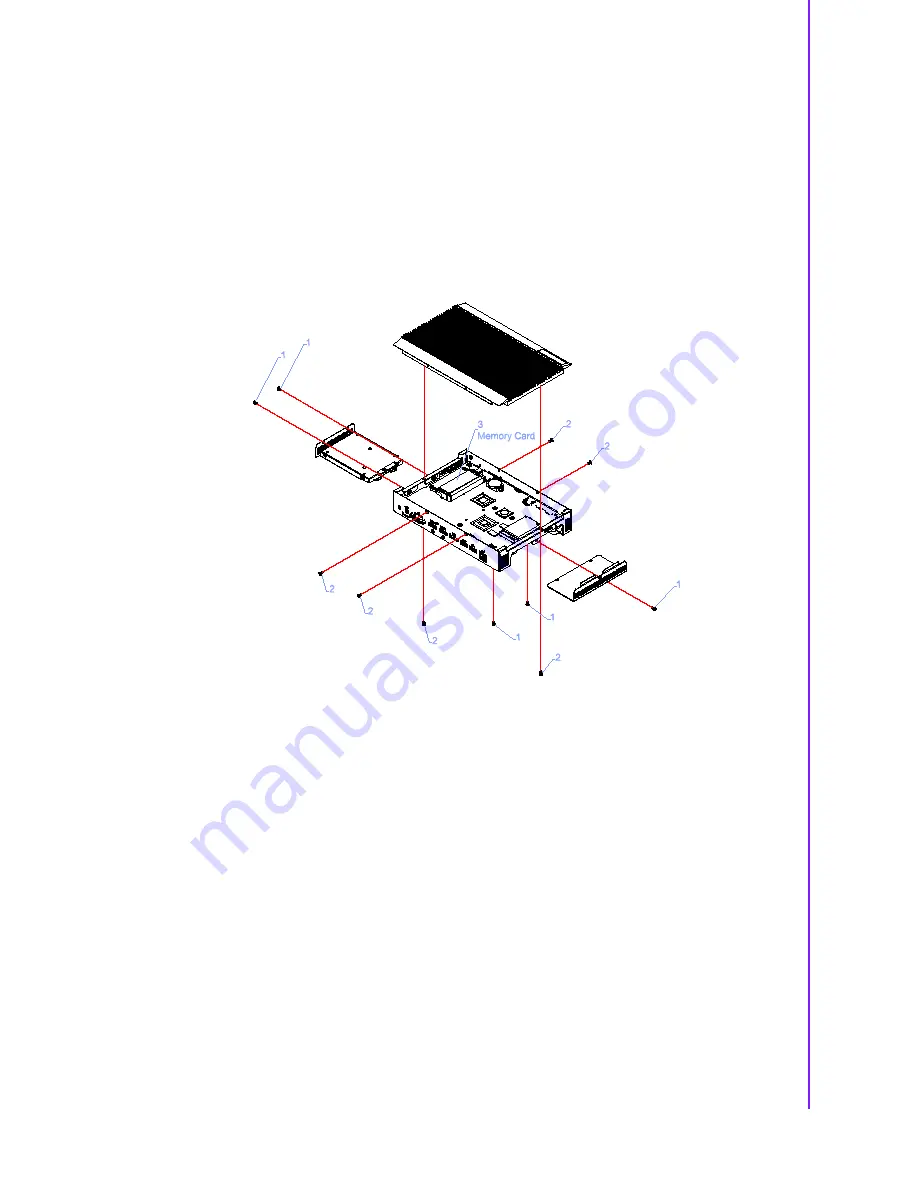
Memory Installation

1.

Remove the mini PCIe slot cover and HDD cover by loosening the five fixing 
screws.

2.

Remove the heatsink by loosening the four fixing screws on the front and rear 
panels, as well as the two fixing screws inside the chassis.

3.

Insert the memory module into the memory socket.

4.

Perform the above steps in reverse to reassemble the system.

Figure 2.14 Memory module installation

Содержание DS-570

Страница 1: ...User Manual DS 570 Graphics Enhanced Digital Signage Player Powered by NVIDIA GeForce GT730M...

Страница 2: ...the rights of third parties that may result from its use Acknowledgements Award is a trademark of Award Software International Inc IBM PC AT PS 2 and VGA are trademarks of International Business Machi...

Страница 3: ...ement materials service time and freight Please consult your dealer for more details If you suspect your product to be defective follow the steps listed below 1 Collect all information about the probl...

Страница 4: ...rating system version application software etc A complete description of the problem The exact wording of any error messages Warnings Cautions and Notes Warning Warnings indicate conditions which if n...

Страница 5: ...ensure that the following items have been shipped 1 x DS 570 unit 1 x accessory box containing the items listed below 1 x power adapter bracket set 2 x mount brackets 1 x warranty card 1 x power adap...

Страница 6: ...Never pour liquid into the openings This can cause fire or electrical shock 13 Never open the equipment For safety reasons the equipment should only be opened by qualified service personnel 14 If one...

Страница 7: ...ector Pin Assignments 7 2 2 4 COM Connector 8 Figure 2 6 COM connector 8 Table 2 3 COM Port Pin Assignments 8 2 2 5 Audio Connector 8 Figure 2 7 Audio connector 8 2 2 6 S PDIF Connector 8 Figure 2 8 S...

Страница 8: ...reen 21 Figure 3 5 S5 RTC wake setup screen 21 Figure 3 6 CPU configuration setup screen 22 Figure 3 7 IDE configuration setup screen 23 Figure 3 8 Miscellaneous Configuration setup screen 24 Figure 3...

Страница 9: ...Chapter 1 1 General Introduction This chapter gives background information regarding the DS 570 series...

Страница 10: ...system and application integration 1 2 Product Features 1 2 1 General Supports an Intel Celeron N2930 quad core 1 86 GHz onboard CPU CPU TDP up to 7 5 W or a Celeron J1900 quad core 2 0 GHz onboard CP...

Страница 11: ...Watchdog Timer Supported by Advantech SUSI API I O Interface 2 x RS 232 USB 1 x USB 3 0 and 3 x USB 2 0 compliant ports Audio Supports one audio jack default is mic in jack sense also supported and o...

Страница 12: ...ure 0 40 C 32 104 F 0 70 C 32 158 F with extended temperature RAM and SSD Relative Humidity 95 40 C non condensing Storage Temperature 20 70 C 4 167 F Vibration Loading During Operation 1 0 Grms IEC 6...

Страница 13: ...Chapter 2 2 Hardware Installation This chapter describes the DS 570 hardware installation process and external I O...

Страница 14: ...2 2 2 USB Connectors On the front of the DS 570 device are two USB 2 0 interface connectors that provide complete plug and play and hot swapping capabilities for up to 127 external devices The two USB...

Страница 15: ...0 100 1000 Base T CSMA CD standards The Ethernet port at the front supports a standard RJ 45 jack connector with LED indicators for denoting its active link and speed status Figure 2 5 LAN connector T...

Страница 16: ...ts mic in function Figure 2 7 Audio connector 2 2 6 S PDIF Connector The S PDIF port allows users to send digital audio to an amplifier or television and also supports jack sensing and line out functi...

Страница 17: ...s two HDMI connectors that provide all digital audio video interfaces for transmitting uncompressed audio video signals However only HDMI 1 supports high bandwidth digital content protection HDCP Thus...

Страница 18: ...or Table 2 5 HDMI Connector Pin Assignments Pin Signal Name 1 TMDS Data2 2 GND 3 TMDS Data2 4 TMDS Data1 5 GND 6 TMDS Data1 7 TMDS Data0 8 GND 9 TMDS Data0 10 TMDS Clock 11 GND 12 TMDS Clock 13 NC 14...

Страница 19: ...lthough a maximum resolution of 3840 x 2160p is supported the actual display resolutions depend on the monitor used Figure 2 12 DP connector Table 2 6 DP Connector Pin Assignments Pin Signal Name 1 ML...

Страница 20: ...ith USB UHCI specification Rev 2 0 and the USB 3 0 interface is compliant with USB UHCI specification Rev 3 0 All USB ports support plug and play installation which enables users to connect or disconn...

Страница 21: ...and HDD cover by loosening the five fixing screws 2 Remove the heatsink by loosening the four fixing screws on the front and rear panels as well as the two fixing screws inside the chassis 3 Insert th...

Страница 22: ...Installation 1 Attach the 2 5 inch SATA HDD to the HDD bracket by tightening the four fixing screws 2 Insert the HDD module into the system 3 Reassemble the HDD cover by tightening the two fixing scre...

Страница 23: ...e card into the card slot or insert a SIM card into the SIM card slot Note The SIM card slot is located under the mini PCIe card slot Do not mix them up 3 Reattach the mini PCIe slot cover by tighteni...

Страница 24: ...and HDD cover 2 Remove the heatsink by loosening the four fixing screws on the front and rear I O panels as well as the two fixing screws inside the chassis Then loosen the four fixing screws on the f...

Страница 25: ...Chapter 3 3 BIOS Settings This chapter explains the BIOS configuration process...

Страница 26: ...screen by selecting the Main tab The Main BIOS setup screen features two main frames All configurable options are displayed in the left frame The options presented in blue text can be configured wher...

Страница 27: ...he left frame such as CPU configuration and press Enter to access the submenu for that item Users can view the Advanced BIOS Setup options for any item by highlighting the item using the Arrow keys Al...

Страница 28: ...Control Enable disable ISCT WLAN power support ISCT WWAN Power Control Enable disable ISCT WWAN power support ISCT Sleep Duration Value Format The ISCT sleep duration value is presented in seconds the...

Страница 29: ...hapter 3 BIOS Settings ITE8528E HW Monitor Monitor hardware status PC health status Figure 3 4 HW monitoring screen S5 RTC Wake Settings Enable disable system wake from S5 using RTC alarm Figure 3 5 S...

Страница 30: ...t Console Redirection Enable disable Serial Port Console redirection CPU Configuration Allows users to adjust the CPU configuration Figure 3 6 CPU configuration setup screen PPM Configuration Enable d...

Страница 31: ...DE configuration setup screen Miscellaneous Configuration Enable disable miscellaneous features High Precision Timer Enable disable the high precision event timer PCI Express Dynamic Clock Gating Enab...

Страница 32: ...should be claimed by the XHCI driver EHCI Hand Off This is a workaround for OS without EHCI hand off support The EHCI own ership change should be claimed by the EHCI driver USB Mass Storage Driver Sup...

Страница 33: ...5 DS 570 User Manual Chapter 3 BIOS Settings Figure 3 9 USB Configuration setup screen Security Configuration Intel Anti Theft Technology configuration Figure 3 10 Intel TXE Configuration setup screen...

Страница 34: ...ngs XHCI Mode Enable disable the XHCI controller USB2 Link Power Management Enable disable USB2 link power management PCI Express Configuration PCI Express Configuration settings LAN1 Control Enable d...

Страница 35: ...Setup Select the Security tab in the DS 570 BIOS Setup Utility to enter the Security BIOS setup screen Figure 3 11 Security Configuration setup screen Administrator Password Allows users to set the a...

Страница 36: ...pt Timeout Allows users to specify the number of seconds to wait for a setup activation key 65535 0xFFFF means wait indefinitely Bootup NumLock State Allows users to select the keyboard NumLock state...

Страница 37: ...tup without saving changes Save Changes and Reset Reset the system after saving changes Discard Changes and Reset Reset the system without saving changes Save Changes Save all changes to the setup opt...

Страница 38: ...0 Allows users to launch the EFI Shell application Shell efi from an available file system device Reset System With ME Disable Mode MEUD000 ME will execute the temporary disable mode or ignore if ME i...

Страница 39: ...Chapter 4 4 Software This chapter explains the OS installation prompts...

Страница 40: ...are required to run TXE manufacturing tools in an EFI Shell or WinPE environment Regarding the Windows 7 OS The Intel TXEI driver uses KMDF WDF 1 11 which is built into Windows 8 and 8 1 How ever Wind...

Страница 41: ...33 DS 570 User Manual Chapter 4 Software...

Отзывы: