Advantech ARK-10 Скачать руководство пользователя страница 6

ARK-10 User Manual

vi

Safety Instructions

1.

Read these safety instructions carefully.

2.

Keep this User Manual for later reference.

3.

Disconnect this equipment from any AC outlet before cleaning. Use a damp 
cloth. Do not use liquid or spray detergents for cleaning.

4.

For plug-in equipment, the power outlet socket must be located near the equip-
ment and must be easily accessible.

5.

Keep this equipment away from humidity.

6.

Put this equipment on a reliable surface during installation. Dropping it or letting 
it fall may cause damage.

7.

The openings on the enclosure are for air convection. Protect the equipment 
from overheating. DO NOT COVER THE OPENINGS.

8.

Make sure the voltage of the power source is correct before connecting the 
equipment to the power outlet.

9.

Position the power cord so that people cannot step on it. Do not place anything 
over the power cord.

10.

All cautions and warnings on the equipment should be noted.

11.

If the equipment is not used for a long time, disconnect it from the power source 
to avoid damage by transient overvoltage.

12.

Never pour any liquid into an opening. This may cause fire or electrical shock.

13.

Never open the equipment. For safety reasons, the equipment should be 
opened only by qualified service personnel.

14.

If one of the following situations arises, get the equipment checked by service 
personnel:



The power cord or plug is damaged.



Liquid has penetrated into the equipment.



The equipment has been exposed to moisture.



The equipment does not work well, or you cannot get it to work according to 

the user's manual.



The equipment has been dropped and damaged.



The equipment has obvious signs of breakage.

15.

DO NOT LEAVE THIS EQUIPMENT IN AN ENVIRONMENT WHERE THE 
STORAGE TEMPERATURE MAY GO BELOW -20° C (-4° F) OR ABOVE 60° C 
(140° F). THIS COULD DAMAGE THE EQUIPMENT. THE EQUIPMENT 
SHOULD BE IN A CONTROLLED ENVIRONMENT.

16.

CAUTION: DANGER OF EXPLOSION IF BATTERY IS INCORRECTLY 
REPLACED. REPLACE ONLY WITH THE SAME OR EQUIVALENT TYPE 
RECOMMENDED BY THE MANUFACTURER, DISCARD USED BATTERIES 
ACCORDING TO THE MANUFACTURER'S INSTRUCTIONS.

17.

CAUTION: Any unverified component could cause unexpected damage. To 
ensure the correct installation, please always use the components (ex. screws) 
provided with the accessory box.
ATTENTION: Tout composant non vérifiée pourrait causer des dommages inat-
tendu. Pour garantir une installation correcte, s'il vous plaît utilisez toujours les 
composants (vis ex.) fournies avec la boîte d'accessoires.

18.

CAUTION: The computer is provided with a battery-powered real-time clock cir-
cuit. There is a danger of explosion if battery is incorrectly replaced. Replace 
only with same or equivalent type recommended by the manufacture. Discard 
used batteries according to the manufacturers instructions.
ATTENTION: L'ordinateur est muni d'un circuit en temps réel de l'horloge ali-
mentée par batterie. Il ya un danger d'explosion si la pile est remplacée de 

Содержание ARK-10

Страница 1: ...User Manual ARK 10 Fanless Embedded Box PC...

Страница 2: ...hard copy user manual in Chinese for China CCC certification purpOS and there is an English user manual included as a PDF file on the CD Please disregard the printed Chinese copy of the user manual if...

Страница 3: ...ational Inc VIA is a trademark of VIA Technologies Inc IBM PC AT PS 2 and VGA are trademarks of International Business Machines Cor poration Intel and Pentium are trademarks of Intel Corporation Micro...

Страница 4: ...ssages you get when the problem occurs 2 Call your dealer and describe the problem Please have your manual product and any helpful information readily available 3 If your product is diagnosed as defec...

Страница 5: ...ve the following information ready before you call Product name and serial number Description of your peripheral attachments Description of your software operating system version application software...

Страница 6: ...r cord or plug is damaged Liquid has penetrated into the equipment The equipment has been exposed to moisture The equipment does not work well or you cannot get it to work according to the user s manu...

Страница 7: ...e operator s position according to IEC 704 1 1982 is no more than 70 dB A DISCLAIMER This set of instructions is given according to IEC 704 1 Advantech disclaims all responsibility for the accuracy of...

Страница 8: ...ARK 10 User Manual viii...

Страница 9: ...O Connectors 8 2 3 1 Power ON OFF Button 8 Figure 2 2 Power ON OFF Button 8 2 3 2 Power Input Connector 8 Figure 2 3 Power Input Connector 8 2 3 3 Ethernet Connector LAN 8 Figure 2 4 Ethernet Connect...

Страница 10: ...ntering Setup 19 3 2 1 Main Setup 19 3 2 2 Advanced BIOS Features Setup 20 3 2 3 Chipset Configuration 33 3 2 4 Security 42 3 2 5 Boot 43 3 2 6 Save Exit 44 Appendix A WDT GPIO Sample Code 45 A 1 Watc...

Страница 11: ...Chapter 1 1 General Introduction This chapter gives background information on ARK 10...

Страница 12: ...ged unit and powered by an Intel Celeron J1900 QC 2 0GHz processor ARK 10 also supports both 2 5 SATA HDD mSATA and SSD for storage options even though it is a palm size system Besides ARK 10 is a low...

Страница 13: ...0 Mbps Intel I210 GbE support Wake on LAN 1 3 4 Power Consumption Power Input Single 12V Power Adapter AC to DC DC12 V 3 A 36 W with lockable design 1 3 5 Power Requirement System power Minimum power...

Страница 14: ...ARK 10 User Manual 4 1 5 Mechanical Specifications 1 5 1 ARK 10 Dimensions Figure 1 1 ARK 10 mechanical dimension drawing Unit mm...

Страница 15: ...Chapter 2 2 Hardware installation This chapter introduces external IO and the installation of ARK 10 Hardware...

Страница 16: ...r of needle nose pliers may be helpful when working with jumpers If you have any doubts about the best hardware configuration for your application contact your local distributor or sales representativ...

Страница 17: ...7 ARK 10 User Manual Chapter 2 Hardware installation 2 2 ARK 10 I O Indication Note VGA does not support hot plug function due to Intel s constraint Figure 2 1 ARK 10 I O view...

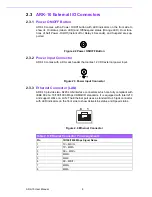
Страница 18: ...eader that carries 12 VDC external power input Figure 2 3 Power Input Connector 2 3 3 Ethernet Connector LAN ARK 10 provides two RJ45 LAN interface connectors which are fully compliant with IEEE 802 3...

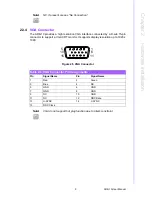
Страница 19: ...nitor It supports display resolution up to 1920 x 1080 Figure 2 5 VGA Connector Note NC if present means No Connection Table 2 4 VGA Connector Pin Assignments Pin Signal Name Pin Signal Name 1 Red 2 G...

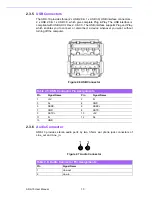
Страница 20: ...to connect or disconnect a device whenever you want without turning off the computer Figure 2 6 USB Connector 2 3 6 Audio Connector ARK 10 provides stereo audio ports by two 3 5mm ear phone jack conne...

Страница 21: ...COM Port Connector 2 3 8 HDD LED Indicator HDD LED indicator on ARK 10 front metal face plate for indicating system status HDD LED is for HDD flash disk status Table 2 7 COM Connector Pin Assignments...

Страница 22: ...ARK 10 User Manual 12 2 4 Peripheral Installation 2 4 1 HDD Installation 1 Unscrew the bottom cover screws marked with HDD 2 Remove the four snap rivets from the bottom cover...

Страница 23: ...13 ARK 10 User Manual Chapter 2 Hardware installation 3 Secure 2 5 SATA HDD onto the bottom cover 4 Connect SATA signal and power cable to the 2 5 SATA HDD...

Страница 24: ...e bottom cover in its original position 2 4 2 mSATA HD Installation For ARK 10 we suggest to install by CTOS due to complex installation with H S mSATA 2 4 3 RAM Installation 1 Unscrew the four screws...

Страница 25: ...15 ARK 10 User Manual Chapter 2 Hardware installation 2 Unscrew the four screws on the sides of ARK 10 3 Unscrew the four screws on the front rear face plate of ARK 10...

Страница 26: ...ARK 10 User Manual 16 4 Remove aluminum top chassis and install RAM Please note that ARK 10 can support DDR3L memory only 5 Replace the aluminum top chassis and secure all screws...

Страница 27: ...Chapter 3 3 BIOS Settings...

Страница 28: ...ARK 10 BIOS setup screens AMI s BIOS ROM has a built in Setup program that allows you to modify the basic system configuration This information is stored in flash ROM so it retains the setup informat...

Страница 29: ...e Main setup screen by selecting the Main tab There are two Main Setup options described in this section The Main BIOS Setup screen is shown below The Main BIOS setup screen has two main frames The le...

Страница 30: ...select any item in the left frame of the screen such as CPU Configuration to go to the sub menu for that item Users can display an Advanced BIOS Setup option by highlighting it using the Arrow keys A...

Страница 31: ...S ACPI auto configuration Enable Hibernation Enables or Disables System ability to Hibernate OS S4 Sleep State This option may be not effective with some OS ACPI Sleep State Select the highest ACPI sl...

Страница 32: ...ARK 10 User Manual 22 3 2 2 2 Super I O Configuration Serial Port 1 Configuration Set Parameters of Serial Port 1 COMA Serial Port 2 Configuration Set Parameters of Serial Port 2 COMB...

Страница 33: ...23 ARK 10 User Manual Chapter 3 BIOS Settings 3 2 2 3 H W Monitor Pc Health Status This page display all information about system Temperature Voltage...

Страница 34: ...S5 RTC Wake Settings Wake system with Fixed Time Enable or disable System wake on alarm event Select FixedTime system will wake on the hr min sec specified Select DynamicTime System will wake on the c...

Страница 35: ...Port Console Redirection Console Redirection This item allows users to enable or disable console redirection for Microsoft Windows Emergency Management Services EMS Console Redirection This item allow...

Страница 36: ...e Disable Bit XD can prevent certain classes of malicious buffer overflow attacks when com bined with a supporting OS Windows Server 2003 SP1 Windows XP SP2 SuSE Linux 9 2 RedHat Enterprise 3 Update 3...

Страница 37: ...hapter 3 BIOS Settings 3 2 2 7 PPM Configuration CPU C state Report Enable Disable CPU C state report to OS Max CPU C state This option controls Max C state that the processor will support S0ix Enable...

Страница 38: ...rial ATA SATA Enable Disable Serial ATA SATA Test Mode Test Mode Enable Disable SATA Speed Support SATA Speed Supports Gen1 or Gen2 SATA ODD Port SATA ODD is Port0 or Port1 SATA Mode Select IDE AHCI S...

Страница 39: ...29 ARK 10 User Manual Chapter 3 BIOS Settings 3 2 2 9 Miscellaneous Configuration OS Selection OS Selection to choose Windows 8 X Windows 7...

Страница 40: ...OM INT19 Trap Response BIOS reaction on INT19 trapping by Option ROM IMMEDIATE execute the trap right away POSTPONED execute the trap during legacy boot Boot option filter This option controls Legacy...

Страница 41: ...e should claim by XHCI driver EHCI Hand Off This is a workaround for OS without EHCI hand off support The EHCI owner ship change should claim by EHCI driver USB Mass Storage Driver Support This item a...

Страница 42: ...le the SMART self test function TXE TXE HMRFPO Disable TXE Firmware Update TXE EOP Message Send EOP Message Before Enter OS TXE Unconfiguration Perform Revert TXE settings to factory defaults Intel R...

Страница 43: ...33 ARK 10 User Manual Chapter 3 BIOS Settings 3 2 3 Chipset Configuration North Bridge Detail for North Bridge items South Bridge Detail for South Bridge items...

Страница 44: ...anual 34 3 2 3 1 North Bridge Intel IGD Configuration Config Intel IGD Settings Graphics Power Management Control Graphics Power Management Control Options LCD Control LCD Control Max TOLUD Maximum Va...

Страница 45: ...oost PAVC Enable Disable Protected Audio Video Control DVMT Pre Allocated Select DVMT 5 0 Pre Allocated Fixed Graphics Memory size used by the Internal Graphics Device DVMT Total Gfx Mem Select DVMT 5...

Страница 46: ...ARK 10 User Manual 36 3 2 3 3 Graphics Power Management Control RC6 Render Standby Check to enable render standby support...

Страница 47: ...rol Primary IGFX Boot Display Select the Video Device which will be activated during POST nThis has no effect if external graphics present nSecondary boot display selection will appear based on your s...

Страница 48: ...m allows you to select system restore states if AC power loss Azalia HD Audio Azalia HD Audio Options USB Configuration USB Configuration Settings PCI Express Configuration PCI Express Configuration s...

Страница 49: ...e protect 3 2 3 6 Azalia HD Audio Audio Controller Control Detection of the Azalia device Disabled Azalia will be unconditionally disabled Enabled Azalia will be unconditionally Enabled Auto Azalia wi...

Страница 50: ...Configuration XHCI Mode Mode of operation of xHCI controller USB2 Link Power Management Enable Disable USB2 Link Power Management USB 2 0 EHCI Support Control the USB EHCI USB 2 0 functions One EHCI...

Страница 51: ...nual Chapter 3 BIOS Settings 3 2 3 8 PCI Express Configuration PCI Express Port 0 Enable or Disable the PCI Express Port 0 in the Chipset Hot Plug Enable or disable PCI Express Hot Plug Speed Configur...

Страница 52: ...om the ARK 10 Setup main BIOS setup menu All Security Setup options such as password protection and virus protection are described in this section To access the sub menu for the following items select...

Страница 53: ...value of 65535 0xFFFF indicates that firm ware will wait for user input before booting This means the default boot selec tion is not automatically started by the firmware Bootup NumLock State Select...

Страница 54: ...o rest system setup without saving any changes Save Changes This item allows you to save changes done so far to any of the options Discard Changes This item allows you to discard changes done so far t...

Страница 55: ...Appendix A A WDT GPIO Sample Code...

Страница 56: ...ov al 00h out dx al model small 486p stack 256 data SCH3114_IO EQU A00h code org 100h STARTup 47H enable WDT function bit 0 0Ch mov dx SCH3114_IO 47h mov al 0Ch out dx al 65H bit 1 0 Reserved bit 6 2...

Страница 57: ...47 ARK 10 User Manual Appendix A WDT GPIO Sample Code 81 ARK 10 User Manual mov dx SCH3114_IO 68h mov al 01h out dx al exit END...

Страница 58: ...ARK 10 User Manual 48...

Страница 59: ...ions are subject to change without notice No part of this publication may be reproduced in any form or by any means electronic photocopying recording or otherwise without prior written permis sion of...

Отзывы: