Advance acoustic 9087331020 Скачать руководство пользователя страница 20

ENGLISH

INSTRUCTION FOR USE

18

SC450 - 9099602000

MAINTENANCE

The lifespan of the machine and its maximum operating safety are ensured by correct and regular maintenance. The following chart 

provides the scheduled maintenance. The intervals shown may vary according to particular working conditions, which are to be 

defined by the person in charge of the maintenance.

WARNING!

Maintenance procedures must be performed with the machine switched off and the batteries/battery charger 

cable disconnected.

Moreover, carefully read the instructions in the Safety chapter.

All scheduled or extraordinary maintenance procedures must be performed by qualified personnel, or by an authorised Service 

Center.

This Manual describes only the easier and most common maintenance procedures.

For other maintenance procedures shown in the Scheduled Maintenance Table, refer to the Service Manual that can be consulted 

at any Service Center.

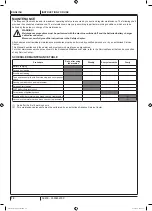
SCHEDULED MAINTENANCE TABLE

Procedure

Daily, after using 

the machine

Weekly

Every six months

Yearly

Battery charging
Squeegee cleaning
Brush/pad cleaning

Tank and vacuum grid with float cleaning, and cover gasket 

check
Squeegee blade check and replacement

Solution filter cleaning
WET battery fluid level check

Screw and nut tightening check

(1)

Brush/pad-holder motor carbon brush check or replacement

(2)

Vacuum system motor carbon brush check or replacement

(2)

(1) 

And after the first 8 working hours.

(2)  This maintenance procedure must be performed by an authorised Advance Service Center.

9099602000(1)08-2012.indb   18

27-Jul-12   14:45:16

Содержание 9087331020

Страница 1: ...TRUCTION FOR USE INSTRUCTIONS D UTILISATION INSTRUCCIONES DE USO INSTRU ES DE USO Advance model 9087331020 ENGLISH FRAN AIS ESPA OL PORTUGU S 9099602000 1 2012 08 9099602000 1 08 2012 indb 1 27 Jul 12...

Страница 2: ...9099602000 1 08 2012 indb 2 27 Jul 12 14 45 08...

Страница 3: ...HNICAL DATA 9 WIRING DIAGRAM 10 USE 11 BATTERY CHECK SETTING ON A NEW MACHINE 11 BATTERY INSTALLATION AND BATTERY TYPE SETTING WET OR GEL AGM 12 BEFORE MACHINE START UP 13 MACHINE START AND STOP 14 MA...

Страница 4: ...e damage to it IDENTIFICATION DATA The machine model and serial number are marked on the plate 29 Product code and year of production are marked on the same plate This information is useful when requi...

Страница 5: ...ocuments Scrubber dryer Instruction for use Manual Battery Charger Manual Scrubber dryer Spare Parts List No 2 lamellar fuses SAFETY The following symbols indicate potentially dangerous situations Alw...

Страница 6: ...ks flames and smoking materials away from the batteries During the normal operation explosive gases are released When using lead WET batteries battery charging produces highly explosive hydrogen gas D...

Страница 7: ...ge temperature must be between 0 C and 40 C The humidity must be between 30 and 95 When using floor cleaning detergents follow the instructions on the labels of the detergent bottles To handle floor c...

Страница 8: ...k cover half open 19 Recovery tank cover completely opened 20 Can holder 21 Squeegee 22 Squeegee mounting handwheels 23 Squeegee balance adjusting handwheel 24 Machine straight forward movement adjust...

Страница 9: ...9099602000 SC450 7 MACHINE STRUCTURE Continues 9 9 1 20 2 15 16 17 3 4 5 7 8 10 12 11 18 19 26 27 28 24 25 35 34 13 14 36 12 38 37 39 33 30 31 40 32 21 22 22 23 6 29 12V 12V P100658 9099602000 1 08 20...

Страница 10: ...abling push button 48 Electronic battery charger 49 Lead WET or gel GEL battery selector 50 Green warning light the battery charger is on and batteries are charged 51 Yellow warning light the battery...

Страница 11: ...diameter 10 in 254 mm Wheel specific pressure on the floor 710 psi 4 9 N mm2 Brush motor power 0 64 hp 480 W Brush speed 154 rpm Brush pad pressure on the floor with full tank and lowered squeegee 66...

Страница 12: ...Vacuum system motor relay EV1 Solution solenoid valve F1 Brush motor fuse 40 A F2 Vacuum system motor fuse 30 A F3 Solenoid valve and electronic board fuse 5 A M1 Brush pad holder motor M2 Vacuum syst...

Страница 13: ...nd the battery charger plug Handle the batteries with great care Install the battery terminal protection caps supplied with the machine The machine requires two 12 V batteries connected according to t...

Страница 14: ...panel B 5 Turn the microswitch D to WET position WARNING Do not move set the adjacent switch E 6 Perform steps 3 4 and 5 in the reverse order Battery charger setting for machines with on board battery...

Страница 15: ...sh pad holder to the deck hub 13 If necessary repeat the procedure until the brush pad holder is engaged Front A B C Figure 3 P100663 Available brushes and their relevant application guides suggestion...

Страница 16: ...o the type of cleaning to be performed ECO system when the lever 36 is turned to ECO position 37 the machine works in a special condition of programmed water economy usage as the water flow is set and...

Страница 17: ...eously To start scrubbing again after a brush pad holder stop due to overload stop the machine by turning the brush pad holder switch and the vacuum system switch 41 and 42 to 0 Turn on the machine by...

Страница 18: ...n open the cover 17 and check that the float inside the grid 30 has gone down to the water level Then close the cover 17 and turn on the vacuum system by pressing the switch 42 When the recovery tank...

Страница 19: ...t 6 Disconnect the vacuum hose C from the tank 7 Disconnect the hose D from the tank vacuum grid 8 Remove the drain hose E through the slit then remove the tank A A B B E C D Figure 5 P100665 9 Instal...

Страница 20: ...d Service Center This Manual describes only the easier and most common maintenance procedures For other maintenance procedures shown in the Scheduled Maintenance Table refer to the Service Manual that...

Отзывы: