ADT DVR1604HF-U-E Скачать руководство пользователя страница 52

Hybrid Standalone DVR User Guide 

3  Menu Operations  


3.4


Setting 

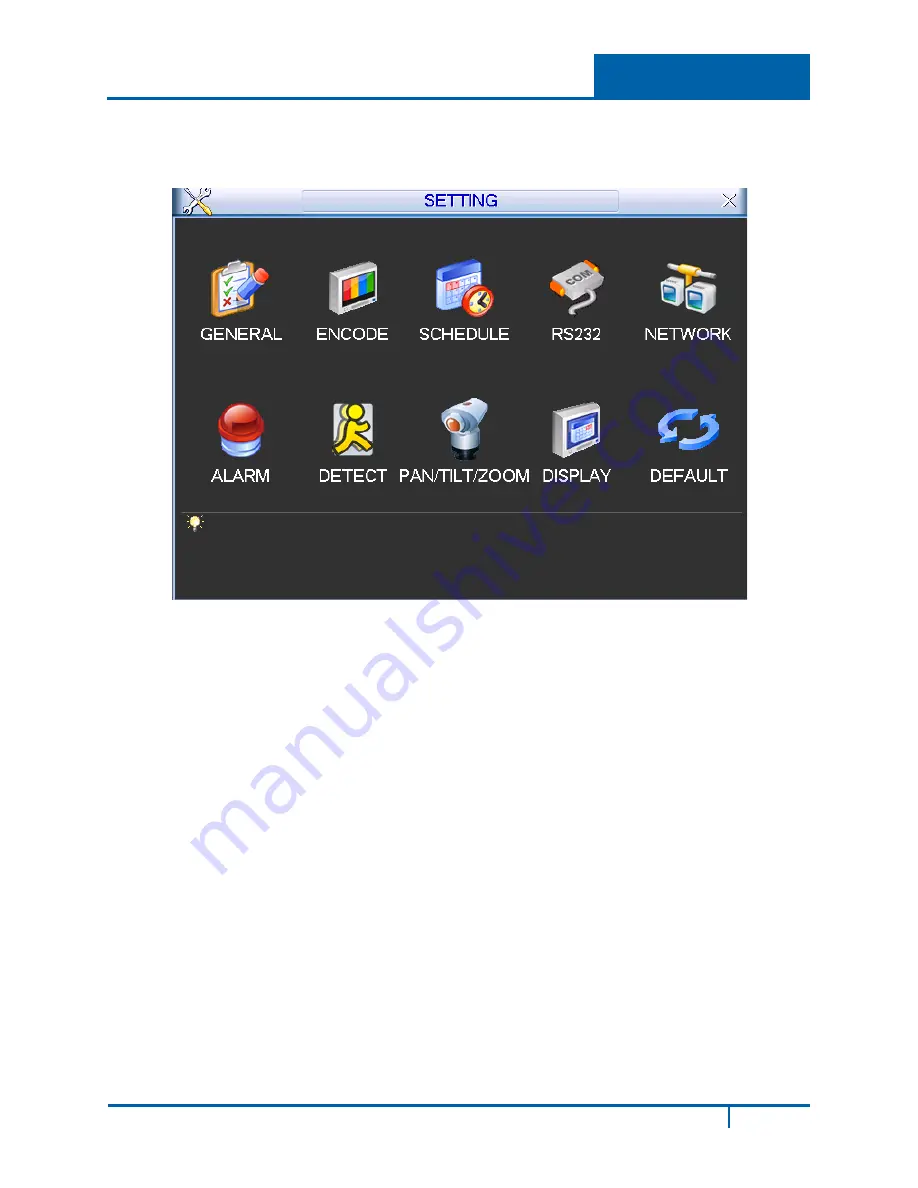
In the Main Menu, click the 

Setting

 icon. The Setting screen opens. 


Figure 3-14 

3.4.1


General  

General setting includes the following items. See Figure 3-15. After completing all settings, click the 

OK

 button. The system reverts to the previous menu. 


DVR1604HF-U-E Hybrid DVR User Guide 

52 


Содержание DVR1604HF-U-E

Страница 1: ...ADT DVR1604HF U E Hybrid Digital Video Recorder User Guide...

Страница 2: ...ignificant information that warrants more than ordinary consideration but not essential to system security CAUTION Cautions draw your attention to actions that could compromise the security of your sy...

Страница 3: ...nd Logout 19 2 2 Virtual Keyboard 21 2 3 Right click Menu 22 2 3 1 Startup Sequence 22 2 3 2 Logout Shutdown 22 2 4 Preview Live Viewing 23 2 5 Search and Playback 26 2 5 1 Other Functions 29 2 5 2 Sm...

Страница 4: ...evice 120 3 6 Advanced 122 3 6 1 HDD Management 122 3 6 2 Abnormality 127 3 6 3 Alarm Output 128 3 6 4 Recording 128 3 6 5 Account 132 3 6 6 Auto Maintenance 135 3 6 7 TV Adjust 136 3 6 8 Video Matrix...

Страница 5: ...Information 232 4 6 8 Remote Device 234 4 7 Logout 236 4 8 Un install Web Service 236 Appendix A Troubleshooting and Daily Maintenance 237 Appendix B Specifications 242 Appendix C Compatible Backup De...

Страница 6: ...h are not allowed during transportation storage and installation Installation Keep upright Handle with care Do not apply power to the NVR before completing the installation Do not place objects on top...

Страница 7: ...s functions such as record playback and live monitor and can guarantee audio and video synchronization The Hybrid Standalone DVR features advanced technology and robust network data transmission funct...

Страница 8: ...Window Split o Adopts the video compression and digital process to display several windows on one monitor o Supports Up to 8 16 20 24 32 channels with 1080p real time live view Network Operation o Sup...

Страница 9: ...l to initiate frame by frame playback Not available in all models 3 Fast Play Press to toggle between normal playback and various fast play speeds Slow Play Press to toggle between normal playback and...

Страница 10: ...s between HDD recordings and other information Menu prompt Enter Enter Use to confirm the current operation return to the default button or select a menu item Rec Record Press to manually start stop r...

Страница 11: ...channels 1 4 9 DB25 audio input port channels 5 16 10 Audio output 11 Bidirectional talk input port 12 Bidirectional talk output port 13 Alarm input alarm output RS485 port for detail see page 12 14...

Страница 12: ...5 normally closed on off switch 7 T T R R Four wire double duplex RS485 port T T output wire R R input wire 8 A B 485 communication port controls the PTZ decoder 1 3 2 Alarm Input Port Connect in para...

Страница 13: ...ting resistance load Rated switch capacity 30VDC 2A 125VAC 1A Maximum switch power 125VA 160W Maximum switch voltage 250VAC 220VDC Maximum switch currency 1A Insulation Between touches with same polar...

Страница 14: ...RS485 A B input on the DVR Since RS485 is disabled by default for each camera you must enable the PTZ settings first The Hybrid DVR supports multiple protocols such as Pelco D and Pelco P To connect P...

Страница 15: ...1 DVR Overview 1 5 Connection Sample Figure 1 6 DVR1604HF U E Hybrid DVR User Guide 15...

Страница 16: ...VR and the audio is received at the earphone or speaker connected to the PC Figure 1 7 1 6 2 PC to the DVR Device Connection Connect the microphone or the pickup to the audio output port on the PC Con...

Страница 17: ...1 DVR Overview 1 7 Remote Control The remote control interface is shown as in Figure 1 9 Figure 1 9 DVR1604HF U E Hybrid DVR User Guide 17...

Страница 18: ...eys to select the recording channel 11 Direction Keys Press to move the selection in the currently active control left right up or own During playback click to control the playback bar 12 Enter Enter...

Страница 19: ...n page 41 2 1 Login Start up and Logout 1 Press the Power button on the front panel After the system has booted up the Startup Wizard appears on the display monitor to have you set up some basic syste...

Страница 20: ...er case virtual keyboards you do not need to change keyboards to make numeric entries 4 Select the desired alpha numeric character It turns green and enters the Password field 5 Repeat until all chara...

Страница 21: ...in account lock 2 2 Virtual Keyboard The system displays three input modes upper case and lower case alpha characters and numeric Switch between modes by clicking the button to the right of the field...

Страница 22: ...ibed on page 64 Remote as described on page 120 Schedule as described on page 59 1 For each option click Next Step to move to the next dialog or Pre Step to return to the previous 2 After completing t...

Страница 23: ...eral Settings Menu Main Menu Setting General To modify the channel name go to the Display settings Main Menu Setting Display Note You can return to live viewing from any other mode by right clicking t...

Страница 24: ...nnel displays and the free channel is shown with Once the backup started the free channel is shown with the icon 4 Remote device Click to open the remote device connection interface Refer to Shortcut...

Страница 25: ...t and then click the Add button The current front end device is added to the digital channel Double click a device in the list to add it or click the Manual Add button and enter the remote device info...

Страница 26: ...pports 1 4 9 and16 window playback 2 Search type Select the desired file a Highlight the for the file type REC for recording or PIC for picture b Use the drop down menu to select the source You can se...

Страница 27: ...ick in the time field and manually enter a time frame Click the Search button to initiate an accurate search Lock File Click the file you want to lock and click to lock The file you lock cannot be ove...

Страница 28: ...playback mode click this button to incrementally speed up the playback speed Note The actual play speed depends on the software version Click to initiate motion detection Smart Search See section 2 5...

Страница 29: ...contents in a new file Note The system supports a maximum of1024 backup files at the same time You cannot operate clip operation if any file has been checked in the file list 13 Recording type In any...

Страница 30: ...re you want to search for motion activity See Figure 2 10 There is no motion detection zone by default you must select one Figure 2 10 3 Click the button to initiate Smart Search playback The DVR will...

Страница 31: ...ace appears 3 Input the time for which you would like to search records in the top right corner 4 Click the Search button All records collected from the entered time up to the current time appear 5 Cl...

Страница 32: ...9 on page26 When you are playback mode you can mark a recording when there is important information you would like to note After the playback you can use the time or the marked key word s to search f...

Страница 33: ...Figure 2 13 Figure 2 13 To modify a Mark Name 1 Double click the marked item 2 Change the Mark Name in the resulting dialog box To delete a record 1 Click inside the box to the left of the marked ite...

Страница 34: ...the previous menu Figure 2 14 5 Use one of these two methods to playback or search in the redundant disk Set the redundant disc s as read only or read write Main Menu Advanced HDD Manage See Figure 2...

Страница 35: ...tton You can view the device name and total free space available for each backup device that is connected 3 Select the device you want to backup 4 Click the Backup button The following screen appears...

Страница 36: ...Picture backup Set the corresponding time channel and then select PIC from the dropdown list See Figure 2 17 Click the Add button and then select the pictures Click the Start button to copy the specif...

Страница 37: ...l or when triggered by a pre determined event 2 7 1 Schedule Snapshot 1 In the Encode screen click the Snapshot button to input snapshot mode size quality and frequency Figure 2 18 2 In the FTP screen...

Страница 38: ...cking the Snapshot checkbox Figure 2 20 2 7 2 Activation Snapshot This function triggers a snapshot when the corresponding alarm occurs 1 In the Encode screen click Snapshot to input snapshot mode siz...

Страница 39: ...pecify the channels for which snapshots are to be taken Figure 2 23 Note An Activation Snapshot has higher priority than a Schedule Snapshot If both types are enabled at the same time the system will...

Страница 40: ...FTP function and double click it to open the dialog 4 On the FTP screen set the FTP server information See Figure 2 24 5 Click the OK button 6 Boot up the corresponding FTP server 7 Enable Schedule Sn...

Страница 41: ...Hybrid Standalone DVR User Guide 3 Menu Operations 3 Menu Operations 3 1 Menu Tree The Hybrid DVR menu tree is shown below DVR1604HF U E Hybrid DVR User Guide 41...

Страница 42: ...mote Device Advanced Backup and Shutdown Click an icon to enter the corresponding sub menu Figure 3 1 3 3 Information Info Click the Info icon on the Main Menu to view system information There are sev...

Страница 43: ...DD is working normally X HDD error No HDD detected HDD is damaged and must be replaced When an HDD conflict occurs you can check whether the system time and HDD time are the same If they are not ident...

Страница 44: ...he conflict TIP Click the Fn button on the front panel or left mouse click to view HDD record time and HDD type and time Double click an item in the list to display the HDD Smart information screen fo...

Страница 45: ...he system displays a maximum of 100 logs in one page and can save a maximum of 1024 log files Use the page up down button in the dialog or on the front panel to view more Backup Select the log files y...

Страница 46: ...rmation etc You can also update system here See Figure 3 8 Click the Version icon on the Info screen see Figure 3 2 on page 43 to open the screen To initiate an update insert the USB device that has t...

Страница 47: ...t one user or block one user if you have proper system rights The maximum disconnection setup time is 65535 seconds Click the Online Users icon on the Info screen see Figure 3 2 on page 43 to open the...

Страница 48: ...tus tab Here you can view the IPC status of the corresponding channel which includes motion detection video loss camera masking and alarm IPC status Remote device not supported by front end Remote dev...

Страница 49: ...nnel both online and offline Select a channel from the dropdown list and then set the start time and end time Click the Search button to view the remote connection log of the current channel You can s...

Страница 50: ...K bad no connection etc Network Sniffer Backup 1 Insert a USB2 0 device and click Refresh View the device in the following column 2 Use the dropdown list to select the peripheral device 3 Click the Br...

Страница 51: ...to open the packets on the PC to solve complicated problems 3 3 7 2 Network Load Click the Network Load tab to view the follow statistics of the device network adapter Here you can view information of...

Страница 52: ...in Menu click the Setting icon The Setting screen opens Figure 3 14 3 4 1 General General setting includes the following items See Figure 3 15 After completing all settings click the OK button The sys...

Страница 53: ...ine and solidus DST This section is for setting DST time and date Enable the DST function and then click the Set button The DST dialog opens as shown in Figure 3 16 Here you can set start time and end...

Страница 54: ...rrent HDD is full while the next HDD is not empty then the system stops recording If the current HDD is full and the next HDD is not empty then the system overwrites the previous files Pack Duration T...

Страница 55: ...ystem Login dialog Mouse Property Click the Mouse Property Setup button to open the Mouse Setup dialog Set the Double click Speed by dragging the slider Click the Default button to restore the default...

Страница 56: ...unless necessary Stop the record operation before making a time modification 3 4 2 Encode Video compression settings are made in the Encode dialog Options include the following items See Figure 3 20...

Страница 57: ...tor screen Figure 3 21 Cover Area Privacy Mask This section is for setting the Privacy Mask In the dialog use your mouse to set the desired mask size and location In single channel video mode the syst...

Страница 58: ...equency Set the timing schedule snapshot interval The value ranges from 1 7 picture s per second Copy After you complete the setup you can click Copy button to copy the current setup to other channel...

Страница 59: ...type and time in the Schedule screen 3 4 3 1 Schedule Menu In the Main Menu click the Setting button and then select Schedule The Schedule menu appears Highlight the box to select the desired function...

Страница 60: ...is function is not available if there is only one HDD Snapshot When selected a snapshot photo is created at the scheduled interval For instructions on how to set up this function see section 2 7 1 Sch...

Страница 61: ...at the scheduled interval click the Snapshot box For instructions on how to set up this function see section 2 7 1 Schedule Snapshot on page 37 To set a recording schedule for Holidays Note You must...

Страница 62: ...h you want to paste settings channels 5 6 and 7 in the figure The current channel name is grayed out channel 1 in the figure 3 To apply the current channel settings to all channels click the All box T...

Страница 63: ...tly Protocol COM is for the Text Overlay function Net Keyboard is for using the network keyboard to control the device PTZ Matrix for connecting to the peripheral matrix control Baud Rate Select the p...

Страница 64: ...3 4 5 Network This section is for inputting the network information The single network adapter dialog is shown in Figure 3 28 and the dual network adapter dialog is shown in Figure 3 29 Figure 3 28 F...

Страница 65: ...lt gateway The IP address and the Default Gateway must be in the same IP section That is to say the specified length of the subnet prefix must have the same string DHCP This section is for auto search...

Страница 66: ...DNS Server DNS server alternate address Transfer Mode Select the priority between fluency video qualities LAN Download The system can process the downloaded data first if you enable this function The...

Страница 67: ...s must be in the same LAN After completing the setup click the Save button The system returns to the previous menu 3 4 5 1 Network Setting The Network Setting dialog is shown in Figure 3 30 Check the...

Страница 68: ...te function and blocked sites function You cannot see these two modes if the Enable button is grayed out Type You can select trusted site and blacklist from the dropdown list You can view the IP addre...

Страница 69: ...oes not exist Delete Click to remove the specified item Edit Click to edit the start address and end address See Figure 3 32 The system checks the IP address validity after the edit operation Figure 3...

Страница 70: ...nutes maximum value is 65535 Time zone Select your corresponding time zone here Manual update Enables you to synchronize the time with the server manually Following is a reference table for time zone...

Страница 71: ...group address o 224 0 0 0 239 255 255 255 o D address space The higher four bit of the first byte 1110 Reserved local multicast group address o 224 0 0 0 224 0 0 255 o TTL 1 When sending out telegraph...

Страница 72: ...tically The IP in the PPPoE is the DVR dynamic value You can access this IP to access the unit Figure 3 35 3 4 5 6 DDNS Setup The DDNS setup dialog appears below in Figure 3 36 Requirements You must h...

Страница 73: ...red domain name Besides the general DDNS the Quick DDNS works with the device from the manufacturer so that it can add the extension function 2 Function Introduction The quick DDNS client has the same...

Страница 74: ...name to login instead of the device IP The user name is optional you can input your commonly used email address IMPORTANT Do not register frequently The interval between two registrations must be mor...

Страница 75: ...Protocol type Internal Port Port that has been mapped in the router External Port Port that has been mapped locally Default Click to restore the UPNP default port setting of the HTTP TCP and UDP Add...

Страница 76: ...connection status in the Network Setting interface If there is a connection you can view the current connection status and the IP address Figure 3 39 To change WIFI settings check the WIFI box in the...

Страница 77: ...turn off the WIFI connection Connection Click this button to open the WIFI Connection dialog as shown below in the figure below Click the Connection button to connect to the selected hotspot Figure 3...

Страница 78: ...ption type After the device successfully connects to the WIFI you can view the hotspot name IP address subnet mask and default gateway in the WIFI Setting interface 3 4 5 10 Email The email dialog is...

Страница 79: ...to 3600 seconds where 0 means there is no delay and the email is sent immediately Test Click the Test button test the email connection Figure 3 44 Note that the system will not send out the email imm...

Страница 80: ...ly For example you can login user ZHY to FTP 10 10 7 7 and then test it to modify or delete the folder Figure 3 46 The system also supports upload multiple DVRs to one FTP server You can create multip...

Страница 81: ...ad interval upload file channel time and type File length is upload file length When this value is larger than the actual file length the system will upload the whole file When this value here is smal...

Страница 82: ...n after a successful connection To configure SNMP 1 In Figure 3 49 above check the box to enable the SNMP function Input the IP address of the PC than is running the software in the Trap address You c...

Страница 83: ...he current item up down Note PPPoE always has the highest priority WIFI and 3G are not supported by ADT at this time 3 4 5 15 Auto Register This function enables the device to automatically register t...

Страница 84: ...be the same as the ID you input prior 5 Click the Add button to complete the setup 6 Boot up the proxy server When the network status is Y the registration is successful You can view the proxy server...

Страница 85: ...e Alarm The system generates an alarm when the front end IPC disconnects from the local hybrid DVR The alarm can activate a recording PTZ snapshot etc The alarm lasts until the IPC and the hybrid DVR...

Страница 86: ...time period when detection is enabled Select Sunday to Saturday from the dropdown list Be sure to check the box to the left of the period to enable it To set your own business day and non business da...

Страница 87: ...r time has elapsed a new alarm signal will be generated when another alarm is detected Alarm Out Check the box to enable the external alarm when the event triggers In the boxes to the immediate right...

Страница 88: ...ecording can begin This value ranges from 10s to 300s Tour Enable the tour function to present an alternating display much like a slideshow of the channel s you have set to record when a motion detect...

Страница 89: ...ble tone from the DVR when the alarm occurs Note A network alarm is an alarm signal using TCP IP You can use NET SDK to activate a network alarm There is no type anti dither or alarm upload function 3...

Страница 90: ...nt to enable for the event Enable Check the box to enable the event type Region Motion Detection only Click the Setup button to set Motion Detection zone There are 396 PAL 330 NTSC small zones The blu...

Страница 91: ...le which camera s will record when the event occurs Latch Select the time in seconds that the system delays after the external alarm has ended before turning off the alarm and the activated output Thi...

Страница 92: ...ndow tour See 3 6 8 Video Matrix on page 136 for details on how to set up Video Matrix Buzzer Enable this function to sound an audible tone from the DVR when the event occurs Test Click this test the...

Страница 93: ...Esc key to exit without saving To set up Motion Detection 1 Open the Motion Detect screen by selecting Main Menu Setting Detect The Detect screen opens as shown in Figure 3 57 2 In the Event Type are...

Страница 94: ...disarmed modes Use the arrow keys to apply that format to the grid cell 7 After setting the zone exit and return to the Detect zone setup screen using one of the following methods a Right mouse click...

Страница 95: ...igure 3 61 Six periods appear for you to set for each day 15 Select the box to the left of a time period to enable it 16 Set the start and end times for each motion detect period 17 When finished sele...

Страница 96: ...Open the Motion Detect screen by selecting Main Menu Setting Detect The Detect screen opens 2 In the Event Type area select the drop down menu and select Video Loss Figure 3 63 3 In the Channel area...

Страница 97: ...the Setup screen Figure 3 61 Six periods appear for you to set for each day 10 Select the box to the left of a time period to enable it 11 Set the start and end times for each motion detect period 12...

Страница 98: ...meone maliciously masks the lens or the output video is in monochrome due to a change in ambient light To set up a Camera Masking event 1 Open the Motion Detect screen by selecting Main Menu Setting D...

Страница 99: ...61 Six periods appear for you to set for each day 10 Select the box to the left of a time period to enable it 11 Set the start and end times for each motion detect period 12 When finished select OK to...

Страница 100: ...Connection Follow the procedures below to go on cable connection 1 Connect the dome RS485 port to DVR 485 port 2 Connect dome video output cable to DVR video input port 3 Connect power adapter to the...

Страница 101: ...sponding baud rate The default value is 9600 Data bits select corresponding data bits The default value is 8 Stop bits select corresponding stop bits The default value is 1 Parity Select from three op...

Страница 102: ...interface appears Here you can set the following items Speed Direction Keys SIT 3D Intelligent Positioning Key Zoom Focus Iris to adjust brightness PTZ Trace Page Switch Set Figure 3 71 3 4 8 4 Speed...

Страница 103: ...s and iris settings To use 3D intelligent positioning 1 Locate and click the button labeled SIT in the center of the eight direction arrows The system reverts to the single screen mode 2 Drag the mous...

Страница 104: ...Trace These functions are described in the following sections PTZ Control page 2 Pattern Described below Click the button and the screen says Record Tour Patrol See below Auto Scan Similar to Auto Pan...

Страница 105: ...ng items Preset Patrol Pattern Border Figure 3 75 Presets Presets are programmed locations that the PTZ camera is trained to view These presets can be strung together to move the camera in a designed...

Страница 106: ...Guide 3 Menu Operations 2 Click Set 3 In the Set Screen that appears click the Preset button 4 Click within the Preset field The numeric keypad appears Input the preset number 1 2 3 etc DVR1604HF U E...

Страница 107: ...nd continue this pattern to set all desired Presets To activate the Preset 1 Right click to return to the Main PTZ Control dialog Click the Page Switch button 2 In the No field enter the Preset No you...

Страница 108: ...The camera moves to that Preset location Patrol Presets can be strung together to move the camera in a designed movement called a Patrol To setup the Patrol 1 In the Main PTZ Control screen click Set...

Страница 109: ...patrol number for example 1 4 Input a preset number you want to add to the patrol for example 3 5 Click Add Preset to add Preset 3 to Patrol 1 6 Return to step 4 to add other presets in the order you...

Страница 110: ...itch button 2 In the No field enter the Tour Patrol No you want to playback using the numeric keypad 3 Click Tour The camera moves to all Preset locations that were set in the selected Tour Patrol The...

Страница 111: ...nt design that you record using the Direction Keys on the Main PTZ Control interface The camera mimics the movement you recorded during setup To setup the Pattern 1 In the Main PTZ Control screen clic...

Страница 112: ...ttern 5 Right click to return to the Main PTZ Control dialog Use the arrow keys to move the camera to the desired view pattern using the Zoom Focus and Iris settings as needed The pattern that the cam...

Страница 113: ...ick the End button to terminate recoding the pattern To activate the Pattern 1 Right click to return to the Main PTZ Control dialog Click the Page Switch button 2 In the No field enter the Pattern No...

Страница 114: ...to initiate The camera moves to all the locations that were recorded in the selected Pattern Border Border is the right and left limitations that you set for camera movement Borders determine the pat...

Страница 115: ...o setup the Borders 1 Right click to return to the Main PTZ Control dialog Use the arrow keys to move the camera to the desired left most limit 2 Click Set 3 In the Set Screen that appears click the B...

Страница 116: ...rs 1 Right click to return to the Main PTZ Control dialog Click the Page Switch button 2 Click the Auto Scan button The Auto Scan button changes to a Stop button as the camera automatically begins to...

Страница 117: ...ame Modify the Channel Name in this field The system supports a maximum of 30 characters Note that all your modifications here only apply to the DVR local end You must open the web or client end to re...

Страница 118: ...here for the scheduled tour motion detection tour The value ranges from 5 120 seconds Split Select the window split mode from the dropdown list Channel Combination This area is for viewing channel na...

Страница 119: ...d to refresh web or client end to get the latest Channel Name The system supports a maximum of 25 characters for Channel Name Figure 3 78 3 4 10 Default Click the Default button The Default dialog box...

Страница 120: ...con to set up a remote device The following dialog opens Figure 3 80 IP Search button Figure 3 81 1 Click this button to search for an IP address This includes the device IP address port device name m...

Страница 121: ...click a device in the list to change the channel setup Delete Select one device in the Added Device list and then click to remove it Status means that the connection is OK and means the connection fai...

Страница 122: ...Add feature 3 6 Advanced Click the Advanced icon in the main window The Advanced screen appears There are 10 function keys HDD Management Abnormality Alarm Output Manual Record Account Auto Maintenanc...

Страница 123: ...current software version can only set the HDD group operation for read write HDDs HDD groups do not include redundancy or read only HDDs Alarm Set Release Click to set clear the Disk Error alarm in th...

Страница 124: ...the HDD channel number HDD Group Use the dropdown to select a group number for the particular hard drive HDD group has only two options group1 or group 2 After selecting the HDD group number click the...

Страница 125: ...d You are able to verify that the channel does not record and that you cannot search for the previous recording Channel Quota The Quota feature enables you to view and set channel storage capacity Fro...

Страница 126: ...3 Menu Operations Figure 3 87 Click Quota Statistics at the bottom left of the page The Quota Statistics page appears Here you can view HDD capacity that you set for each channel Figure 3 88 DVR1604H...

Страница 127: ...m No Disk Disk Error No Disk Space Network Disconnection IP Conflict and MAC Conflict Enable Check this box to enable an alert for the item selected in Event Type Alarm Out Check the box to enable the...

Страница 128: ...an be used to set up recording status For each alarm click to select whether recording is scheduled manual or stopped not recorded Status for each alarm is indicated at the bottom After the setup is c...

Страница 129: ...statuses Schedule Manual Stop Schedule The channel records for the period you have set up Main Menu Setting Schedule Manual The channel records immediately until you select Stop Manual recording has...

Страница 130: ...ule Recording Highlight the below All and to the right of Schedule to schedule recording on all channels See Figure 3 93 When system is in schedule recording all channels will record as you have previ...

Страница 131: ...Main Menu Setting Schedule The indicators associated with each channel illuminate on the front panel indicating that they are engaged in a recording session Figure 3 94 3 6 4 7 Stop All Channel Recor...

Страница 132: ...supports a maximum of 20 user groups and 64 users There are two levels for group or user management admin and user Each user should only belong to one group User rights cannot exceed group rights The...

Страница 133: ...e user account rights you can also modify the passwords of other users Figure 3 97 3 6 5 2 Add Modify Group A group is a convenient method for assigning a set of rights to multiple users Usually a use...

Страница 134: ...time monitor playback record PTZ user account etc 5 Click Save To modify a group 1 Click the Modify Group button in the Account screen The Modify Group dialog appears 2 Make the desired changes 3 Clic...

Страница 135: ...nding rights for the current user 8 Click Save It is recommended that the user rights are set lower than the administrative rights To modify a user 1 Click the Modify User button in the Account screen...

Страница 136: ...to adjust each item to the desired setting 3 After completing the setup click the OK button The system reverts to the previous menu Figure 3 101 3 6 8 Video Matrix When an alarm occurs while this fea...

Страница 137: ...escribed below and then click Save Figure 3 103 Sniffer Mode Select COM from the drop down menu Protocol Select NONE or POS Setting Click the COM Setting button to open a dialog for making RS232 setti...

Страница 138: ...dropdown menu 3 For Setting click the Com Setting button The following dialog appears Refer to Section 3 4 4 on page 62 for details Figure 3 104 4 Select the Overlay Channels on which you want to over...

Страница 139: ...Select NET from the drop down menu Protocol Select ATM POS or POS The dialog changes depending on the selection you make here Setting Click this button to open the Setup dialog Available options depen...

Страница 140: ...ng click the ATM POS button The following setup dialog appears Figure 3 106 4 Set the Source IP Destination IP and Record Channels Source IP refers to host IP address that sends out information which...

Страница 141: ...and data package Note Having six Frame ID groups can help ensure validity of the information 7 Click Save 8 Select the Overlay Mode Preview or Encode 9 Select the Overlay Position Top Left Top Right...

Страница 142: ...efers to other systems that receive the information 5 Select the Overlay Channels on which to apply the overlay 6 Select the Overlay Mode Preview or Encode 7 Select the Overlay Position Top Left Top R...

Страница 143: ...on file under current folder After a successful import the system needs to reboot to activate new setup Format Click the Format button A dialog box appears for you to confirm the current operation The...

Страница 144: ...on from the drop down menu Logout Menu User Click this to log out You must enter your password when you log in the next time Restart Application Select to reboot the DVR Shutdown The system shuts down...

Страница 145: ...value is usually less than 255 4 Open a browser window and input the DVR IP address The system automatically downloads the latest web control and overwrites the previous one if necessary 5 To uninstal...

Страница 146: ...Select Internet Options from the Tools menu The Internet Options dialog appears b Click the Security tab and click Custom level The Security Settings dialog appears c Scroll down the list and Enable t...

Страница 147: ...owing exceptions In the LAN mode 1 The Web Service opens with four channel windows by default No video is displayed 2 The Open Close and CAM buttons in the left pane are used to open the video stream...

Страница 148: ...Mode go to page 150 4 3 1 LAN Mode After logging into the LAN mode the main window appears Figure 4 4 Section 1 Click the tab of the function you want to switch to Playback Alarm Setup or Logout Secti...

Страница 149: ...input port from the device to the client end uses the first channel audio input port During the bidirectional talk process the system will not encode the audio data from channel 1 Section 5 Instant R...

Страница 150: ...8 Function Buttons On the top right corner are located six function buttons which provide instant access to the following features digital zoom local record snapshot picture and close video Section 9...

Страница 151: ...ted to output sub stream The icon for each selected camera becomes yellow and the S designation for Sub Stream appears to the right of each M would appear for HD Main Stream Section 3 Start Talk butto...

Страница 152: ...k drop down to select which channels are displayed 1 6 or 3 8 7 8 window screen mode 1 8 Section 6 Function Buttons On the top right corner are located six function buttons which provide instant acces...

Страница 153: ...By default all snapshot images are stored in the system client folder named PictureDownload 4 Audio Turn audio on or off 5 Close video Turn off the video 4 3 4 Pan Tilt Zoom PTZ Panel Before initiati...

Страница 154: ...button b Move the camera again and then click the right limit button to set the right limit Preset 1 Select Preset from the dropdown list 2 Turn the camera to the corresponding position and enter the...

Страница 155: ...such as zoom focus iris direction etc 4 Click the Add button to set one pattern Aux 1 Input the corresponding aux value 1 8 2 You can select one option 3 Click the Aux On or Aux Off buttons Light Wip...

Страница 156: ...o adjust the brightness contrast hue and saturation The border of the currently selected channel border becomes green 3 Alternatively click the Reset button to restore system default settings Figure 4...

Страница 157: ...Figure 4 8 appears 2 Set the record type record date window display mode and channel name 3 Click the date on the right pane to select the date The green highlighted date is system current date and t...

Страница 158: ...r of the installation directory or you can download it to a specified directory 6 Use the Playback Control Bar to implement various operations such as Play Pause Stop Slow Play and Fast Play During pl...

Страница 159: ...de 4 Web Service Figure 4 10 More This interface is for searching for recordings or pictures You can select Record Channel Record Type and Record Time to Download See Figure 4 11 Figure 4 11 DVR1604HF...

Страница 160: ...ch button The available storage device appears in the window See Figure 4 12 Select file s from the list and then click the Start backup button Refer to the Path section on page 168 to set device down...

Страница 161: ...alarm triggers Video Masking The system alarms when the camera is maliciously covered Disk Error The system alarms when a disk error occurs Video Loss The system alarms when video loss occurs Disk Fu...

Страница 162: ...the following for detailed information Channel Select a channel number from the drop down list Period This setting divides one day 24 hours into two time periods You can set different hue brightness...

Страница 163: ...nitor window saturation The value ranges from 0 to 100 The default value is 50 The greater the number the more intense the color This value has no effect on the general brightness of the video as a wh...

Страница 164: ...n stream Select different encode frame rates from different recorded events The system supports Active Control Frame function ACF which enables you to record in different frame rates For example you c...

Страница 165: ...ccording to the resolution and frame rate you have set Audio Enable Check the box to enable audio recording Audio Encode If enabled make your selection from the dropdown G711a PCM or G711u Watermark E...

Страница 166: ...set Activation snapshot is only valid for a motion detection alarm or a camera masking alarm Image Size This is the same as the resolution of the Main Stream Select from D1 HD1 2CIF CIF or QCIF Qualit...

Страница 167: ...e this feature in live mode check the Preview box or to enable in the recorded file for playback check the Monitor box and then click the Setup button Channel Display Enable this function to overlay t...

Страница 168: ...set the location if where snapshot images and video recording files are stored 1 Click the Browse button to set the saved path for the snapshot image on the Live screen and the recording storage path...

Страница 169: ...fault setup is 1500 bytes MTU modification can affect current network service and may result in a reboot of the network adapter When you change the MTU setup a pop up dialog box appears for you to con...

Страница 170: ...referred DNS Displays the DNS IP address Alternate DNS Displays the alternate DNS IP address LAN Download If enabled The system can process the downloaded data resulting in increased download speeds o...

Страница 171: ...alue ranges from 1 to 20 The default setup is 10 TCP Port The default value is 37777 You can input the actual port number UDP Port The default value is 37778 You can input the actual port number HTTP...

Страница 172: ...ddress in the LAN to login the device Go to the IP address item to see the current device information You can access the client end via this new address Figure 4 22 4 6 2 6 DDNS The DDNS page is used...

Страница 173: ...me you input to log in the server Password The password you input to log in the server Update period The device sends out a live signal to the server regularly This parameter sets the interval value b...

Страница 174: ...uickddns com Port number 80 Domain name There are two modes Default domain name and customized domain name Except default domain name registration you can also use customized domain name You can input...

Страница 175: ...uide 4 Web Service Figure 4 24 4 6 2 8 Email The Email screen is used to set up email alerts if you have set them up for sending out an alert in the event of a triggered alarm Figure 4 25 DVR1604HF U...

Страница 176: ...t SSL TLS or NONE Subject Input email subject here Attachment Check the box to send out the email of the snapshot picture Receiver Enter the destination receiver s email address maximum of three addre...

Страница 177: ...P This feature enables you to establish the mapping relationship between the LAN and the public network Here you can also add modify or remove UPnP item See Figure 4 26 1 In the Windows OS navigate to...

Страница 178: ...authentication access control and the management relationship between one proxy and one group of the managers Make sure that the device and the proxy are the same The read community will read all the...

Страница 179: ...y processes the information of V1 If you check V2 the system only processes the information of V2 SNMP V3requires account security verification for the server to connect to the device If you select V3...

Страница 180: ...e automatically registers to the proxy server IMPORTANT Do not input a network default port such as the TCP port number The proxy server software is developed from the SDK Open the software and input...

Страница 181: ...server certificate is a digital certificate issued to a web server by a trusted Certificate Authority CA A server certificate verifies the organization s identity to the client so that the client can...

Страница 182: ...Use the Motion Detect screen for setting up a Motion Detection event to trigger an alarm and initiate recording Figure 4 31 The following describes the Detect window Enable Check the box to enable the...

Страница 183: ...vent has ended The system only stores one event during the anti dither period The value ranges from 5s to 600s Sensitivity There are six levels The sixth level has the highest sensitivity Region Click...

Страница 184: ...k the box to enable the external alarm when the event triggers In the boxes to the immediate right enable which camera s will record when the event occurs Latch Select the time in seconds that the sys...

Страница 185: ...ed Video Matrix Check the box to enable this function When an event occurs the device connected to the SPOT OUT port on the rear of the DVR displays video output from the selected channel s in a 1 win...

Страница 186: ...n select a channel to be enabled from the dropdown list Period This feature activates the Video Loss function in the specified time periods To set the Video Loss period 1 Click the Setup button 2 In t...

Страница 187: ...riggers In the boxes to the immediate right enable which camera s will record when the event occurs Latch Select the time in seconds that the system delays after the external alarm has ended before tu...

Страница 188: ...ord Check the box to enable and the click the buttons for the channels that you want included in the snapshot The selected channels are highlighted Checkboxes Show Message If enabled a pop up alarm me...

Страница 189: ...sking function Then select a channel from the dropdown list Period This feature activates the Camera Masking function for the specified periods To set the Camera Masking period 1 Click the Setup butto...

Страница 190: ...0s to 300s Alarm Out Check the box to enable the external alarm when the event triggers In the boxes to the immediate right enable which camera s will record when the event occurs Latch Select the tim...

Страница 191: ...cord Check the box to enable and the click the buttons for the channels that you want included in the snapshot The selected channels are highlighted Checkboxes Show Message If enabled a pop up alarm m...

Страница 192: ...et Alarm and Alarm Out Local Alarm The system detects the alarm signal from the alarm input port Figure 4 41 Enable Check the box to activate the Alarm function Alarm Select the channel number from th...

Страница 193: ...set an anti dither time of 10 seconds the activation will last 10seconds when a local alarm is activated If another local alarm signal is detected before these 10 seconds have elapsed the buzzer tour...

Страница 194: ...n for setting up the camera Figure 4 43 Tour Enable the tour function to present an alternating display much like a slideshow of the channel s you have set to record when a motion detect event occurs...

Страница 195: ...n an alarm occurs Message If a 3G network is connected a message is sent when the anomalous occurs Note This feature is not supported by ADT at this time Network Alarm The system detects the alarm sig...

Страница 196: ...screen Delay To avoid rerecording the same event enter the number of seconds to wait after the event has ended before a new recording can begin This value ranges from 10s to 300s Alarm Out Check the...

Страница 197: ...an alarm occurs the device connected to the SPOT OUT port on the rear of the DVR displays video output from the selected channel s in a 1 window tour See the Video Matrix section on page 223 for detai...

Страница 198: ...onditions No Disk Disk Error No Disk Space Network Disconnection IP Conflict and MAC Conflict No Disk To enable notification s when no disk drive is detected 1 Check the Enable box 2 Check the box ass...

Страница 199: ...curs Message If a 3G network is connected a message is sent when the anomalous event occurs Note This feature is not supported by ADT at this time 3 Click Save Figure 4 49 No Disk Space To enable noti...

Страница 200: ...mail alert is sent to you when an alarm occurs Buzzer If enabled a buzzer sounds when an alarm occurs Message If a 3G network is connected a message is sent when the anomalous event occurs Note This f...

Страница 201: ...e is sent when the anomalous event occurs Note This feature is not supported by ADT at this time 3 Click Save Figure 4 52 MAC Conflict To enable notification s when a MAC conflict is detected 1 Check...

Страница 202: ...larm and Motion Detect with Alarm Make sure you have enabled the corresponding record mode in the Setup Storage Conditions You can view the current time period setup from the color bar Green represent...

Страница 203: ...file in two disks Highlight Redundancy to activate this function Snapshot Check this box to enable the snapshot function Holiday Click this box to enable holiday dates Buttons Copy Use this button to...

Страница 204: ...e selections from options above 3 Click the Setup button for the desired day In the resulting setup dialog are six 24 hour time periods Figure 4 56 4 Set the corresponding recording range for each tim...

Страница 205: ...an also make changes in the HDD Operation dropdown menu Set as read and write read only or else format the hard drive Figure 4 57 HDD Setting Use the HDD Setting page to assign a hard drive to an HDD...

Страница 206: ...hannel tab to assign a channel number to a channel group To assign the HDD Channel to a Group 1 Locate the Channel number on the screen and use the drop down to select the corresponding HDD Group numb...

Страница 207: ...Anonymous box for servers that support the anonymity function which allows you to automatically login anonymously If enabled you do not need to input the user name password or the sender information 3...

Страница 208: ...e Schedule Manual and Stop Schedule Channel records as you have set in recording setup Main Menu Setting Schedule Manual Manual recording has highest priority overriding the automatic recording setup...

Страница 209: ...Figure 4 62 Device ID Enter a device name such as DVR1 etc Device No Enter the channel number Language Select the desired language from the dropdown list Note The device must reboot in order for a ch...

Страница 210: ...rding duration The value ranges from 1 to 120 minutes the default value is 60 minutes Date and Time Available options contained in the Date Time tab are as follows After making your selections click t...

Страница 211: ...ows NTP Check the box to enable the Network Time Protocol NTP function Time Zone Use the drop down list to select your time zone adjustment from GMT Server Enter the address of the NTP server Click th...

Страница 212: ...passwords or assign users to groups Rules User Names and Group Names can be no longer than 6 characters including alpha numeric and the underline character Passwords must be 1 6 numeric characters on...

Страница 213: ...logging in Figure 4 65 To add a user 1 Click the Add User button The Add User dialog appears 2 Enter the User Name which can be a maximum of 6 characters including alpha numeric characters and the un...

Страница 214: ...default user cannot be deleted To modify a user 1 Click the Modify button The Modify User dialog opens 2 Make changes to the user s account as necessary 3 To modify the password 4 Check the Modify Pa...

Страница 215: ...o add remove groups or to modify a group account Figure 4 69 To add a group 1 Click the Add Group button The Add Group dialog opens 2 Enter the Group Name which can be a maximum of 6 characters includ...

Страница 216: ...t to assign to the group 5 Click Save Figure 4 70 To delete a group 1 Click the Delete button The Delete Group dialog opens 2 Click Save to confirm To modify a group 1 Click the Modify button The Modi...

Страница 217: ...Use the drop down list to make your selection 1920x1080 1280x1024 1280x720 1024x768 Note The system must reboot to activate the current setup Transparency Move the slider to adjust transparency The va...

Страница 218: ...ar at system startup Navigation Bar Check the box to enable the navigation bar to be displayed on the video monitor TV Adjust Use this to adjust margins and brightness settings on the video monitor Fi...

Страница 219: ...next channel The value ranges from 5 to 120s The default setup is 5s Split This section enables you to set how channels are displayed in the tour The system can support 1 4 8 9 16 25or 36 windows depe...

Страница 220: ...Window Split drop down list to select View 4 This configuration contains two groups Group 1 will simultaneously display channels 1 through 4 for the set interval and then Group 2 will simultaneously...

Страница 221: ...6 and 8 to select only even channels for the new group number 4 and click Save 6 To relocate group 4 to be displayed before group 3 in the tour select group 4 and then click the up arrow button Group...

Страница 222: ...hen click the button What were labeled as groups 3 and 4 are now groups 1 and 2 respectively Motion Tour Alarm Tour Type Set the type of tour split to show for the Motion Detect Tour Alarm Tour View 1...

Страница 223: ...alog you can set the matrix output channel and its interval Figure 4 75 4 6 5 4 Default The Default page enables you to reset default settings to all sections of the web service from one location Here...

Страница 224: ...corresponding Web Service settings to your local PC To perform one of these functions click the corresponding button and then use the resulting dialog to navigate to the desired location 4 6 5 6 Auto...

Страница 225: ...ge enables you to install the latest firmware files To upgrade you DVR 1 Click the Browse button 2 In the ensuing dialog navigate to and select the upgrade file The filename will have a bin extension...

Страница 226: ...to the PC to transfer data directly Protocol COM is for the Text Overlay function Net Keyboard is for using the network keyboard to control the device PTZ Matrix for connecting to the peripheral matri...

Страница 227: ...channel to which the PTZ camera is connected Protocol Select the corresponding dome protocol such as PELCO D Address Set the corresponding PTZ camera address The default value is 1 Note that your setu...

Страница 228: ...s in the COM mode screen Make your selections as described below and then click Save Sniffer Mode Select COM from the drop down menu Protocol Make a selection from the dropdown list POS or NONE Settin...

Страница 229: ...for the overlay The Text Overlay screen in network mode can be set up in two different types with or without the ATM POS protocol With the Protocol For network mode with the ATM POS protocol you must...

Страница 230: ...he live video Encode means the card number is overlaid in the recorded file Overlay Position From the dropdown list select the position where you want the overlay to appear Top Left Top Right Bottom L...

Страница 231: ...to set the source port and target port There are a four IP groups The Record Channel applies only to one group optional Having six Frame ID groups can help ensure validity of the information Overlay C...

Страница 232: ...Event Operation Record Operation User Management and Log Clear Start Time Set the start time of the requested log End time Set the end time of the requested log Search Select the log type from the dr...

Страница 233: ...Hybrid Standalone DVR User Guide 4 Web Service Figure 4 88 4 6 7 3 Online User The Online User page is shown below in Figure 4 89 Figure 4 89 DVR1604HF U E Hybrid DVR User Guide 233...

Страница 234: ...resses from large to small Click other items to view their information Add button Click to connect to the selected device and add it to the Added Device list in the lower half of the screen Note The s...

Страница 235: ...word is admin Figure 4 91 Channel The dropdown list here displays unconnected channel number Set the remote channel connection in the main dialog Note This hybrid DVR supports the IPC from many popula...

Страница 236: ...el Figure 4 92 4 7 Logout Click the Logout button to log out of the Web Service The system reverts to the Login dialog You must input your username and password to log in again Figure 4 93 4 8 Un inst...

Страница 237: ...ng Possible reasons Input voltage is not stable or it is too low HDD malfunction or something wrong with the ribbon Video signal is not stable Working environment is too harsh too much dust Hardware m...

Страница 238: ...ideo is distorted when searching local recordings Possible reasons Video quality setup is too low Program read error bit data is too small If there is a mosaic pattern in the full screen Restart the D...

Страница 239: ...asons Poor network quality Client end resources are limited There is a multicast group setup on the DVR This mode can result in a mosaic screen Usually this mode is not recommended There is a Privacy...

Страница 240: ...e two loops connected to one alarm device 18 Remote control does not work Possible reasons Remote control address is not correct Distance is too far or control angle is too small Remote control batter...

Страница 241: ...e away from static or induced voltage Unplug the power cable before you remove the video signal cable or RS485 cable To avoid HDD malfunction always shut down the device properly using the Shutdown fu...

Страница 242: ...1 4 8 9 16 windows Monitor Touring Supports monitor tour functions such as motion detection alarm and scheduled auto control Resolution Resolution 1920x1080 1280x1024 1280x720 1024x768 For IP View all...

Страница 243: ...up Function Backup Mode Supports peripheral USB backup device flash drive portable disk etc 1 eSATA port up to 16TB Supports eSATA device backup Supports network download and backup Network Function N...

Страница 244: ...user serial port user and network user Configurable user power Supports user group and its corresponding rights modification No limit to the user or group amount Password Authentication Password modif...

Страница 245: ...ataTraveler 2G Kingston Data Traveler 1G Kingston Data Traveler 16GB Kingston Data Traveler 32GB Kingston Data Traveler Locker 32GB Lexar Lexar 256MB Maxell USB Flash Stick 128M Maxell USB Flash Stick...

Страница 246: ...Hitachi HitachiCinemaStar 7K1000 B HCT721010SLA360 1T SATA Maxtor DiamondMax 20 STM3320820AS 320G SATA Maxtor DiamondMax 20 STM3250820AS 250G SATA Samsung Samsung HA HA500LJ CE 500G SATA Samsung Sams...

Страница 247: ...Seagate Pipeline HD2 ST31000424CS 1T SATA Seagate Seagate Pipeline HD2 ST31000322CS 1T SATA Seagate Seagate Pipeline HD2 ST1000VM002 1T SATA Seagate Seagate Pipeline HD2 ST1500VM002 1T SATA Seagate Se...

Страница 248: ...AVCS 63H1B1 500G SATA Westem Digital WDAV GP AVCS WD7500AVCS 63ZLB0 750G SATA Westem Digital WDAV GP AVCS WD3200AVCS 320G SATA Westem Digital WDAV GP AVCS WD2500AVCS 250G SATA Westem Digital WDAV GP E...

Страница 249: ...e latest version to ensure the accuracy of the table below Manufacturer Model Port Type Type Sony DRX S50U USB DVD RW Sony DRX S70U USB DVD RW Sony AW G170S SATA DVD RW Samsung TS H653A SATA DVD RW Pa...

Страница 250: ...h HFNOVO CRT LXB HF769A 17 inch HFNOVO CRT LX GJ556D 17 inch Samsung LCD 2494HS 24 inch Samsung LCD P2350 23 inch Samsung LCD P2250 22 inch Samsung LCD P2370G 23 inch Samsung LCD 2043 20 inch Samsung...

Страница 251: ...work Working Mode D LinK DES 1016D 10 100M self adaptive D LinK DES 1008D 10 100M self adaptive Ruijie RG S1926S There are five network modes AUTO HALF 10M FULL 10M HALF 100M FULL 100M H3C H3C S1024 1...

Страница 252: ...Wireless Mouse List Appendix G Compatible Wireless Mouse List Refer to the following table for compatible devices Brand Model V80 Rapoo 3500 Logitech M215 Shuangfeiyan Tianyao G7 630 DVR1604HF U E Hyb...

Страница 253: ...ttings 119 223 Detect Menu 89 182 Camera Masking 98 189 Motion Detection 93 182 Video Loss 96 186 Disk Error 127 199 Display List 250 Setup 117 217 DVR Features vii Front Panel 9 Keyboard 21 Overview...

Страница 254: ...S 181 IP Filter 68 174 Multicast 71 179 NTP 70 211 PPPoE 72 172 Priority 83 SNMP 82 178 TCP IP 65 169 UPnP 74 177 Web Service 169 No Disk 127 198 No Disk Space 127 199 NTP Setup 70 211 O Online User 4...

Страница 255: ...p 22 Storage Settings Web Service 202 Switcher List 251 Synchronization 29 System Settings Web Service 209 T TCP IP 68 169 Text Overlay 137 228 Tour Setup 92 219 Troubleshooting 237 TV Adjust 136 218...

Отзывы: