background image


6–1 

S E C T I O N   6  


Maintenance 

x x x x x x x x x x x x x x x x x x x x x x x x x x x x x x x x


In This Section 


About 6270ADT Maintenance 


How to Clean the 6270ADT 


Routine Care


x x x x x x x x x x x x x x x x x x x x x x x x x x x x x x x x


About 6270ADT Maintenance 

With the exception of normal cleaning, the 6270ADT is maintenance 
free.   

How to Clean the 6270ADT 

IMPORTANT:

  Do not use an abrasive cleaning agent or abrasive 

cloth when cleaning the 6270ADT or damage to the touch screen may 
occur.  

Clean the 6270ADT as follows: 

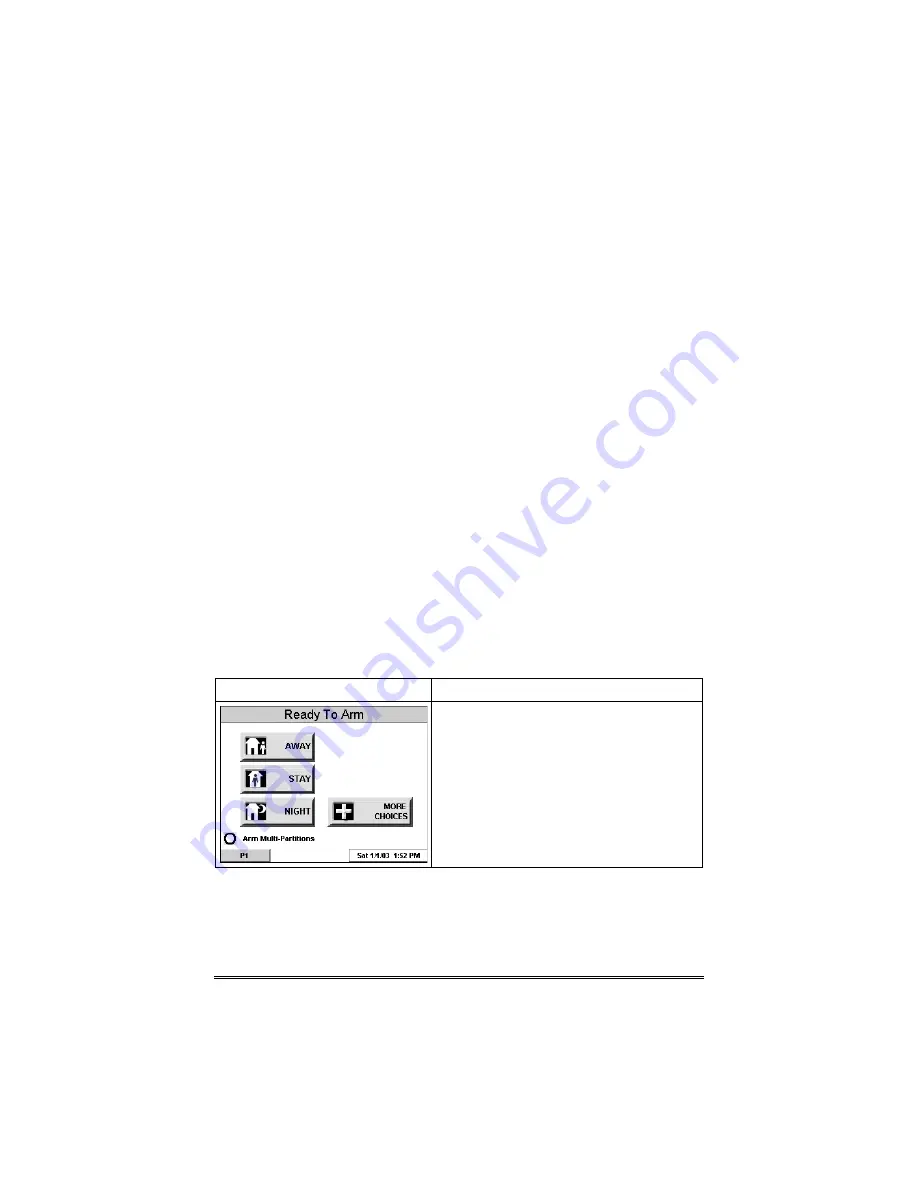
1.  From the "Home" screen, press the 

SECURITY button.  The "Arming" screen 

is displayed. 

SCREEN ACTION 


2.  Press the 

MORE CHOICES button.  

The "More Choices" screen is displayed. 

Содержание 6270ADT

Страница 1: ... 7 7 7 7R RX XF FK K 6 6F FU UH HH HQ Q H H S SD DG G QVWDOODWLRQ DQG 6HWXS XLGH ARMED READY MESSAGE FUNC PANIC BACK HOME K0977 2 9 03 Rev A ...

Страница 2: ......

Страница 3: ... Power Up 4 2 How to Change the ECP Address 4 2 How to Access the Central Station Screen 4 3 How to Select System Options 4 6 How to Set the NIGHT Setup Button Function 4 7 How to View and Edit Screen Security 4 8 How to View the Panel Configuration 4 9 6270ADT Setup 4 10 How to Adjust the Touch Screen Contrast 4 11 How to Adjust the Volume 4 12 How to Select Screen Saver Activation Time 4 13 How ...

Страница 4: ... 7 Troubleshooting 7 1 Troubleshooting 7 1 Diagnostics 7 1 About Diagnostics 7 1 How to Access the Diagnostics 7 1 Performing Diagnostics 7 3 LCD Display Test 7 3 Audio Test 7 6 LED Test 7 7 SECTION 8 Specifications 8 1 Specifications 8 1 SECTION 9 Index 9 1 ...

Страница 5: ...te UL These notes include specific information that must be followed if you are installing this system for a UL Listed application These notes include information that you should be aware of before continuing with the installation and which if not observed could result in operational difficulties Note These text notes are provided throughout the manual to provide informative information and shortc...

Страница 6: ...vi ...

Страница 7: ...en keypad that combines security and home control The 6270ADT can be used for x Quick and easy security system operation x Messages x Control of the home environment including lights and contains provisions for the future control of heating and air conditioning UL The home environment control feature has not been evaluated by UL System Features Security x Arm System Away Stay Night x Disarm System...

Страница 8: ...8BP 3 2 4 VISTA 128FBP 3 1 6 VISTA 250BP 3 2 4 VISTA 250FBP 1 1 5 On all panels except the residential panels you may obtain the software revision level of the alarm panel by entering the program mode and then entering 92 on the keypad The second line of the keypad displays the software revision level without the decimal point ECP Error The message ECP Error will be displayed at the top of the scr...

Страница 9: ...d complete the following steps 1 Detach the case back by pushing up into the two tabs located at the bottom of the 6270ADT with the blade of a screwdriver while pulling the case back and case front apart 2 Locate the case back over the mounting surface such that the opening in the case back is aligned with the wire cable access opening in the mounting surface while passing the wires cable through ...

Страница 10: ...nnections diagrams at the back of this guide or the appropriate Systems Interconnection Diagram provided and follow the instructions below UL x On single partition systems at least one keypad MUST receive power from the control panel s auxilary power x On multiple partition systems at least one keypad in each partition MUST receive power from the control panel s auxilary power x You may use a List...

Страница 11: ... WALL OR MOUNTING SURFACE CASE FRONT CASE BACK Figure 2 Wiring Preparation 2 Connect 12VDC to the 6270ADT using step a or b below a If powering the keypad from the control panel connect the AUX terminal of the control panel to terminal block position 2 12VDC terminal of the 6270ADT red wire b If powering the keypad from a supplementary power supply connect the terminal of the supplementary power s...

Страница 12: ...rminal of the control panel to the terminal of the supplementary power supply black wire Then connect the terminal of the supplementary power supply to terminal block position 3 GND terminal of the 6270ADT black wire 4 Connect Data Out terminal of the control panel to terminal block position 1 Data In terminal of the 6270ADT yellow wire 5 Connect the Data In terminal of the control panel to header...

Страница 13: ...x x x x x x x x x x x x x x x x x x x x x x x x x In This Section Front Panel LEDs Front Panel Buttons x x x x x x x x x x x x x x x x x x x x x x x x x x x x x x x x Front Panel LEDs ARMED READY MESSAGE FUNC PANIC BACK HOME 6270 001 V1 Front Panel LEDs and Buttons ...

Страница 14: ...GE FLASHING The 6270ADT contains message s for the User OFF No messages Front Panel Buttons BUTTON DESCRIPTION HOME Used to return to the HOME screen display from any sub menus FUNC Reserved for future use PANIC Used to display the EMERGENCY screen Fire or Panic signal generation BACK Used to exit the current screen display and return to the prior screen display Used to scroll through screen lists...

Страница 15: ...antity of 6270ADTs that may be used and the required control panel software revision level On residential control panels Safewatch Pro 3000EN or equivalent two 6270ADTs may be used addresses 1 and 2 These addresses in field 189 are enabled by default If the defaults have been changed enable these addresses in field 189 using an alpha keypad and the Data Field Programming procedures located in the ...

Страница 16: ...boot up process will continue until completion If there are to be additional 6270ADT units in the system refer to the How to Change the ECP Address paragraph How to Change the ECP Address After enabling addresses in the control panel using an alpha keypad power up each 6270ADT one at a time and set its address to one of the addresses you enabled in the control panel If this is a first time power u...

Страница 17: ...ress the SECURITY button on the Home screen The Arming screen is displayed SCREEN ACTION 2 Press the MORE CHOICES button The More Choices screen is displayed 3 Press the SETUP button on the More Choices screen The Setup screen is displayed 4 Press the ADVANCED SETUP button The Enter Authorized Code authorization screen is displayed ...

Страница 18: ... top of the screen is displaying ECP Error the ECP address in the 6270ADT is not valid for the panel that it is connected to To change the ECP address in the 6270ADT when ECP Error is being displayed enter the 6270ADT default code of 4140 to advance to the next screen 6 Press the Central Station button The Central Station menu screen is displayed ...

Страница 19: ...address 2 The available ECP addresses are 1 2 for residential controls or 1 30 for commercial controls Select the ECP address for this 6270ADT using the Up Dn arrows Press the OK button to accept the address setting or the CANCEL button to maintain the original ECP address The 6270ADT goes to the Central Station menu screen 3 Press the Back button three times to save the new address The More Choic...

Страница 20: ...ng SCREEN ACTION 1 On the Central Station screen press the Options button A pop up window is displayed with an option for selecting Lighting 2 Touch the Lighting button to turn the Lighting option on or off A checkmark appears in the button with the Lighting option is ON Note DO NOT select the Demo Mode option This option should only be selected if instructed to do so by factory service When this ...

Страница 21: ...m When selected arms all zones without entry delay To set the NIGHT button function do the following SCREEN ACTION 1 On the Central Station screen press the Night Setup button A Night Setup pop up window is displayed with options for selecting Away Stay Instant and Maximum 2 Select the arming mode that will be activated by pressing the NIGHT button on the Arming screen Press the Ok button to accep...

Страница 22: ...REEN ACTION 1 On the Central Station screen press the Screen Security button A listing of the classes of screens and the user level that has access to them will be displayed 2 If the listing is correct depress the BACK button to return to the Central Station screen If changes are necessary select the line to be changed and a Setup screen will be displayed Note The Setup screen contains a heading o...

Страница 23: ...the configuration of the panel that the 6270ADT is connected to To view the panel configuration do the following SCREEN ACTION 1 On the Central Station screen press the Panel Config button A Panel Configuration screen will be displayed providing details of your system 2 Depress the OK button to return to the Central Station screen or if you desire to clear the configuration from the 6270ADT and ha...

Страница 24: ... allows you to adjust the touch screen contrast and or adjust the 6270ADT speaker volume You may also select the time interval that must pass prior to the 6270ADT turning off the backlight to save power Additionally you may enter the User Setup screen Advanced Setup screen or Clean Screen maintenance mode from the Setup screen by pressing the corresponding button Access the Setup screen as follows...

Страница 25: ...t the touch screen contrast as follows If Then you want to increase contrast press the slide bar above the current contrast setting you want to decrease contrast press the slide bar below the current contrast setting another adjustment or selection is to be made go to the corresponding paragraph in this section no additional adjustment or selection is to be made press the BACK button or press the ...

Страница 26: ... 6270ADT speaker volume by pressing your finger on the touch screen slide bar associated with the Volume scale and doing the following If Then you want to increase volume press the slide bar above the current volume setting you want to decrease volume press the slide bar below the current volume setting VOLUME SLIDE BAR INDICATOR 6270 007 V1 Volume Control ...

Страница 27: ...cklight Off After arrow button A pull down menu displaying the time period options is displayed 2 Select the time period option you want by pressing it The pop up window closes automatically and the selection is displayed in blue Note Additional options can be viewed by using the up down arrows to scroll through the time period options 3 Press either the Home or Back button A Settings Changed pop ...

Страница 28: ...s pressed Additionally when using the 6270ADT with a Safewatch Pro 3000EN or equivalent panel the panel will download its time into the 6270ADT once an hour after the clock is set If Adjust for DST Daylight Savings Time is selected the 6270ADT will adjust for Daylight Savings time IMPORTANT This means that the 6270ADT setting will override and overwrite the control panel time setting That is if th...

Страница 29: ...tting Chime Mode On Off Operating modes allows you to turn the 6270ADT chime mode on or off When the chime mode is selected a request is sent to the alarm panel requesting that the panel chime the 6270ADT whenever an entry exit or perimeter zone is opened Access the Operating Modes screen as follows 1 From the Home screen press the SECURITY button The Arming screen is displayed SCREEN ACTION 2 Pre...

Страница 30: ...th the instructions Enter Authorized Code 4 Enter your Installer code The Operating Modes screen is displayed 5 Touch the Chime Mode button to turn the Chime Mode on or off A checkmark appears in the button when the Chime Mode is ON Press the HOME or BACK button after making your selection When the 6270ADT exits the Operating Modes screen your selection is saved ...

Страница 31: ...the 6270ADT you may program users to access any and all of the following systems x Fire Burglary Security x Lighting x Messages Users for the systems are programmed in a central user setup location that provides the specific questions for the user pertaining to each system You may want these users to be the same but there are situations in which you may want a user to have access to one system e g...

Страница 32: ...EEN ACTION 2 Press the MORE CHOICES button The More Choices screen is displayed 3 Press the SETUP button on the More Choices screen The Setup screen is displayed 4 Press the USER SETUP button on the Setup screen The User Setup screen is displayed ...

Страница 33: ...he instructions Enter Authorized Code 2 Enter your Authorized code The User Options screen is displayed Note The authorized code for adding users is dependent upon the alarm panel you are interfacing with Check your alarm panel Installation and Setup Guide to determine who can add users 3 Press the box next to Enter User Name The Enter Data keyboard screen is displayed ...

Страница 34: ...he User Authorization screen is displayed with the instructions Enter 4 Digits 6 Enter the 4 digit code for this user The User Options screen is displayed with the user s name and code displayed 7 Select the partitions access level and enter a user number for this user If assigning this user to wireless key enter one of the zone numbers of the keyfob the wireless key must be programmed first befor...

Страница 35: ...t a user or delete a user 1 To delete a user touch the circle next to the user to be deleted and press the DELETE USER button The User Authorization screen is displayed with the instructions Enter Authorized Code 2 Enter your Authorized code The Confirm Delete screen is displayed Note The authorized code for deleting adding and editing users is dependent upon the alarm panel you are interfacing wi...

Страница 36: ...played How to Edit a User Edit a User as follows SCREEN ACTION Three selections are available add a user edit a user or delete a user 1 To edit a user touch the circle next to the user to be edited and press the EDIT USER button The User Authorization screen is displayed with the instructions Enter Authorized Code ...

Страница 37: ...ding and editing users is dependent upon the alarm panel you are interfacing with Check your alarm panel Installation and Setup Guide to determine who can delete add and edit users 3 Select whatever options you wish to select for this user and press the Save button The configuration changes are saved and you are returned to the User Setup screen ...

Страница 38: ...6270ADT Installation and Setup Guide 5 8 ...

Страница 39: ...bout 6270ADT Maintenance With the exception of normal cleaning the 6270ADT is maintenance free How to Clean the 6270ADT IMPORTANT Do not use an abrasive cleaning agent or abrasive cloth when cleaning the 6270ADT or damage to the touch screen may occur Clean the 6270ADT as follows 1 From the Home screen press the SECURITY button The Arming screen is displayed SCREEN ACTION 2 Press the MORE CHOICES ...

Страница 40: ...loth DO NOT use any liquids sprays or ammonia based cleansers Press CONTINUE to disable touchscreen When the Continue button is pressed the Touch Screen Disabled for 30 Seconds During these 30 seconds the touch screen should be wiped clean of fingerprints using a mild soap solution and a soft cloth When the counter reaches zero the window automatically closes and the touch screen is active Note Do...

Страница 41: ...ectrical equipment Do not slam sensor protected doors or windows x Keep dust from accumulating on the keypad and all protective sensors particularly on motion sensors and smoke detectors x The keypad and sensors should be cleaned carefully with a dry soft cloth Do not spray water or any other fluid on the units ...

Страница 42: ...6270ADT Installation and Setup Guide 6 4 ...

Страница 43: ... Panel Installation Guide Diagnostics About Diagnostics A series of diagnostic tests are provided that allows verification of correct operation of the 6270ADT and its connections to the security system There are a total of three diagnostic tests How to Access the Diagnostics To access diagnostics do the following 1 From the Home screen press the SECURITY button The Arming screen is displayed SCREE...

Страница 44: ...p screen is displayed 4 Press the Advanced Setup button on the Setup screen The Enter Authorized Code authorization screen is displayed 5 Enter your 4 digit Installer code The Advanced Setup menu screen is displayed 6 Press the Diagnostics button on the Advanced Setup menu screen The Diagnostics screen is displayed ...

Страница 45: ... press x the back button to return to the previous screen or x the home button to return to your home page Once the Diagnostics screen is exited subsequent entry to this screen displays all test options as Not Performed LCD Display Test Perform the LCD Display Test as follows SCREEN ACTION 1 When you press the Test button associated with the LCD Display Test a pop up Confirmation Window is display...

Страница 46: ... a pop up Confirmation Window is displayed in the center of the screen with the background in 16 shades of gray Within the Confirmation Window the question 16 Shades of Gray is displayed 4 When you press the Yes or No button accordingly automatically the contrast test begins from light to dark Changing Contrast is displayed in the center of the screen during this time At the conclusion of the cont...

Страница 47: ...the Diagnostics screen is displayed with the LCD Display Test results Passed or Failed shown in the test status column Note If the response was no the No button is pressed to any question of this test when the system is returned to the Diagnostics screen Failed is displayed in test status column ...

Страница 48: ...creen while beeps sound from the speaker At the conclusion of the test a pop up Confirmation Window is displayed in the center of the Diagnostics screen Within the Confirmation Window the question Did you hear Beep is displayed When you press the Yes button Passed is displayed in the test status column on the Diagnostics screen When you press the No button Failed is displayed in the test status co...

Страница 49: ...entially top to bottom red green amber 5 times At the conclusion of the test a pop up Confirmation Window is displayed in the center of the Diagnostics screen 2 Within the Confirmation Window the question Did you see chasing LED pattern is displayed If you press the Yes button Passed is displayed in the test status column on the Diagnostics screen If you press the No button Failed is displayed in ...

Страница 50: ...6270ADT Installation and Setup Guide 7 8 SCREEN ACTION ...

Страница 51: ... x x x x x x x x x x x x x x x x x x Specifications MECHANICAL Dimensions Width 6 1 4 inches Height 5 inches Depth 1 1 8 inches ELECTRICAL Operating Voltage 12VDC Current Drain Backlight OFF Sound OFF Backlight ON Sound OFF Backlight ON Sound ON 180mA 220mA 280mA ...

Страница 52: ...6270ADT Installation and Setup Guide 8 2 ...

Страница 53: ...est 7 6 LCD Display 7 3 LED Test 7 7 Performing 7 3 ECP Error 1 2 Front Panel Buttons 3 2 Front Panel LEDs 3 1 Initialization 4 2 Maintenance 6 1 Cleaning 6 1 Routine Care 6 3 Mounting the 6270ADT 2 1 Night Setup 4 7 Operating Modes Chime 4 15 Panel Configuration Delete 4 9 View 4 9 Power Up 4 2 Routine Care 6 3 Screen Saver Activation Adjustment 4 13 Screen Security Edit 4 8 View 4 8 Setup 4 10 C...

Страница 54: ... 1 System Features 1 1 System Options Selecting 4 6 Time and Date Set 4 14 Time Set 4 14 Troubleshooting 7 1 Diagnostics 7 1 Performing Diagnostics 7 3 User Adding 5 3 Deleting 5 5 Editing 5 6 User Code Setup 5 1 Access 5 1 Volume Adjustment 4 12 Wiring the 6270ADT 2 2 ...

Страница 55: ...NOTES ...

Страница 56: ...NOTES ...

Страница 57: ...NOTES ...

Страница 58: ...NOTES ...

Страница 59: ...NOTES ...

Страница 60: ...NOTES ...

Страница 61: ...NOTES ...

Страница 62: ...NOTES ...

Страница 63: ... TOUCH SCREEN KEYPAD FROM THE CONTROL TOUCH SCREEN KEYPAD CONTROL TERMINAL STRIP SUPPLEMENTARY POWER SUPPLY GND DATA OUT DATA IN 12VDC BLACK RED BLACK GREEN YELLOW _ _ AUX AUX DATA IN DATA OUT POWERING THE TOUCH SCREEN KEYPAD FROM A SUPPLEMENTARY POWER SUPPLY UL Use a Listed Class 2 power supply suited for the application Summary of Connections ...

Страница 64: ...DENTAL DAMAGES FOR BREACH OF THIS OR ANY OTHER WARRANTY EXPRESS OR IMPLIED OR UPON ANY OTHER BASIS OF LIABILITY WHATSOEVER EVEN IF THE LOSS OR DAMAGE IS CAUSED BY THE SELLER S OWN NEGLIGENCE OR FAULT Seller does not represent that the product s it sells may not be compromised or circumvented that the product s will prevent any personal injury or property loss by burglary robbery fire or otherwise ...

Отзывы: