background image

23

7.1  Handpiece tubing cleaning & maintenance

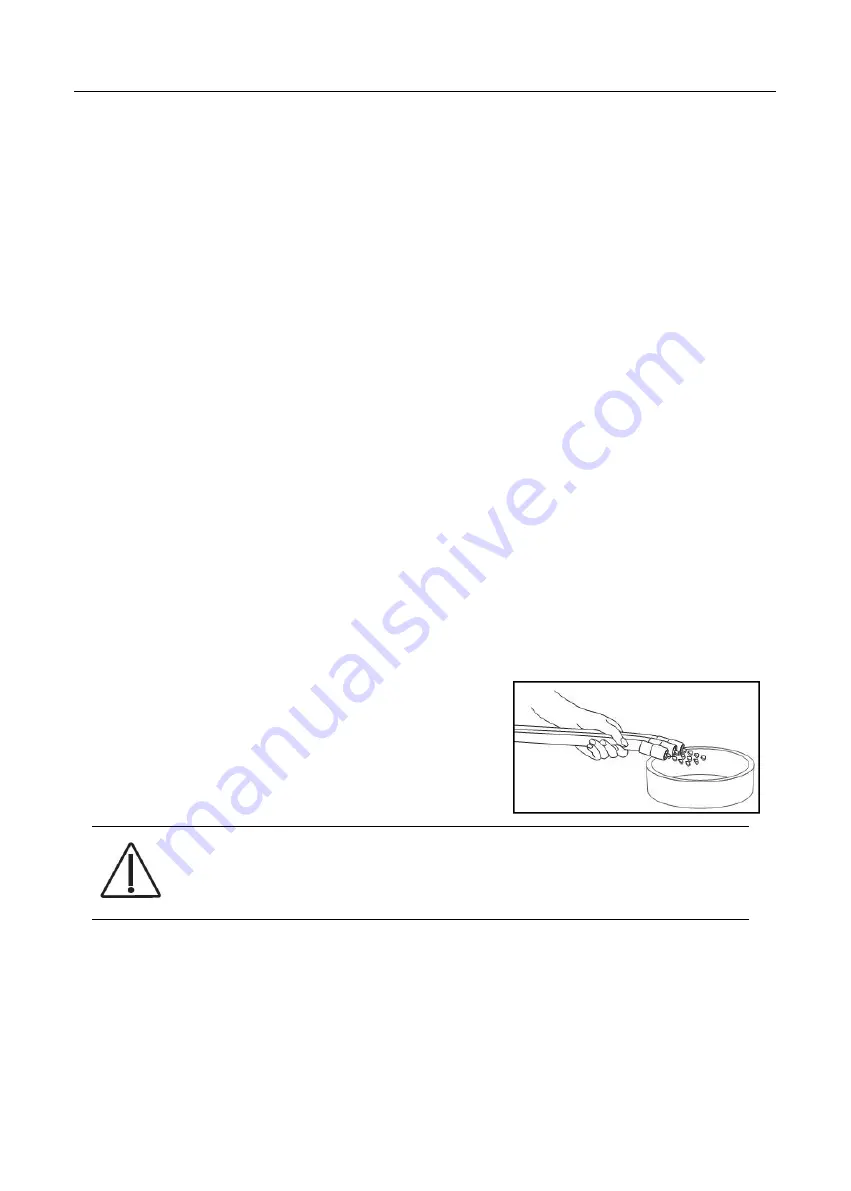
Figure 14

Attention: 

After each patient, air and water of all the tubes is to be    

released around

20-30seconds,to reduce cross infection and potential 

bacterial contamination.

User's Manual of Beyond 300/301 Delivery System

7  Maintenance & sterilization instructions

Touch surface & transfer  surface

Touch surface refers to the surface area that need contact in dental 

treatment while can be potential cross contamination points.

Transfer surface refers to the surface area that  contaminated from 

contacting with the instruments or other  inactive object.

ADS company  recommends isolating protection for all applicable touch 

surfaces and transfer surfaces. The partition used  must be  a plastic film 

approved the Food & Drug Administration. The plastic films should be  

taken off and  discarded after  the treatment of  each  patient. 

P/N:8023488

Flush the  tubings  independently or together.

After each patient:
1. Disconnect the handpiece before flushing the conduit.
2. Gather handpiece  tubings that use water coolant and hold them 

over a sink, cuspidor bowl, or basin. 
3. Hold the tubings  so that the water is directed away from you and 

into  the receptacle .(Figure 21.)
4. Flush the tubing continuously about 20~30 min.

Suggestions:

n

Suck 2 cups of fresh water in every two hours during working time;

n

Suck 1 liter of water after daily working.

7.2   Clean HVE & SE valves

Содержание Beyond 300

Страница 1: ...http www adsequip com User s Manual of Beyond 300 301 Delivery System P N 8023488 Version A Date 2017 08 01 ...

Страница 2: ...n writing ADS does not warrant that this document is error free No part of this document may be copied reproduced altered or transmitted in any form or by any means electronic or mechanical including photocopying recording or by any information storage and retrieval system without prior written permission from ADS The document is intended to be used in conjunction with the equipment Comments and f...

Страница 3: ...Chair position buttons 14 5 5 3 Initial settings of the chair 14 5 5 4 Initial settings description 15 5 5 5 Chair positions description 16 5 6 Foot control 17 5 7 Junction box 18 6 Functions introduction 19 6 1 Valves layout of delivery head 19 6 2 Functions introduction 19 6 3 3 Way syringe adjustment 22 7 Maintenance and sterilization instructions 23 7 1 Handpiece tubing cleaning maintenance 23...

Страница 4: ... Delivery system Model Beyond 300 301 Working conditions Ambient temperature 5 40 Relative humidity 80 Nominal Voltage AC110 V 22 V Nominal Frequency 50 Hz 1 Hz Water pressure 29psi 58psi Input air pressure 72 5psi 101 5psi Air flow 50 L min 1 2 Symbols explanation Symbols Explanations Manufacturer EU Representative Manufacturing date Serial Number Handle with Care Keep dry Table 1 ...

Страница 5: ...bols Explanations Refer to instructions Notice Refer to attatched document Backrest Down Avoid Electric Shock Backrest Up Ground protection Chair Down Setup Button Chair Up Spitting position Program Chair Position 1 Program Chair Position 2 Program Chair Position 3 P ...

Страница 6: ... is in good grounding The unit needs professional maintenance All the electrical components and connections should be made by an authorized technician All power and water air supply must be cut off after work finished every day The equipment should not be operated in the environment of high temperature high humidity vibration flammability unbalance or dusty No object can be touched in the unit s w...

Страница 7: ... curing light or other accessories they must be high quality products that passed the safety certification Transportation storage environment requirements a Ambient temperature range 40 70 C b Relative humidity range 20 90 Including condensation c Air pressure range 12 5 15psi Protect against rain and vibration in transportation handle with care Packaged equipment should be stored indoor with less...

Страница 8: ...ntaning or repairing switch on the power water and air before the use The 3 way syringe handle and syringe tip should be put into the disinfection bag to disinfect and then 134 pressure 29 8psi high pressure steam disinfection disinfection time is no less than 3 minutes Please read the user s guide before cleaning and disinfecting the high speed turbine and pneumatic micromotor The cover clean wit...

Страница 9: ...6 P N 8023488 Beyond 300 User s Manual of Beyond 300 301 Delivery System 4 Sizes unit inches ...

Страница 10: ...7 P N 8023488 Beyond 301 User s Manual of Beyond 300 301 Delivery System ...

Страница 11: ... adjusts the water output from the Water Q D Rotate counterclockwise to increase output and rotate clockwise to decrease output 4 City Bottle Selector This routing valve controls the water systerm input With the toggle up in the City position water enters the dental unit from the office plumbing With the toggle down in the Bottle position water enters the dental unit from self contained water syst...

Страница 12: ...9 P N 8023488 User s Manual of Beyond 300 301 Delivery System Figure 2 5 2 Assistant s control The assistant s control can rotate as the figure shown ...

Страница 13: ...rotate as the figure shown Figure 3 Figure 4 To realize cup filling function and bowl rinsing function just press the two buttons beside the cup filling nozzle The bowl rinsing button is designed to have off delay function A Cup filling button B Bowl rinsing button Note Beyond 300 system is non cuspidor type ...

Страница 14: ...u want to change the duration of cup filling or bowl rinsing you need to remove the two nozzles and take off the upper shell of the cuspidor body rotate the needle valves clockwwise to extend the time counterclockwise to shorten the time 5 4 Dentist unit The unit can rotate as the figure shown Figure 6 ...

Страница 15: ...rews clockwise Figure 8 Tools 5mm Allen wrench Tools 3mm Allen wrench Figure 7 1 Remove the plugs change the tightness of the three screws to adjust the damping force of level arm Note 1 3 of damping adjustment 2 of stop adjustment Loosen the screws in counterclockwise tighten in clockwise 1 2 3 User s Manual of Beyond 300 301 Delivery System 5 4 1 Level arm adjustment ...

Страница 16: ...trol panel Main control panel Figure 9 Assistant s control panel 5 5 1 System state The light on of control panel indicates a normal working state and you can operate normally User s Manual of Beyond 300 301 Delivery System ...

Страница 17: ...ons 1 0 P User s Manual of Beyond 300 301 Delivery System Notice The hydraulic system shall have the initial setting of the chair in following situations First installation or replacement of mainboard Insert replace repair any position feedback potentiometer or wiring Reset or replace the limit switch Reset the motion range of the chair Caution When setting up the system do not extent the maximum ...

Страница 18: ...ond 300 301 Delivery System Hydraulic system initial settings 1 Press P button about 12 second until the buzzer sound 2 short beeps the indicator flashes twice and then illuminates enter initial setup state press P1 the buzzer sound 1short beep P light off escape setup state This step eliminates the former stroke parameters 2 Press P button about 12 seconds until the buzzer sound 2 short beeps the...

Страница 19: ...rest will stop immediately Chair down Press this button continuously and the chair will move downwards When the backrest reach the desired position stop pressing the button and the backrest will stop immediately User s Manual of Beyond 300 301 Delivery System NOTE If you press the button continuously when the chair backrest reach the limit position it will automatically stop the movement NOTE If y...

Страница 20: ...automatically Spitting position backrest highest the chair is still and light off Press this button again the chair returns to former position and light on The chair shall stop at a new position by halfway stop 0 5 6 Foot control Delivery systems are equipped with wet dry variable speed disc type foot controls Foot pressure on any part of the control disc controls the flow of air to the active han...

Страница 21: ...ment cap then rotate clockwise to the desired pressure Push in on the adjustment cap to lock in the adjustment 2 To Decrease Air and or Water Pressure To decrease pressure pull out on the adjustment cap then rotate counterclockwise to the desired pressure Push in on the adjustment cap to lock in the adjustment NOTE When decreasing pressure pressure must be relieved from the system This may be achi...

Страница 22: ...ol the air and water supplies to the unit Flush This toggle is used to purge the coolant water from the handpiece tubing Hold the handpiece tubing over a suitable container then activate and hold the toggle for at least 30 seconds to flush out the handpieces User s Manual of Beyond 300 301 Delivery System 6 Functions introduction 6 1 Valves layout of delivery head Syringe air control Syringe water...

Страница 23: ...ntrol Turn on the switch on the syringe and rotate this valve counterclockwise to increase flow rotate clockwise to decrease flow Syringe water control Turn on the switch on the syringe and rotate this valve counterclockwise to increase flow rotate clockwise to decrease flow 20 P N 8023488 User s Manual of Beyond 300 301 Delivery System CAUTION Avoid operating the handpieses for extended periods l...

Страница 24: ...eyond 300 301 Delivery System Turn off mist spray Turn on mist spray Hint Adjust the drive air pressure to meet the demands of handpiece manufacturer s drive air pressure specifications Refer to your handpiece documentation for the drive air pressure specification ...

Страница 25: ...22 P N 8023488 User s Manual of Beyond 300 301 Delivery System 6 3 3 way syringe adjustment Figure 13 3 way syringe adjustment ...

Страница 26: ... ADS company recommends isolating protection for all applicable touch surfaces and transfer surfaces The partition used must be a plastic film approved the Food Drug Administration The plastic films should be taken off and discarded after the treatment of each patient P N 8023488 Flush the tubings independently or together After each patient 1 Disconnect the handpiece before flushing the conduit 2...

Страница 27: ...ty collector 4 Tighten the dirty collector clockwise Figure 16 7 4 Clean the filter The filter aids in preventing solids from entering the suction system To ensure a good working state of the suction system please clean the filter screen at least twice a week To clean the filter 1 Close the suction system 2 Pull out the filter remove the filter screen and clean the solids 3 Reinstall the filter 8 ...

Страница 28: ...serve the right to make any alterations which may be due to technical improvements Ajax Dental System Inc Add 13900 Sycamore Way Chino CA 91710 Tel 626 620 0456 E mail ads adsequip com http www adsequip com ...

Отзывы: