
ADJ Products, LLC - www.adj.com - Fog Fury Jett Instruction Manual Page 6
ADJ Products, LLC - www.adj.com - Fog Fury Jett Instruction Manual Page 7
Fog Fury Jett
Description
The new Fog Fury Jett fog machine features a fog juice level sensor.
When the fog juice level is low, a LED below the reservoir will flash. When
the fog juice level reaches a lower level, a bult-in sensor inside the reser-
voir will automatically shut off the pump. This will greatly expand the life
of the pump. The new Fog Fury Jett fog machine included a revolutionary
new heating element that has been specially designed to prevent exces-
sive particle build up that can cause premature fogger failure. The fog
machine also includes a remote control, that may be removed for periods
on non-use.
Fog Fury Jett
Set-Up
1. Open the shipping carton and carefully remove the unit from the
shipping carton.
2. Be sure to remove all the packing material especially around the
nozzle.
3. Set the fog machine on a flat dry surface. Fill the fog fluid reser-
voir with American DJ brand fog juice. Place the feeder tube with
the filter deep inside the reservoir and tighten the cap.
4. Firmly attach the remote control receiver to the rear remote control
socket on the unit.
5. Plug the unit in to a matching power supply. At this time the red
LED located on the remote receiver will glow red, this indicates that
the unit is heating up. Wait about nine minutes for the fogger
to reach normal operating temperature. When it has reached the
temperature, the green LED on the remote receiver will glow.
6. Either press the remote button to emit fog or use the manual but-
ton on the rear of the unit to emit fog.
7. Follow the operating instructions on the next few pages for proper
operation.
NOTE: If the LED under the reservoir begins to flash, this indi-
cates that fog juice fluid is low.
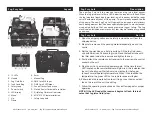
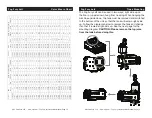
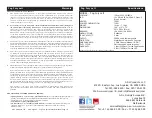
Fog Fury Jett
Layout
A
A
L
B
B
H
J
K
M N O P
I
D
S
D
E
E
F
G
C
C
Q
R
R
A. 12 LEDs
B. Handle
C. Fog Fluid Tank
D. Tank Fixed Ring
E. Safety Loop
F. Power Switch
G. LED display
H. Menu
I. Up
J. Down
K. Enter
L. Manual Fog
M. DMX 3 pin XLR Input
N. DMX 3 pin XLR Output
O. Control Socket Connection
P. Electric Power Cord with Fuse Holder
Q. Visible Fog Fluid Level Indicator
R. M10*P1.5 C Clamp Installation
S. Safety Loop hole