background image

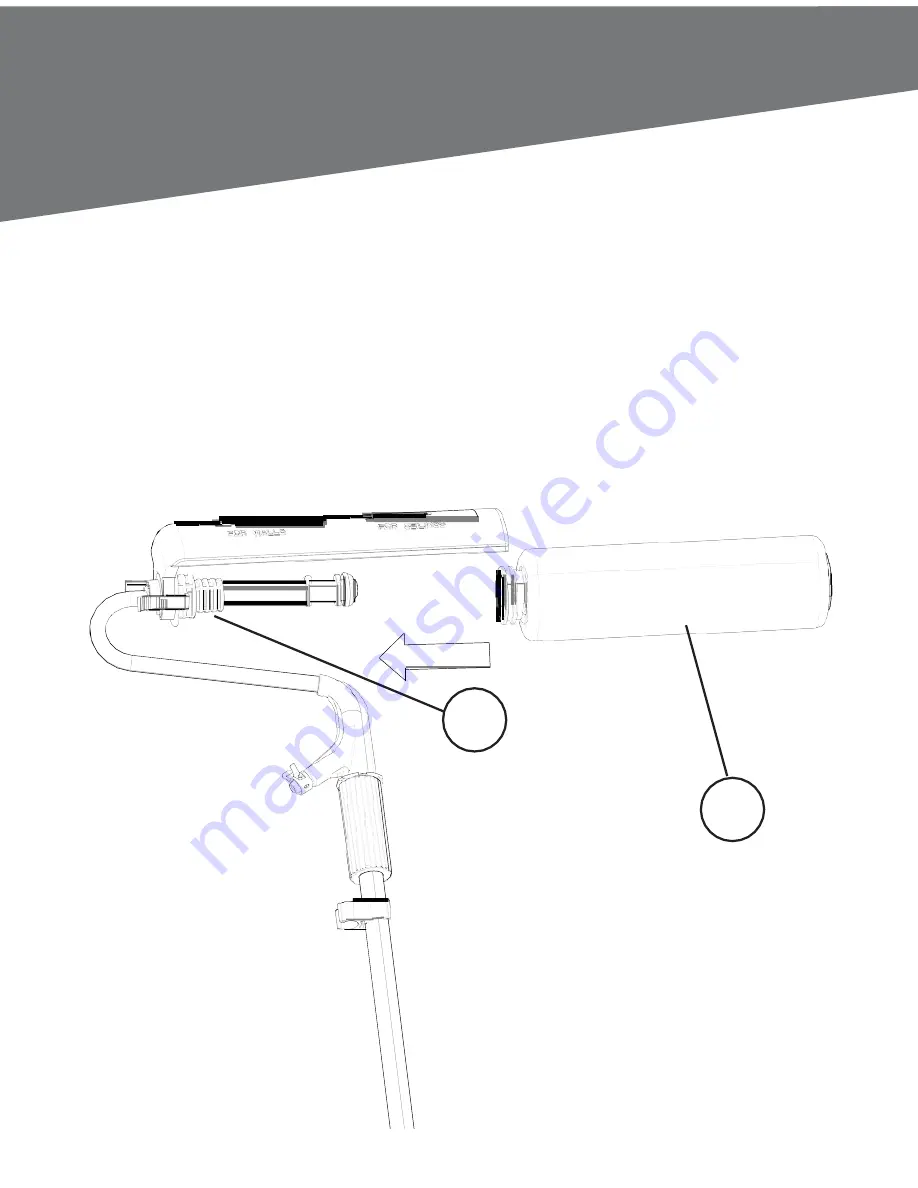
Step 2


Insert the roller brush (C) onto the smaller threads of the 
hose (B2).


B2


C


Содержание 716-30

Страница 1: ...AINT ROLLER USER MANUAL Item 716 30 Please read and comply with these instructions prior to the initial operation of the appliance Keep the operating instructions for future reference or for subsequent possessors ...

Страница 2: ...nplug grasp the plug not the cord G Power cable and power plug must be undamaged Replace damaged parts immediately H Do not point the paint roll or accessories toward yourself or any other person danger of injury by ejected material I Never submerge the unit in liquid To clean wipe the unit with a damp cloth J Use only cold water for rinsing out and cleaning the equipment Don t use hot water or an...

Страница 3: ...If the equipment used should be cleaned with water the paint is suitable If the equipment needs to be cleaned with turpentine or any other solvent it is not suitable for use with this equipment Before beginning work cover the floor furniture doorframes and other objects Place the unit on a sufficiently sized piece of plastic or cardboard Stir the paint well and thin up to 10 if necessary follow in...

Страница 4: ...Parts A Roller hood B Hose C Roller brush D Extension pole E Handle F Hose extension ...

Страница 5: ...Step 1 Press together the locking tabs A1 and then mount the roller hood A onto the hose B A1 A B B1 Slide the roller hood A onto the small thread of the hose B1 ...

Страница 6: ...Step2 Insert the roller brush C onto the smaller threads of the hose B2 B2 C ...

Страница 7: ...Step 3 Attach the extension pole D to the hose B by turning the pole D1 clockwise until it fits tightly B D1 D ...

Страница 8: ...Step4 Connect the extension pole D to the handle E by inserting it into the hole and using the locking tabs E1 to fasten it ...

Страница 9: ...Step 5 Slip the hose extension F over the pipe nipple B3 and tighten it with the plastic clip F1 Clip the length of the hose extension into the clip provided D1 ...

Страница 10: ...Step6 Slip the hose extension F through the handle thread E2 ...

Страница 11: ...Step 7 Connect the hoses to the pump with the shorter hose on the right side and longer hose on the left side Tighten the locking nuts by hand ...

Страница 12: ...he short hose in the paint container all the way to the bottom and attach it to the side of container with the plastic clip The unit is now fully assembled and ready to work Press the I button to turn on the machine ...

Страница 13: ...Insert the paint roll into a plastic bag immediately and tie it up to be airtight 3 Leave the suction and air bleed hoses in the paint LONG BREAKS days 1 Place the paint roll in a bucket of water 2 Wet the paint surface in the paint container with some water to prevent a skin from forming 3 Other parts should be cleaned according to the cleaning instructions ...

Страница 14: ...ched on 1 Remove the paint roller and clean it separately 2 Keep pumping water through the system until it is clean 3 Clean the paint in the hose if needed Maintenance 1 Change Battery Detach the remote controller from the handle Open the battery cover at the back with a tool such as a flat screwdriver Replace the battery with the same type Important Information ...

Страница 15: ...ted while working Filter clogged at suction hose System has sucked in air Clean aerate filter Dispose Do not dispose of electrical appliances as unsorted municipal waste Use separate collection facilities Contact your local government for information regarding the collection systems available If electrical appliances are disposed of in landfills or dumps hazardous substances can leak into the grou...

Страница 16: ...www adirpro com customersupport adirpro com Irvington NJ 07111 ...

Отзывы: