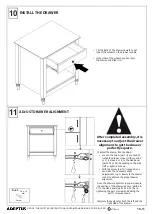
adeptus 78101 Скачать руководство пользователя страница 10

1

0

-1

1

1

0


INSTALL THE DRAWER

Tilt the back of the drawer upward to get

it 

past the wheels on the drawer runners.

Once clear of the wheels, you can level

the drawer and slide it in.

1

1

D=02

D

After completed assembly, it is 

necessary to adjust the drawer 

alignment to get the drawer 

perfectly square.

To adjust the drawer front position

:

L

oosen the screw (part 

H

you used to

install the drawer runner (either part

s E

or F) in steps 5 or 6, to the side panel

(parts 02 or 03), depending on the side

(left or right), as shown.

With the screw (part H) loosened, you

can make the necessary slight

adjustments (up or down) to the drawer

runner to achieve the proper drawer

alignment.

Once the drawer alignment is square, secure 

the position of the drawer runners (parts E & 

F)

to the side panels (parts 02 & 03) 

by re-

tightening the part H screw and adding

 the

part D screw as shown.

Complete these steps for both the left and the 

right side of the drawer.

ADJUST DRAWER ALIGNMENT

3.5

 x 1

4

mm

Screw

H

H

NOTICE: 

7+(:5,77(1


,16758&7,216

 CONTAINED


+(5(,1$5(


&23<5,*+7('

Содержание 78101

Страница 1: ...2 7 6 3 5 86 3 1 27 5 86720 56 3 6 9 28 1 0 1 180 5 72 5 9 5 7851 285 5 7 5 0 62 3529 6 59 25 3 576 HELPFUL OVERALL x 6 9 7 6 16758 7 21 6 76 1 7 2 817 28 5 6 7 6 7 7 66 0 x 2 127 8 7 3 576 2 7 81 7...

Страница 2: ...is a SOLID WOOD product We inspect all wood and follow quality assurance guidelines that pass third party inspections Note Real wood has knots small cracks and what may look like blemishes These chara...

Страница 3: ...e all the components and tools listed on pages 3 4 Remove all fittings from the plastic bags and separate them into their groups Keep children and animals away from the work area small parts could cho...

Страница 4: ...30 mm Dowel 4 x 30 3 5 x 14 mm mm 6 x 10 mm Screw Screw Left Drawer Runner Right Drawer Runner Knob Screw Back Panel Nail Foot 1 1 1 2 1 2 2 1 1 1 1 1 1 01 12 02 03 04 04 05 06 07 08 09 10 11 4 1 NOT...

Страница 5: ...part 11 Insert 2 dowels part A into both ends of each crossbar 2 drawer crossbars part 04 and 1 bottom crossbar part 05 A A A A 11 07 03 02 05 04 10 A A A A A A A A A A A A A A A A A 2 O O 04 Foot AT...

Страница 6: ...on the front side of the Left facing side panel part 03 03 02 4 ATTACH THE RIGHT DRAWER RUNNER 250D TO THE RIGHT FACING SIDE PANEL HALF OF RUNNER SET NOTE The end of the Right drawer runner part F wi...

Страница 7: ...TACH RIGHT SIDE PANEL TO CROSSBARS AND SHELF NOTE Do not attempt to complete this step with the unit upright It should be at on its front side on a hard clean surface B B B B B 02 RIGHT FACING SIDE PA...

Страница 8: ...he unit turned over upside down and on a hard clean surface K K K K K K K K K K K 27 mm 27 mm 9 0 0 6 90 8 K 11 Back Panel Nail ATTACH THE BACK PANEL Before attaching the back panel make sure the unit...

Страница 9: ...o the right drawer side part 12 67 3 4 Attach the knobs part G to the drawer front part 09 by inserting the screw part B through the back of the drawer front part 09 and into the back of the knob part...

Страница 10: ...or F in steps 5 or 6 to the side panel parts 02 or 03 depending on the side left or right as shown With the screw part H loosened you can make the necessary slight adjustments up or down to the drawe...

Страница 11: ...S Care and use instructions Use for general home use as an end table or nightstand with storage Clean with a damp cloth and wipe dry Do not use harsh chemicals or abrasive sponges or cloths that could...

Отзывы: