background image

27 

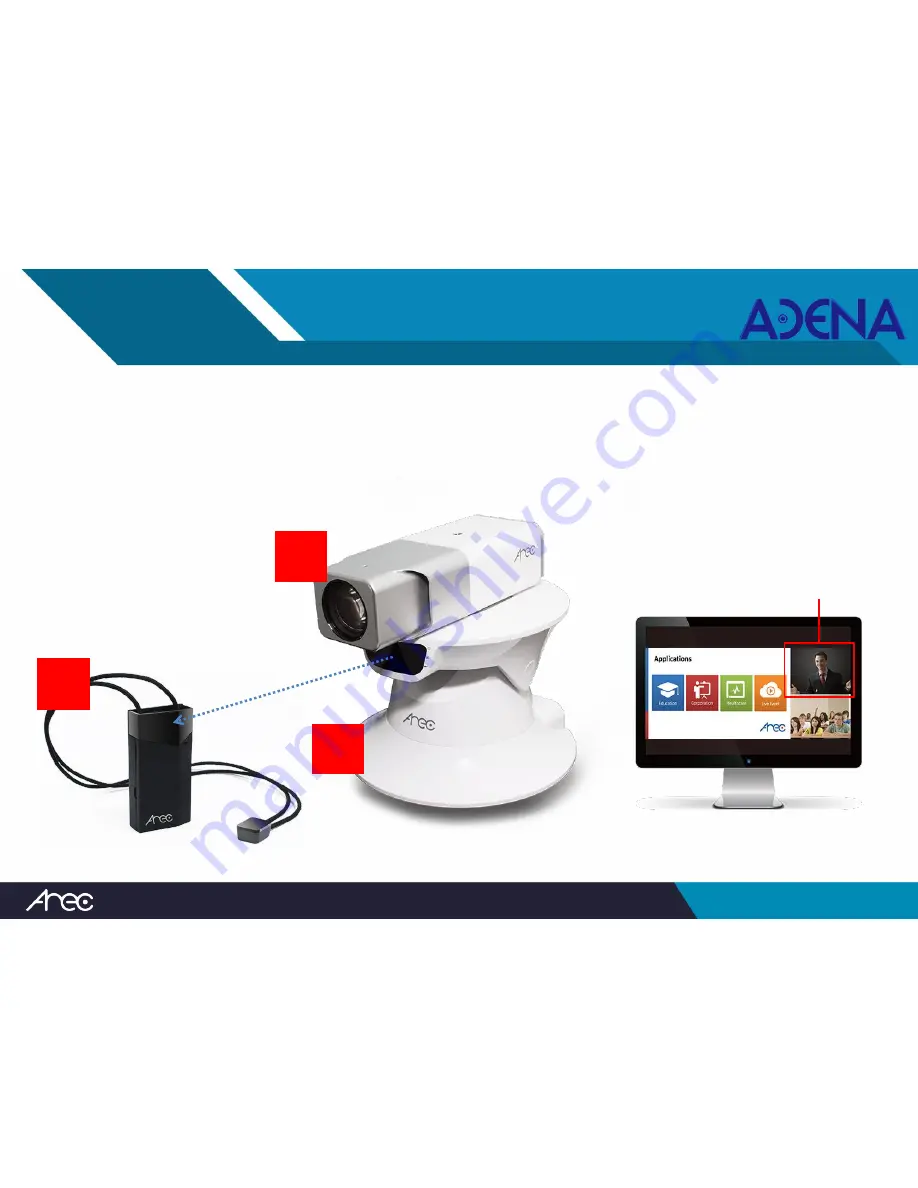
Check (Tracking Mount) 

4


/ 14 steps 

Power-on and swing wireless microphone(F) 

Face to presenter camera (B), and the tracking mount (D) will follow your 
movement automatically 

Check CH2 video on LCD monitor for tracking function 

LCD Monitor** 

Auto-tracking video 

**Does not include in AREC set 

Содержание AREC AM-600

Страница 1: ...Recording Live Broadcasting Easy to Install Solutions Installation Guide Interactive Set ADENA Ltd www a dena com yakov a dena com ...

Страница 2: ...Index Contents 03 Tools Preparation 07 Accessories in Box 09 Installation Location 14 Installation Steps 15 Function Check 22 Interactive Function Check 37 Appendix 37 01 ...

Страница 3: ... Contents Tools Preparation Accessories in Box 02 Contents in the box are for Room X only For interactive classrooms all items are duplicated for Room Y ...

Страница 4: ...cription Photo AX AREC MS 650 Media Station B AREC CI 200 Presenter Camera C AREC CI 230 Audience Camera D AREC TP 100 Auto tracking Mount for Presenter Camera F AREC AM 600 Wireless Microphone 03 Contents 1 4 pages ...

Страница 5: ...to G Rack Mount Kit H Ceiling Microphone J Camera Bracket K 12 Key Panel L VGA Splitter T AEC Mixer Code Item Photo NX WiFi Router Q Extension Cord R POE Switch S POE Splitter U Camera Bracket 04 Contents 2 4 pages ...

Страница 6: ...Qty Photo AB Audio 12m 1 A9 Audio 3m 4 H1 HDMI 2m 1 05 Contents Code Item Qty Photo V1 VGA 2m Male Female 1 V4 VGA 2m Male Male 2 V5 VGA 5m Male Male 1 N1 CAT 6E 50cm 1 N2 CAT 6E 90cm 2 N5 CAT 6E 3cm 5 3 4 pages ...

Страница 7: ...ption Photo Installation Guide Manual for installer Quick Guide Manual for users USB drive Could be used for video file export test Include preset system configuration utilities and documents 06 Contents 4 4 pages ...

Страница 8: ...escription Photo Flathead Screwdriver Tool for wire installation Phillips Screwdriver Tool for screw installation Tweezers Tool for wire installation Stripper Tool for wire installation CAT 6E Cable Cable for extension 1 2 pages ...

Страница 9: ...op For PPT capture and web director LCD Monitor VGA or HDMI Preview and GUI display Headset Speaker For audio test and remote voice Apple iPad For director APP optional Rack For devices placement optional 08 Tools Preparation 2 2 pages ...

Страница 10: ...09 Accessories in Box AX Antenna Quick Installation Guide AREC Media Station Remote Controller Power Adapter A1 A2 1 3 pages Please insert the USB drive into the backside USB slot of Media Station ...

Страница 11: ...10 Accessories in Box D1 D3 D K D2 K2 K1 T T1 T1 T1 T1 2 3 pages ...

Страница 12: ...m Male Female 1 V4 VGA 2m Male Male 2 V5 VGA 5m Male Male 1 N1 CAT 6E 50cm 1 N2 CAT 6E 90cm 2 N5 CAT 6E 3cm 5 Code Item Qty AB Audio 12m 1 A9 Audio 3m 4 H1 HDMI 2m 1 Code Item Qty F Bluetooth Microphone 1 Q Extension Cord 1 USB drive 1 3 3 pages ...

Страница 13: ...12 Installation Location Installation Steps For Room X only please repeat all steps for Room Y ...

Страница 14: ...Connection Diagram 13 ...

Страница 15: ...On the rack K NX Installation Location 14 On the wall Presenter Camera On the ceiling 200 240cm 200 240cm B D J S H In the rack L T Q R AX On the wall Audience Camera C U Room X ...

Страница 16: ...On the rack K NY Installation Location 15 On the wall Presenter Camera On the ceiling 200 240cm 200 240cm B D J S H In the rack L T Q R AY On the wall Audience Camera C U Room Y ...

Страница 17: ...ter S is fixed under the bracket L Install on the wall at the back of classroom Suggestion distance from camera to floor is 200 240cm B D J S Install on the wall at the front of classroom Suggestion distance from camera to floor is 200 240cm C U ...

Страница 18: ...17 Installation Presenter Camera 2 7 steps B D Adjust cable length if necessary N5 D1 D3 Cable in Box E Cable in Box E R S N1 IN D2 Cable in Box D OUT C N5 R OUT ...

Страница 19: ...18 Installation VGA Splitter 3 7 steps Power adaptor in box L Adjust cable length if necessary Does not include in AREC set V1 V4 PPT Source V5 Projector A L Q L ...

Страница 20: ... Mic 4 7 steps Power adaptor in box T Install on the ceiling at the center of classroom AX Adjust cable length if necessary Does not include in AREC set T PPT Source Q LINE OUT T1 T1 A9 A9 AB T1 T1 AX LINE IN A9 A9 Speaker T H ...

Страница 21: ...20 Installation WiFi Router 5 7 steps Power adaptor in box N NX N Director Computer AX Adjust cable length if necessary Does not include in AREC set N5 N5 Q Director APP on Apple iPAD Connect to LAN ...

Страница 22: ...21 Installation 12 Key Panel 6 7 steps Rack Adjust cable length if necessary Does not include in AREC set A Power adaptor in box A K1 K2 G G Q A K ...

Страница 23: ...on Media Station 7 7 steps AX V4 L T A9 NX N5 Power adaptor in box R N5 N2 N2 H1 Adjust cable length if necessary Does not include in AREC set V4 or OUT Networking A1 LCD Monitor Q S IN IN R N5 OUT IN R R R C A9 N5 ...

Страница 24: ...23 Function Check For Room X only please repeat all steps for Room Y ...

Страница 25: ...24 Check Power On 1 14 steps Check all power adaptors are well set Power on all the devices check video image on the LCD monitor R R Does not include in AREC set LCD Monitor Q M L AX P NX ...

Страница 26: ...eck Remote Controller 2 14 steps Press key use key to select layout Check video sources on the LCD monitor CH1 PPT source CH2 Presenter camera CH3 Audience camera Does not include in AREC set LCD Monitor A2 ...

Страница 27: ...F 26 Check Wireless Microphone 3 14 steps Power on wireless microphone F AX Blue LED Power Key Check the blue LED light on the media station front panel A for connection A1 ...

Страница 28: ... and swing wireless microphone F Face to presenter camera B and the tracking mount D will follow your movement automatically Check CH2 video on LCD monitor for tracking function LCD Monitor Auto tracking video B D Does not include in AREC set F ...

Страница 29: ... 5 14 steps Make sure the power is on check the buttons in the direction of arrows Adjust the volume by turning the buttons VOL 1 Room X PPT source Room Y mixed volume VOL 2 ceiling microphone volume only T POWER LED ON ...

Страница 30: ...Headset Connect headset to media station audio out jack Check the sound from headset PPT source play music or video Ceiling microphone wireless microphone speak into the microphone and check the function from the headset Adjust each or mixed volume level if necessary ...

Страница 31: ...k 12 Key Panel 7 14 steps Press key two times to start recording Press key to stop recording after 1 min Check icon and timer on the LCD monitor 00 00 48 Does not include in AREC set K LCD Monitor LCD Monitor ...

Страница 32: ... 12 Key Panel 8 14 steps Press key to playback latest video Press key to stop playback Check video on the LCD monitor and volume with headset LCD Monitor Does not include in AREC set Headset K 00 00 12 00 10 05 ...

Страница 33: ...eck 12 Key Panel 9 14 steps Plug in USB drive into USB slot Press key use key to select Record Export Lecture Video Select first video move to icon D Confirm to export then check status bar of video export K ...

Страница 34: ...r NX via cable Run browser IE or Firefox to URL http 192 168 11 254 Log on online director page User director Password director Install VLC plug in and set allow only first time Press F5 to refresh browser Online Director Director UI Director Computer WiFi Router NX ...

Страница 35: ... Director 11 14 steps Check all videos on web director Click on layout template and check result Change to CH2 or CH3 Click on direction key and zoom bar and check result CH1 CH4 Selection Zoom Bar Layout Direction ...

Страница 36: ...tall AREC Action APP from App Store Connect iPad to WiFi Router NX via WiFi SSID AREC_WIFI_X or AREC_WIFI_X_5G No password Run AREC Director APP and log on IP 192 168 11 254 User director Password director Apple iPad Director APP Log in WiFi Router NX ...

Страница 37: ... Check Director APP 13 14 steps Check video on director APP Press layout button and check result Press key to start recording and check timer Press key to stop recording after 1 min Layout Timer Rec Stop ...

Страница 38: ...uter to WiFi Router NX via cable Start browser IE or Firefox to URL http 192 168 11 254 Log in video manager page User video Password video Select lecture Select video to play or download Computer Video Manager WiFi Router Lecture Page Video Page NX ...

Страница 39: ...38 Interactive Function Check ...

Страница 40: ...39 Room X Room Y AX AY Networking Interactive Networking 1 7 steps ...

Страница 41: ...P Address 2 7 steps Go to Room X and access Media Station AX Press key use key to select Setting About and get the IP address of Media Station AX 192 168 123 123 for example Does not include in AREC set LCD Monitor A2 ...

Страница 42: ...r IE or Firefox to URL http 192 168 11 254 Log in system admin page User admin Password admin Select Recording Setting Enable streaming setting and select Webcasting fill below URL URL rtmp 192 168 123 123 live Program rooom x Computer System Admin WiFi Router Recording Setting Webcasting Setting NX ...

Страница 43: ...Continue setting Media Station AX in Room X Select Sensor Setting and select CH4 Select Encoder as a video source Protocol RTMP URL rtmp 192 168 123 123 live Program rooom y Computer System Admin WiFi Router Sensor Setting Encoder Setting NX ...

Страница 44: ... cable Start browser IE or Firefox to URL http 192 168 11 254 Recording Setting Enable streaming setting and select Webcasting URL rtmp 192 168 123 123 live Program rooom y Sensor Setting Select CH4 and select Encoder as a video source Protocol RTMP URL rtmp 192 168 123 123 live Program rooom x Computer WiFi Router NX ...

Страница 45: ...key to select layout Check video sources on the LCD monitor CH1 PPT source CH2 Presenter camera CH3 Audience camera CH4 Remote video Does not include in AREC set LCD Monitor A2 Interactive Remote Video 6 7 steps Headset ...

Страница 46: ...ull screen remote video CH4 Change layout in Room X then CH4 on LCD monitor of Room Y will be changed simultaneously Check the audio volume of Room X by hearing headset in Room Y LCD Monitor Interactive Remote Video 7 7 steps Headset K LCD Monitor K Room X Does not include in AREC set ...

Страница 47: ...46 Appendix ...

Страница 48: ...omer s network B AREC CI 200 CI 200 Presenter 192 168 11 33 Fixed IP C AREC CI 230 CI 230 Audience 192 168 11 44 Fixed IP D AREC TP 100 TP100 Presenter 192 168 11 55 Fixed IP NX NY WiFi Router SSID AREC_WIFI_X AREC_WIFI_X_5G SSID AREC_WIFI_Y AREC_WIFI_Y_5G No password 192 168 11 11 Fixed IP ...

Страница 49: ...Encoder Default Sources Setting 48 VGA 1 HDMI 1 Remote Video IP_CAM IP_CAM Video Source Audio Volume ...

Страница 50: ...Default Layout Setting 49 K Change layout cycling ...

Страница 51: ......

Отзывы: