

www.addonics.com
Technical Support (M-F 8:30am - 6:00pm PST)
Phoner: 408-453-6212
Email. www. Addonics.com/support/query/
Operation
1.
Attach the source (or master) drive to the connector that labelled SOURCE
2.
Attach the target (or slave) drives to the other three connectors. You can attach
from 1 to 3 target drives. You may use the included connecting cables in case there
is interference for direct attaching drive to the duplicator.
3.
Attached the 12V power adapter to the duplicator and press the power switch to
ON position to power up the unit
4.
After a few seconds, the LCD screen should display COPY and the number of drives
detected. The green LED light corresponding to each connector should also glow. If
any LED does not glow, check to make sure the drive is fully inserted into the
connector or try a different drive.
5.
Press ENT button (the top right- hand button) to start the duplication.
Note
•
The duplicator is set up to copy WHOLE MEDIA as the default setting. This setting
copies the drive sector by sector, ensuring everything is copied to the target drive.
This is a recommend setting for copying boot drive or making identical copy of the
master drive.
•
PERFORMANCE is set to SPEED for fastest duplication. Drives with very slow
performance may not be detected properly. In that case, try changing the
PERFORMANCE setting to COMPATIBILITY or BALANCE.
Please refer to the Jasper II controller user guide for all the various configuration settings of
the duplicator
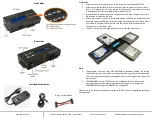
Front view
Rear view
Included accessories
4 pcs of this cable


