www.addonics.com
Technical Support (M-F 8:30am - 6:00pm PST)
Phone: 408-453-6212
Email: www.addonics.com/support/query/
Quick Start
Insert the source and target drives and power up the unit. By default, the
duplicator will initialize, scan for drives, and offer the copy function. When the
copy function appears, press ENT to begin copying.
Canceling Functions
When selecting menu options, canceling is done by pressing ESC. When the
unit is busy performing an operation such as copy, verify, or overwrite, the
operation can be canceled by holding the ESC button until the unit beeps.
Duplicator Functions
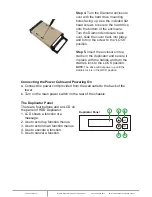
The duplicator has three menu sections: The Main menu, Setup Options, and
Advanced Setup Options. Setup Options is accessed through the Main
menu. Advanced Setup Options is accessed by holding the ESC button from
any other menu until the unit beeps.
1. Copy HDD
Scans the ports, then copies from the source to the target.
2. Compare HDD
Scans the ports, then target will be compared to source.
3. PreScan Source
Reads all blocks on the source drive to confirm no I/O errors are
encountered.
4. ReScan BUS
Manually scans all ports and reports how many units were found.
5. Source Size
Examines the source drive and reports total space and space used, if
drive contains compatible partitions. Press up/down to change display,
ESC to exit.
6. Secure Erase
Scans all ports, then erases all data on all connected drives (including
Source HDD). NOTE: some drives will remain in a locked state when the
process is complete. Drives that are locked may not appear to an operating
system and will cause an I/O error if used as a target in the duplicator. If this
happens, start secure erase again and hold ESC to cancel the operation a
few moments after it begins.
7. Overwrite
Overwrite is used to write data onto the entire hard disk, it will destroy all
data on all HDDs connected to the duplicator (including Source HDD) by
writing data to all sectors. There are 3 sub-options: One pass , 3 pass and 7
pass.
8. Setup
Enters the Setup menu. See Setup Options for details.
9. USB Mode
Not supported.
10. Adv Setup
Enters Advanced Setup Options menu. Only available when holding ESC on
any main menu option. See Advanced Setup Options.
Setup Options:
8-01. Language
Use this option to select the language of the system, currently only English is
supported.
8-02. Copy Size
Controls how much of the source drive to use for copy operations, in percent-
age. Default setting is ALL (100%).
8-03. Startup Menu
Sets the first menu option to appear after boot. Default setting is Copy HDD.
8-04. Auto Compare
Controls whether or not the target is compared automatically when copy is
complete. Default setting is OFF.
8-05. Copy with Size
Causes duplicate drive to report to an operating system the exact same total
size as source when copy is complete. Works only on drives formatted using
a Master Boot Record. Default setting is OFF.
8-06. Button Sound
Enables audible beep when pressing buttons. Default setting is ON.
8-07. Device Info
Displays information about connected drives. Main display is drive manufac-
turer and size. Press up/down to select drives, ENT to display model number
and firmware revision of selected drive.
8-08. System Info
Displays firmware version and date.
8-09. Fast Copy
When this setting is ON, the duplicator will attempt to copy the source drive's
contents instead of the entire disk. Also controls Compare function. Default
setting is OFF.
NOTE:
Target drive size is still required to be equal to or greater than source. Only works with
source drives formatted using Master Boot Record. If the source drive has a boot record other
than MBR, the entire disk will be copied as if Fast Copy were OFF. If the source drive is
formatted with a Master Boot Record and contains only FAT32 or NTFS partitions, identical
partitions will be created on the target(s) and only the files will be copied. If the source drive with
MBR format includes partitions other than FAT32 or NTFS, all sectors of all partitions (including
FAT32 and NTFS) will be duplicated.
Enabling Fast Copy may not produce bootable duplicates.
Advanced Setup
10-01. Detect HDD Delay
Sets delay between attempts to detect disk connection or disconnection.
Default setting is 4 seconds.
10-02. Read Error Skip
Sets whether a sector or block may be skipped if a read error occurs on the
source drive. Default setting is OFF.
10-03. Update Firmware
Used to apply firmware updates. Connect a drive formatted as FAT contain-
ing one partition with the firmware file in the root directory.
NOTE: This function scans the entire disk before proceeding. Providing a
drive that is as small as possible is strongly recommended.
10-04. Compare Firmware
Used to confirm correct firmware. Connect a drive formatted as FAT contain-
ing one partition with the firmware file in the root directory.
NOTE: This function scans the entire disk before proceeding. Providing a
drive that is as small as possible is strongly recommended.
10-05. Quick Erase HDD
Scans the ports, then quickly erases all sectors on all connected drives.
10-06. H/W Diagnostic
Starts comprehensive tests for LCD, SDRAM, HDD ports, and Flash
memory.
10-07. Load Default
Resets all configuration settings to default.
10-08. Link Option
Enables USB Mode option on the Main Menu. This feature is not supported.
Default setting is ON.
10-09. USB Auto-Link
Automatically enables USB Mode. This feature is not supported. Default
setting is ON.
10-10. COPY HPA
Enables copy functions to duplicate the source drive's Host Protected Area.
Normally this area is defined as not available to a host controller as defined
by ATA/SATA specifications.


