background image

wel

c

ome

c

ontent

s

inst

all

ation 


op

era

tion



r

t

er

in

orma

tion

15

c Press 

 to save the value and return to standby. Alternatively, press 


to discard any change and return to standby. 

To set the cable length

a  From standby, press  . The Caps Lock and Scroll 

Lock indicators will flash.

b  Use the keypad to enter the cable length in metres.
c Press 

 to save the value and return to standby.

  Alternatively, press 

 to discard any change and return to standby.

Note: You can also increase or decrease the cable length setting from the 
standby level (and view the resulting change in screen image quality) using   

and   respectively. If necessary, press 

 to return to a neutral setting. Such 

adjustments to the cable length setting are saved automatically.  

To set the cable type

a  From standby, press  . The Num Lock and Caps 

Lock indicators will flash.

b  Type the number that corresponds to the category 

of link cable used:

•  Press 

 for 

Cat 5


•  Press 

 for 

Cat 5e


•  Press 

 for 

Cat 6


Num

Loc

k

Caps

Loc

k

Scroll

Loc

k

Num

Loc

k

Caps

Loc

k

Scroll

Loc

k

To adjust video gain

a  From standby, use   and   to decrease or increase the gain level. If 

necessary, press 

 to return to a neutral setting. Gain adjustments are 

saved automatically. 

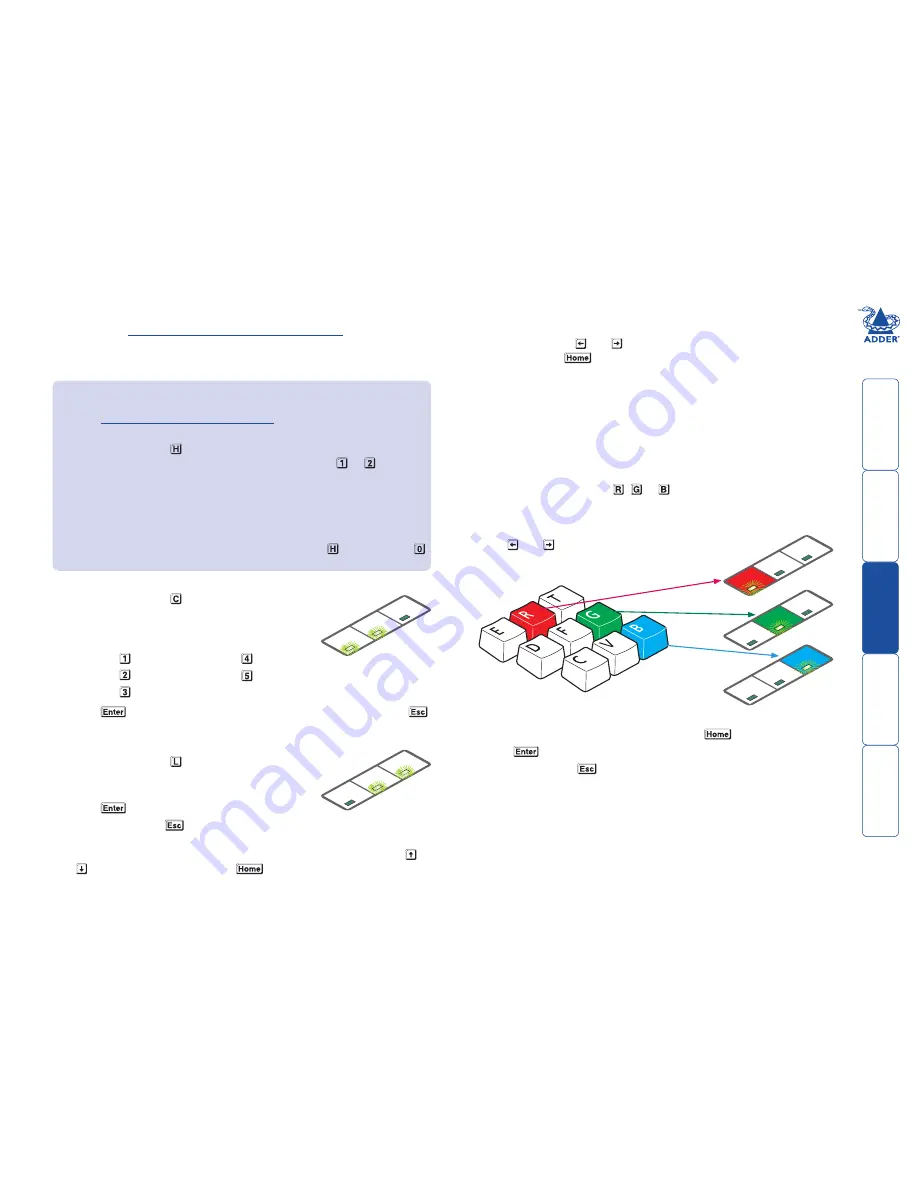
To adjust colour skew

You will only need to use these adjustments if the video image is not sharp after 
adjusting the cable type and length. Before entering video compensation mode, 
display the suggested screen content (see Test images while compensating on 
the previous page). Look for colour fringes adjacent to the displayed icons and 
text. Also check the skewtest.exe image to confirm whether the red, green and 
blue crosses are all vertically aligned.

a  From standby, press either  ,   or   depending on which colour needs 

to be adjusted. The Num Lock, Caps Lock or Scroll Lock 
indicators will flash for the Red, Green and Blue channels 
respectively.  

b Use   and   to adjust the delay for the 

chosen colour while watching the results 
on the remote video display.

Num

Loc

k

Caps

Loc

k

Scroll

Loc

k

Num

Loc

k

Caps

Loc

k

Scroll

Loc

k

Num

Loc

k

Caps

Loc

k

Scroll

Loc

k


Note: If the screen goes blank during adjustment, either press the opposite 
arrow key to the one you last pressed or press 

 to reset all delays.


c Press 

 to save the setting and return to standby.

  Alternatively, press 

 to discard any change and return to standby.

To exit video compensation mode (return to normal operation)

1  Ensure that you are at standby level by exiting from any adjustment options. 
2  On the remote unit, return the miniature switch 

1

 to its OFF position.

  All USB devices will be reconnected to the computer and normal operation 

will continue. 

MS2 variants

  By default, all video compensation changes that you make will 

affect both channels equally. If you wish to adjust the channels separately:

•  Enter 

video compensation standby level

. The green indicators on both 

link sockets of the remote module will flash.

•  From standby, press 

. The keyboard indicators will alternate between 

the Num Lock and Scroll Lock, and the Caps Lock. Press   or   to select 
the primary or secondary video display, respectively. The green indicator 
of the link socket corresponding to the chosen video channel will flash 
(lower=primary, upper=secondary), the other will remain on.

•  Make the required compensation changes to the chosen video channel 

using the techniques described below.

•  To return to using both channels, from standby, press 

 and then press    

The green indicators of both link sockets will flash.

•  Press 

 for 

Cat 7


•  Press 

 for 

Cat 7a


Video compensation (continued)

Once you have 

entered video compensation standby level

, you can choose 

which adjustments to make. Generally you should set the cable type and cable 
length options first. Then, if necessary, use the video gain and colour skew 
adjustments to fine tune the remote video image.

Содержание AdderLink X-USBPRO

Страница 1: ...AdderLink X USBPRO Analog video and USB extenders...

Страница 2: ...module power connection 8 Connections at the remote module 9 Dual user configuration 12 Video display DDC information 13 Video compensation 14 What is skew and why is compensation needed 14 Operation...

Страница 3: ...ion methods mean that CD quality sound and high video resolutions of up to 1920 x 1200 are fully supported Any lag effects caused by long cable runs are easily eliminated using the intuitive video com...

Страница 4: ...udio lead 3 5mm jacks Video lead 15 way male to male CD ROM Video lead 15 way male to male Self adhesive feet AdderLink X USBPRO extender modules X USBPRO MS2 local module X USBPRO MS2 remote module A...

Страница 5: ...e if USB powering not possible Part number PSU IEC 5VDC 2 5A Rack mount plate for X USBPRO module useable for the local or remote modules Part number X RMK FASCIA Rack mount chassis Part number X RMK...

Страница 6: ...PRO can be used with other USB hubs in the system but please note that due to power constraints the local unit should not be connected to the downstream port of a bus powered USB hub Additionally X US...

Страница 7: ...the MS2 local module From primary video output port From secondary video output port Note Do not use USB cables longer than 3 metres to connect the local module to the computer 4 Optionally connect an...

Страница 8: ...a second category 5 5e 6 7 or 7a link cable up to 300 metres in length to the upper socket on the MS2 local module Primary CATx link cable Secondary CATx link cable 6 Optionally connect a local video...

Страница 9: ...X USBPRO MS2 and optionally for X USBPRO units 1 Connect the output lead of the optional power adapter to the socket labelled POWER on the local module 2 Insert the IEC connector of the separate powe...

Страница 10: ...nly Optionally attach the lead from a second video display to the upper video out socket on the MS2 remote module To primary video display To secondary video display MS2 variant only When connecting f...

Страница 11: ...on the remote module 5 Optionally attach the lead from your stereo speakers to the audio output socket on the remote module To speakers Link to local module MS2 variant only Connect a second category...

Страница 12: ...Attach the output connector of the power supply to the POWER socket of the remote module To power supply 7 Attach the IEC power lead to the power supply body and insert the mains plug of the lead to a...

Страница 13: ...ule Second USB from the PC PC AUDIO VIDEO USB REMOTE ADDER POWER SHARPNESS LINK TO LOCAL ON REMOTE ADDER POWER SHARPNESS LINK TO LOCAL ON USER 1 USER 2 ADDER ADDER ADDER ADDER Both local modules requi...

Страница 14: ...play to its remote position and the new DDC information will be used at every power on Note For MS2 variants the dual video channels are handled seprately Therefore if you wish to capture both sets of...

Страница 15: ...t allows you to get the best results from your remote video display s Using this special mode you can configure Cable type Select the type of link cable used Cable length Enter the length of the link...

Страница 16: ...e Red Green and Blue channels respectively b Use and to adjust the delay for the chosen colour while watching the results on the remote video display Num Lock Caps Lock Scroll Lock Num Lock Caps Lock...

Страница 17: ...the right by one user will cancel out a simultaneous left mouse move by the other The same is also true when the local module has feed through peripherals attached to it adjacent to the computer For...

Страница 18: ...on being read and stored from a locally connected video display Two green flashes Checksum error prior to copying no information will be programmed Three green flashes Too much data to fit into the mo...

Страница 19: ...n buildings Ensure that all twisted pair interconnect cables are installed in compliance with all applicable wiring regulations Do not connect CATx link interfaces RJ45 style connectors to any other e...

Страница 20: ...Increase the separation between the equipment and the receiver c Connect the equipment to an outlet on a circuit different from that to which the receiver is connected d Consult the supplier or an ex...

Страница 21: ...Technology House Trafalgar Way Bar Hill Cambridge CB23 8SQ United Kingdom Tel 44 0 1954 780044 Fax 44 0 1954 780081 Adder Corporation 350R Merrimac Street Newburyport MA 01950 United States of Americ...

Отзывы: