ADDER 12 Port SMART View 2XPRO 2XPRO/12 Скачать руководство пользователя страница 53

SmartView XPro

Installation and Use

Page 52

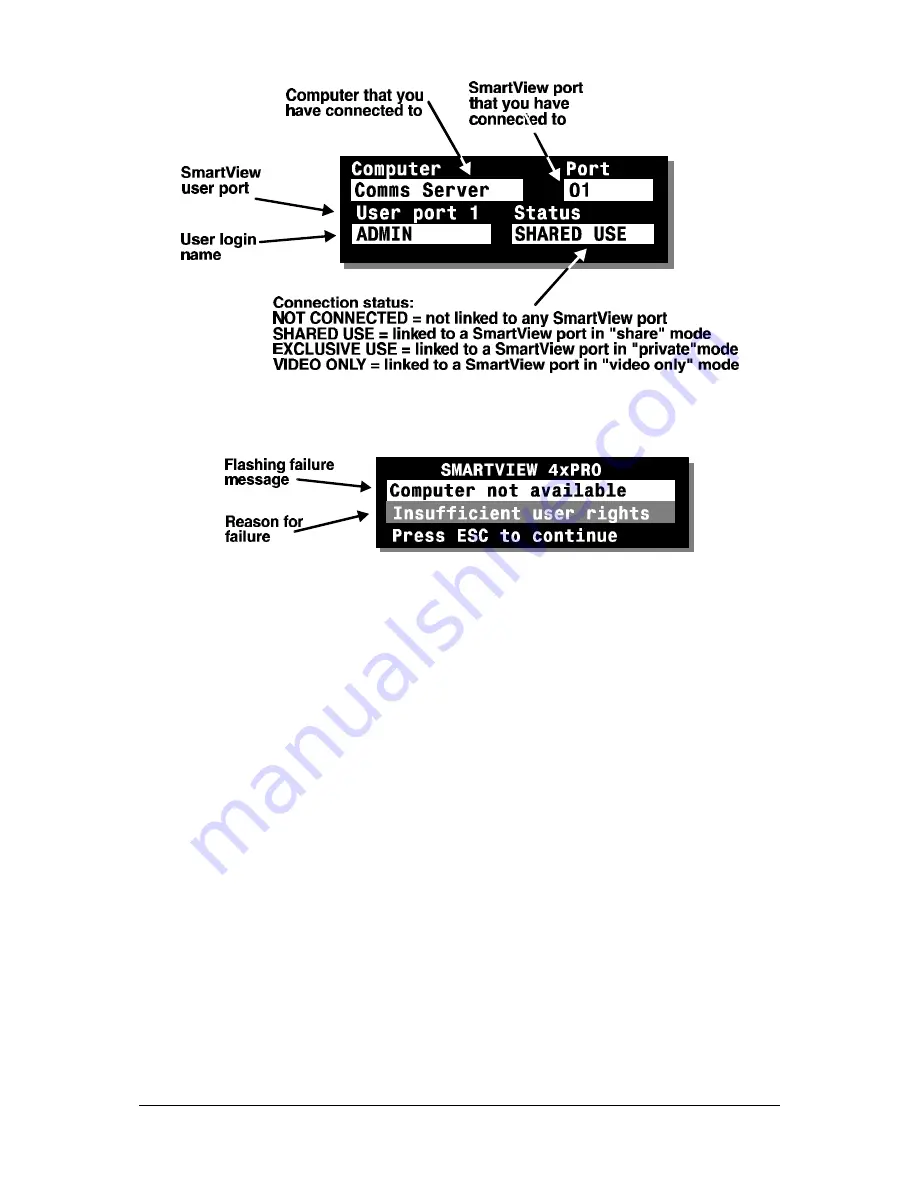
SmartView indicates an unsuccessful connection

4.11 The reminder banner

Normally the SmartView will display a discreet computer name reminder banner that
reminds you which computer you are connected to. This banner will normally appear
at the top of the screen in a central location and may optionally be disabled (see
section 4.12.2). Many computer screens can look very similar and so this banner
serves as a useful reminder of which computer you are working on. The colour and
transparency of the banner can be selected to make it as discreet as possible. It
may also be moved around the screen in any direction by using the ‘HOTKEYs’
together with the cursor keys.

For example to move the banner up the screen (assuming the default CTRL + ALT
hotkeys) use:

ba

ba


w

w

The computer name banner is also used to tell the you that another user is using the
computer that you are currently connected to. Whist the other user has control of the
computer you will see the message "Video Only" below the computer name banner.

Содержание 12 Port SMART View 2XPRO 2XPRO/12

Страница 1: ...ew w XPRO I N S T A L L A T I O N U S E www addertec com SMART V V i i e e w w XPRO 16 Port SMARTView 4XPRO 4XPRO 16 12 Port SMARTView 2XPRO 2XPRO 12 8 Port SMARTView 2XPRO 2XPRO 8 4 Port SMARTView 2...

Страница 2: ...rts contained within power adapter No user serviceable parts within power adapter do not dismantle Plug the power adapter into a socket outlet close to the SmartView XPro Replace the power adapter wit...

Страница 3: ...the interference with one or more of the following measures a Reorient or relocate the receiving antenna b Increase the separation between the equipment and the receiver c Connect the equipment to an...

Страница 4: ...Structuring your SmartView XPro installation 17 2 6 Maximising the video quality 23 2 7 Other useful installation information 24 2 8 Re enabling a disconnected PS 2 mouse 24 2 9 Hot plugging the Smar...

Страница 5: ...Setting the USER PREFERENCES 53 4 13 Using the FUNCTIONS menu 54 4 14 Querying the routing status 55 4 15 Using the dual access ports 1 and 3 55 4 16 Cascading SmartViews 56 4 17 Resetting user port k...

Страница 6: ...se connections and an RJ45 link for connection to a remote AdderLink extender unit This gives the user the ability to connect to the SmartView from up to 200 metres away using common twisted pair netw...

Страница 7: ...t panel key keyboard hotkey or 3 button mouse Supports high bandwidth monitors at resolutions up to 1920 x 1440 Fully flash upgradeable via the serial port upgrade cable included Supports a very wide...

Страница 8: ...and name search options Supports moving or blank screen savers and auto logout on screen save option Wheel mouse may be used to launch and operate the OSD menus User may select English French or Germa...

Страница 9: ...rackets to SmartView Pro 6 screws supplied with 4XPro12 and 4XPro16 models This installation guide A serial cable for flash upgrades and upload download functions 1 3 AdderLink XR receiver package con...

Страница 10: ...SmartView XPro Installation and Use Page 9 1 5 Product information Fig 1 SmartView 2XPro and 4XPro models viewed from the front...

Страница 11: ...SmartView XPro Installation and Use Page 10 Fig 2 SmartView 2XPro8 and 4XPro 16 models viewed from the rear 2XPro4 and 4XPro12 models are similar but with less computer ports...

Страница 12: ...SmartView XPro Installation and Use Page 11 Fig 3 AdderLink XR top and AdderLink Gold below XR receiver units...

Страница 13: ...SmartView XPro Installation and Use Page 12 Fig 4 Mounting the AdderLink into its 19 inch rack mounting bracket...

Страница 14: ...esolution monitor with an extended keyboard and a wheel mouse on one user port and a smaller monitor with a basic mouse and keyboard on another The SmartView XPro intelligently handles these mixtures...

Страница 15: ...IntelliMouse These are fitted with a wheel or other scroll control and sometimes have additional buttons Examples are Microsoft IntelliMouse Logitech Pilot Mouse Logitech MouseMan Genius NetMouse and...

Страница 16: ...use one 2 2 Mounting the SmartView The SmartView XPro has been designed to be used either on a desktop or mounted in a 19 inch rack If the SmartView is to be used on a desktop then you will need to st...

Страница 17: ...as possible Where possible 2 metre cables are recommended as these will give very high video quality Any unused computer connections can be left unconnected To connect computers with serial mouse con...

Страница 18: ...d control up to 16 computers see figure 5 For larger numbers of computers XPro units may be cascaded in a tree structure to form a video switching network see figure 6 The SmartView unit at the top of...

Страница 19: ...e supported Keep all cascade cables as short as possible The video quality is maximised by using the shortest possible total cable run from computer to KVM If you are making multiple cascade links bet...

Страница 20: ...SmartView XPro Installation and Use Page 19 The following diagrams show some typical SmartView XPro installations...

Страница 21: ...SmartView XPro Installation and Use Page 20 Fig 5 A typical installation using a single SmartView XPro 8...

Страница 22: ...SmartView XPro Installation and Use Page 21 Fig 6 A cascaded application using multiple SmartView XPros...

Страница 23: ...SmartView XPro Installation and Use Page 22 Fig 7 An advanced application that uses two sets of cascaded SmartViews that are cross linked together using twisted pair wiring and AdderLinks...

Страница 24: ...will be truly appalling with smudging ghosting and loss of focus Cables that are designed to carry video signals are constructed using three separate co axial cores to carry the red green and blue si...

Страница 25: ...s you to disconnect and re connect the shared mouse without powering down the system although this is generally not advisable see section 2 8 for details Keyboard and mouse mode switching The SmartVie...

Страница 26: ...only be restored by rebooting the PC This is because the mouse drivers only setup and enable the mouse when the PC is initially booted If you have switched off your SmartView or you are attempting to...

Страница 27: ...integrated AdderLink extender If you are connecting an AdderLink XR receiver to one of the SmartView s integrated AdderLink extender ports then no further configuration is necessary Remember that the...

Страница 28: ...Decide if you are going to use password security The SmartView may be run with security enabled or disabled With security disabled all user ports have full access to all of the computers and full admi...

Страница 29: ...ht digit port number depending on the number of cascade levels that have been connected see section 4 10 for details The SmartView supports up to 512 computer names although special versions are avail...

Страница 30: ...the system via a special user named ADMIN This profile may not be altered or deleted from the system and has full access rights to all computers and system parameters Consequently it is advisable to...

Страница 31: ...se the menu bar to select the user that you want to edit Press ENTER or RETURN to edit the user s name password and access rights Press RETURN or ENTER if you want to keep the existing entries 3 5 Cre...

Страница 32: ...red users will have access to this computer Don t worry if all the users have not yet been defined You can allocate computers to users when you add the users later Press RETURN or ENTER to create the...

Страница 33: ...ed by defining the port routing that is required to get from the user s KVM to the computer Figure 7 illustrates how port numbers are constructed and how the physical configuration of a cascaded syste...

Страница 34: ...SmartView XPro Installation and Use Page 33 Fig 7 Creating menu entries for computers that are connected to cascaded SmartViews...

Страница 35: ...than to individual users These may only be setup or changed by the system administrator logged in using the ADMIN account From the main menu press F1 for MORE MENUS Use the cursor keys to position th...

Страница 36: ...s assumed to have a QWERTY format The new language settings are enabled when you quit from the SETUP OPTIONS menu The language option only affects the way that the SmartView interprets the keyboard ke...

Страница 37: ...w detects an active user by looking for keyboard and mouse data A user becomes inactive if no keyboard or mouse data has been received by the SmartView for a specified timeout period Whilst one user i...

Страница 38: ...Pro s channel may be switched using a three button mouse or IntelliMouse see section 4 9 Pressing the central button or wheel button together with the left hand mouse button will cause the SmartView t...

Страница 39: ...active PC If you are using such a monitor you must not set the SmartView to scan ALL ports Constant switching on and off of your monitor s relay will eventually damage your monitor If you are using th...

Страница 40: ...yboard or mouse data has been received from the active user port for the user timeout period the SmartView will allow other users to access the computer The new port then becomes the active port until...

Страница 41: ...t you may optionally purchase a second power adapter to provide power supply redundancy part code PSU IEC 5VDC Plug the power adapter into one of the inlets The power indicators on the front of the Sm...

Страница 42: ...r port is defined by the way that the SmartView XPro is configured There are two special computer ports that may be selected using the COMPUTER key switch These are the on screen menu port o and the n...

Страница 43: ...y shows the user port number that your keyboard and mouse are connected to Then press the COMPUTER key until the red COMPUTER display shows the computer that you wish to connect to Pressing the comput...

Страница 44: ...access to computer ports 1 3 and 7 Action of the COMPUTER key if the front panel controls have been disable 4 7 Logging on to the SmartView XPro If password security has been set on the system then t...

Страница 45: ...the hotkeys and the command key before a new hotkey command is accepted by the SmartView HOTKEYs TAB is an exception and this allows you to tab through the ports by holding down the hotkeys and repeat...

Страница 46: ...cts channel 16 16 port models only HOTKEYs and TAB selects the next available channel HOTKEYs and M displays the on screen menu for selecting computers by name this is the recommended way of selecting...

Страница 47: ...SmartView and port 16 on the last SmartView Examples of common hotkey sequences assuming CTRL ALT hotkey option To select channel 2 press ba ba2 2 release 2 2ba ba To tab through channels press ba bav...

Страница 48: ...the SmartView will select the next available channel otherwise it will select the next numerical channel Mouse switching may be enabled or disabled see section 3 6 7 When mouse switching is disabled t...

Страница 49: ...fault hotkeys CTRL ALT the key combination to launch the on screen menu would be press ba baM M release Mba Mba You may also use a 3 button mouse or wheel mouse to launch the on screen menu if you hav...

Страница 50: ...omputer place the menu bar over the computer name using a combination of the up and down cursor keys and the page up page down keys You may also use the wheel on a wheel mouse to move the menu bar up...

Страница 51: ...jf f When a computer is selected in EXCLUSIVE mode the computer s video picture will only be displayed one the KVM console that has exclusive access Other KVM consoles will not be able to access the c...

Страница 52: ...her with the CTRL key on the keyboard If you have many connected computers then you can do an alphabetic search of the list of computer names by pressing F3 and then entering the name that you want to...

Страница 53: ...so this banner serves as a useful reminder of which computer you are working on The colour and transparency of the banner can be selected to make it as discreet as possible It may also be moved aroun...

Страница 54: ...option as required Press ESC to quit and save the changes 4 12 1 OSD COLOUR Accessed from menu USER PREFERENCES Settings DEFAULT SCHEME 1 SCHEME 2 As you toggle between these options you will see the...

Страница 55: ...select MOVING DOT then a moving dot will be displayed on a blank background The dot regularly changes colour and bounces off the sides of the screen in a zigzag pattern 4 13 Using the FUNCTIONS menu...

Страница 56: ...s preventing your access To query the routing status press F1 from the main on screen menu and then select ROUTING STATUS A routing status display similar to the one shown below will be displayed for...

Страница 57: ...ermines the number of users that may be accessing ports on the cascaded units simultaneously The full rules that must be followed when configuring a cascade of SmartViews are given in section 2 5 Alth...

Страница 58: ...n changed whilst the mouse is disconnected Consequently you will normally need to perform a power off reset of the user port if you have disconnected and re connected a mouse The power off reset funct...

Страница 59: ...artView XPro to add or edit users and computer names If this unfortunate situation does occur then you can resolve it by performing a complete reset to return the SmartView to its factory default stat...

Страница 60: ...menu names and configuration settings 1 Logon to the Adder Technology website at www addertec com and download the files XPREAD EXE and XPWRITE EXE 2 Connect the serial port on the rear of the SmartV...

Страница 61: ...gmein Test COMPUTERS PORT Admin PC 2103 1 1 1 1 Alan s System 2102 1 1 1 Comms Server 3 1 1 Comms PC 4 1 1 1 1 Gateway 1 8 1 Gateway 2 5 1 Test System 15 1 1 Web Browser 9 1 1 1 To restore the saved e...

Страница 62: ...hed 1 port 1 2 port 2 3 port 3 and 4 port 4 The bottom nibble defines the computer port that the user port is to be switched to e g 0 port 1 1 port 2 E port 15 F port 16 For example Hexadecimal code 1...

Страница 63: ...type of operation is usually required where each computer is fitted with multiple video cards or video cards with multiple video heads Such configurations are typically required in banking and enginee...

Страница 64: ...SmartView XPro Installation and Use Page 63 Synchronised SmartViews used for a dual head video switching application The pinout of the RS232 synchronisation cable is as shown below...

Страница 65: ...a file or printed to a printer This logging program uses the Excel compatible file XPRODATA CSV that may be downloaded from the SmartView see section 4 2 to cross reference the port and user informati...

Страница 66: ...ved on COM1 to the file datalog txt XPLOG PRINT 2 would print activity information received on COM2 to the printer attached to the computer s LPT1 printer port These programs will run continuously unt...

Страница 67: ...4 10 and then press F1 The version number of the current firmware will then be displayed at the bottom of the Configuration Menu To perform a firmware upgrade on your SmartView XPro you will need a s...

Страница 68: ...tical servers should be switched off or disconnected before performing an upgrade Step 2 Connect your computer to the SmartView XPro Connect your computer s serial port COM1 or COM2 to the SmartView X...

Страница 69: ...ilable from the Adder Technology website at www addertec com The upgrade files will be supplied to you as a group and consist of several files as explained below These files should be downloaded to th...

Страница 70: ...ade to version 1 30 then the DAT file that you need would be named 2X8V130 DAT Also check that all the required files are loaded into the same directory on your computer From that directory run the up...

Страница 71: ...rate It is therefore good practice to ensure that the upgrade process is always fully completed A partial or failed upgrade may be rectified by performing another upgrade If the upgrade process is int...

Страница 72: ...female to PS 2 6 pin mini DIN male converter Keyboard monitor and mouse extension cables can be used to increase the distance from SmartView up to 10m Most keyboards and mice will also operate at dist...

Страница 73: ...t important Good quality coaxial video cables may be run at distances up to 30 metres with acceptable video quality In a cascaded application it is advisable to keep the total cable run from computer...

Страница 74: ...re colour coded in PC99 specification colours for your convenience These match the colours used on the back of your SmartView XPro and most modern PCs These cables are available in various different l...

Страница 75: ...ndix B Problem Solving Problem Poor video quality with smearing fuzziness or ripple Action Use screened coaxial video cables to connect your devices to the SmartView For more help with problems visit...

Страница 76: ...SmartView XPro Installation and Use Page 75 Notes...

Страница 77: ...SmartView XPro Installation and Use Page 76 Notes...

Страница 78: ...INSTALLATION USE ADDERTechnology Limited Technology House TrafalgarWay Bar Hill Cambridge CB3 8SQ England Telephone 44 0 1954 780044 Fax 44 0 1954 780081 Email sales addertec com Web Site www adderte...

Отзывы: