Adcom GTP-880 Скачать руководство пользователя страница 39

| ADCOM GTP-880 Owner’s Manual

38

39

ADCOM GTP-880 Owner’s Manual |

this will insure that all the appropriate low frequency 
information is directed to the subwoofer where it can be 
most effectively handled. 

4. Use the   and   buttons to cycle through the speaker 
options for the front speaker. The following options are 
available for each group of loudspeakers:

• 

For front you can select small or large

• 

For center you can select small, large or none

• 

For surr(ounds) you can select small, large or none

• 

For surr(ounds) rear you can select BS(LB), LB/RB or 

none. LB/RB means you have a left back and right back 
rear surround speaker setup for use in a 7.1 configuration. 
BS(LB) means you have a single centrally placed back sur-
round speaker for use in a 6.1 (EX) type configuration.

• 

For subwoofer you can select on or off 

5. Press the   button when you have made a selection. 
Repeat steps 4 and 5 until you have completed selecting 
the speaker type for each loudspeaker in your system.

6. Press the   button when you are finished to select 
the front crossover (xover) menu. The front, center and 
surround crossover menus are used to independently set 
the internal high pass filter of the GTP-880’s crossover for 
each of these three speaker groups.

7. Use the   and   buttons to adjust the front crossover. 
The crossover settings appear as follows as you scroll 
through them: 40Hz, 60Hz, 80Hz, 100Hz, 120Hz, 150Hz

Note:

 None will appear for a large speaker setting.

You can scroll in either direction using the   and   buttons.

Consult the material that came with your loudspeakers to 
determine the correct settings, if any are recommended. 
If you are not sure about the frequency response of your 
speakers, we recommend you set the crossover at 80Hz, 
unless otherwise directed by the manufacturer. If you are 
using very small satellite speakers you may need to set 
the crossovers to 100 or even 120Hz. When correctly set, 
you should hear a smooth transition of lower to upper bass 
between the satellites and the subwoofer. 

8. Press the   button when you have made a selection. 
Repeat steps 7 and 8 until you have completed the speaker 
crossover settings for each group of speakers.

9. Press the   button to select the return to main 
menu option. 

10. Press select or menu to return to the main menu, or 
press the menu button twice to exit the menu system. 

3.5 Channel Configuration: Calibration

The next step is to adjust the output level of each channel 
so that they are properly matched. This must be done 
to insure a correct presentation of multichannel sound 
sources. The adjustment must be as precise as possible, 
and is almost impossible to accomplish by ear. Therefore, 
we recommend that you use a sound level meter. This 
device insures that all loudspeaker levels are precisely 
matched and set accurately. (The Radio Shack analog sound 
level meter is inexpensive and suitable for this task.)

Set the meter to slow response and “C” weighting. Set it 
to the 70 or 80dB sensitivity scale. Position the meter at 
the approximate center of your listening area, at average 
ear height [approximately 40-46 inches (102-117 cm)] with 
its microphone positioned vertically (pointing at the ceil-
ing). Don’t aim the microphone at the speakers, as this 
will produce inaccurate results.

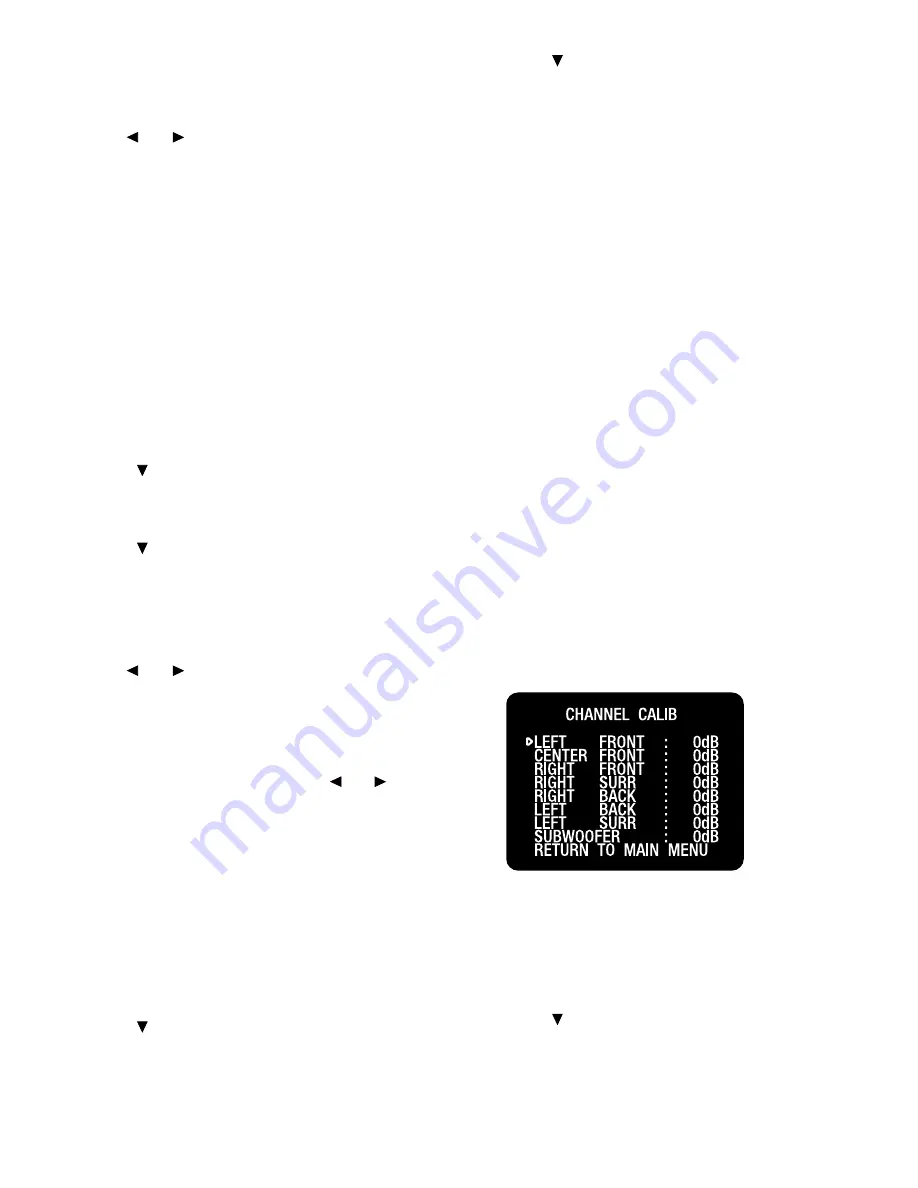
To proceed with the adjustments, you will access the 
channel calibration menu shown below.

To set the channel levels for you system:

With no source playing, set the volume level of the 
GTP-880, using the main volume control, to 0dB.

1. Press the menu button to enter the main menu. The 
main menu appears on the front panel display and the 
OSD. The cursor on the OSD should be pointing to the input 
configuration menu and input config appears on the front 
panel display.

2. Press the   button until the channel calibration menu is 
selected. The cursor on the OSD should be pointing to the 
channel calibration menu and channel calib appears on the 
front panel display.

Содержание GTP-880

Страница 1: ...1 ADCOM GTP 880 Owner s Manual...

Страница 2: ...Once you have correctly connected your new preamplifier to your other components you should be able to enjoy many trouble free years of performance We conduct a thorough quality and performance test o...

Страница 3: ...810 25 2 3 Remote Features 25 26 2 4 Remote Function Table 26 31 2 5 Programming the ADCOM GRC 810 32 33 2 6 Programming Macro Buttons 33 2 7 Function and Data List Discrete 34 35 Setup 3 1 Setup Over...

Страница 4: ...e unused for a long period of time Care should be taken so that objects do not fall and liquids are not spilled into the enclosure through any openings This unit should be serviced by qualified servic...

Страница 5: ...osed valuable limited warranty Please read the details on the warranty card carefully to understand the extent of the protection offered by the warranty its reasonable limitations and what you should...

Страница 6: ...tputs to room two remain active and available It should be noted that they are only active oif room two power is on Note The rear panel power switch must be on for this button to function 2 Room Two C...

Страница 7: ...letter M appears next to the tuner preset number in the front panel display Pressing the button again returns the FM tuner to stereo mode The letter S will appear ONLY when a stereo station has been...

Страница 8: ...a preset radio station 1 Tune to the new radio station you desire 2 Press and hold the mem button on the remote or the memory button on the front panel The display will change to show the word memory...

Страница 9: ...mode to your program mate rial loudspeaker setup and personal taste In addition the GTP 880 precision bass management feature provides maximum flexibility when setting up your audio surround system se...

Страница 10: ...dia deliver a true discrete center surround channel Both DTS ES formats are backwards compatible with the original DTS process and will deliver a 5 1 channel output when no center or back surround spe...

Страница 11: ...mind that the GTP 880 s rear panel is the central connecting point for almost every component in your audio video system Leave sufficient room behind the rear panel to accommodate cables antenna leads...

Страница 12: ...put 18 Composite Video Inputs 19 Composite Video Output 20 12V DC Trigger main room 2 21 IR Inputs main room 2 22 Room 2 Analog Audio Output 23 RS232 Control DB9 24 SACD Input DB25 25 DVD Audio Input...

Страница 13: ...Note No on screen text messages are available on component video 15 AM FM Antenna Inputs FM Antenna terminal Use to connect the supplied FM antenna or an external 75 antenna Do not over tighten as thi...

Страница 14: ...is installed behind solid or smoked cabinet doors or when the front panel sensor is otherwise not visible to the remote control To extend the remote sensor connect an optional remote sensor to the mai...

Страница 15: ...hould not be used with any other device Caution Before you plug the power cord into an AC wall outlet con firm that all connections to the GTP 880 have been made correctly Warning Never disconnect the...

Страница 16: ...oofer and then connect the subwoofer speaker itself to the amplifier DVD Player Composite Connect the composite video output from the DVD player to the DVD video input jack on the rear of the GTP 880...

Страница 17: ...at one of the composite video input jacks DVD VCR video 1 2 or 3 is automatically sent to the composite video main out and VCR out jacks as well as the s video main out and VCR out jacks Any signal th...

Страница 18: ...the rear of the GTP 880 Digital Audio If your satellite tuner or television has a digi tal output jack connect it to one of the coaxial coax 1 3 or optical opt 1 3 input jacks on the rear of the GTP 8...

Страница 19: ...19 ADCOM GTP 880 Owner s Manual Connection Diagram GTP 880 to a GFA 7807 Amplifier GFA 7807 Power Amplifier...

Страница 20: ...ADCOM GTP 880 Owner s Manual 20 Connection Diagram GDV 850 DVD Player to the GTP 880 Direct Analog Input DVD Audio GDV 850 DVD Player GTP 880 Tuner Preamp...

Страница 21: ...21 ADCOM GTP 880 Owner s Manual Connection Diagram GDV 850 DVD Player to the GTP 880 Digital Analog Stereo Input GDV 850 DVD Player GTP 880 Tuner Preamp...

Страница 22: ...ADCOM GTP 880 Owner s Manual 22 Connection Diagram Analog Source CD VCR etc to the GTP 880 Analog Input Analog Source GTP 880 Tuner Preamp...

Страница 23: ...23 ADCOM GTP 880 Owner s Manual Connection Diagram GTP 880 Video Outputs...

Страница 24: ...tton 41 Navigation Select Buttons 42 Pause Button 43 Stop Button 44 Direct Access Keypad 45 Surround Mode Buttons 46 Direct Analog Input Buttons 47 Random Repeat Buttons 48 Ch Trim FM AM Button 49 Ch...

Страница 25: ...again to reenter the main remote page The dim button will now again change the GTP 880 display The button description that follows distinguishes the func tion of each button dependent on the page the...

Страница 26: ...hrough channels adjusting level in 1dB steps 15dB to 10dB Use the left and right arrows to make adjustments In tuner mode this button is used to program radio stations in memory 50 Th Eq P Scan Button...

Страница 27: ...trim adjust toggles comp on off toggles treble bass adj toggles tone bypass programmable programmable programmable programmable displays room 2 setup backlight toggles vfd brightness Code 195 135 134...

Страница 28: ...able random repeat programmable programmable programmable programmable programmable programmable programmable programmable programmable programmable backlight programmable Code 195 135 134 136 131 132...

Страница 29: ...e programmable programmable programmable programmable programmable programmable programmable programmable programmable programmable programmable programmable programmable programmable programmable bac...

Страница 30: ...ble programmable programmable programmable programmable programmable programmable programmable programmable programmable programmable programmable programmable programmable programmable programmable b...

Страница 31: ...31 ADCOM GTP 880 Owner s Manual Macro 1 Function Notes Buttons Function Notes Data Code Macro 2 Function Notes Macro 3 Function Notes Macro 4 Function Notes...

Страница 32: ...nge or green to signal particular functions as you enter new commands into your ADCOM remote Begin by deciding which source component s commands you will be transferring to the ADCOM remote Then press...

Страница 33: ...DCOM remote can learn up to 10 individual commands and store them as a single macro There are four macro initiator buttons on the ADCOM remote m1 m2 m3 and m4 Each macro initiator can store and transm...

Страница 34: ...compensation on direct select theater compensation off direct select pro logic II cinema direct select pro logic II music direct select pro logic emulation direct select dts neo 6 cinema direct select...

Страница 35: ...eft channel level up adjust back left channel level down adjust back right channel level up adjust back right channel level down direct select dynamic range no comp direct select dynamic rnage comp 25...

Страница 36: ...wing buttons To use the GTP 880 menu system 1 Press the main menu button to display the main menu The main menu appears on the OSD 2 Press or followed by the select button to select a setup menu Your...

Страница 37: ...to any menu to change your selection should that be required 6 Press the button once to select the Mode menu 7 Use the and buttons to select a Mode for that source The available surround modes appear...

Страница 38: ...first three settings in the speaker configuration menu deal with the type of speakers you are using in your sys tem It is very important that you understand what is meant by the large and small settin...

Страница 39: ...en 120Hz When correctly set you should hear a smooth transition of lower to upper bass between the satellites and the subwoofer 8 Press the button when you have made a selection Repeat steps 7 and 8 u...

Страница 40: ...the speaker level You can adjust the selected channel level in 1dB steps across a range of 15dB to 10dB While you are adjusting each speaker the test tone will remain on that channel until you have st...

Страница 41: ...f you find you are continually trimming the same channel s by the same amount for every film you might want to consider re calibrating the speaker levels as shown in the section channel calibra tion S...

Страница 42: ...etting is changed on the GTP 880 To set the on screen display time out 1 Press the menu button to enter the main menu The main menu appears on the OSD The cursor on the OSD should be pointing to the i...

Страница 43: ...tton twice to exit the main menu To turn on theater compensation using the th eq button 1 Press the th eq button on the remote control The front panel display and the OSD will show the following 2 Pre...

Страница 44: ...lect the C width menu 8 Use the and buttons to cycle through the C width options The C width settings appear as follows as you scroll through them step 0 step 1 step 2 step 3 step 4 step 5 step 6 step...

Страница 45: ...panel display and OSD 2 Press the same button for five 5 seconds to choose from among three data format options for digital audio sources The following is shown on the front panel display and the OSD...

Страница 46: ...an provide sufficient overall gain reduction to allow even wide dynamic range soundtracks with very soft parts and very loud parts to maintain good audibility at low volume levels In most cases a mini...

Страница 47: ...47 ADCOM GTP 880 Owner s Manual Installer s Notes This page has been intentionally left blank...

Страница 48: ...not at all then please read note 2 to complete the troubleshooting procedure Note 2 Make sure that the power amplifier is at least 6 from the GTP 880 Usually putting another compo nent between them is...

Страница 49: ...gnal Multi path signals or interfe ence from another station Interference from other electrical sources computers games consoles Interference from fluorescent lighting or electrical motor Station sign...

Страница 50: ...The chassis top cover and rear panel are heavy gauge steel that has been powder coated and baked to ensure a lasting finish If the front panel top or sides become dusty or fingerprinted they can be c...

Страница 51: ...MD CCIF 15 kHz 16 kHz 6 Channel S E Inputs 0 003 All Other Analog Inputs 0 002 Digital Inputs 0 005 S N Ratio ref 2 0Vrms A weighted All Direct Inputs 98dB Analog DSP Inputs 93dB Digital Inputs 100dB...

Страница 52: ...GTP 880 Owner s Manual 52 ADCOM A division of Klein Technology Group LLC 8551 East Anderson Drive Suite 105 Scottsdale Arizona 85255 Voice 480 607 2277 Fax 480 348 9876 http www adcom com GTP880_manua...

Отзывы: