background image

101

GB

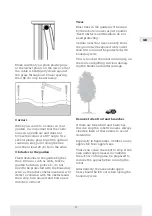
cable lies completely straight.

When you have made it back to the 
charging station, pull out about 1 metre 
of extra cable so that you have plenty of 
wire to work with when connecting or 
if corrections need to be made some-
where along the lawn.

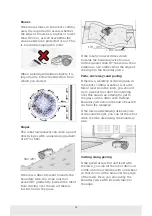
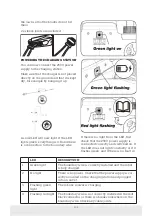
CONNECTING THE BOUNDARY WIRE

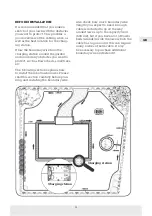
REMEMBER: There must be at least 
1 metre of cable in a straight line in 
front of the charging station's drive 
plate.

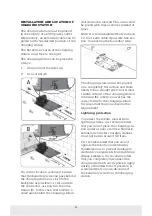
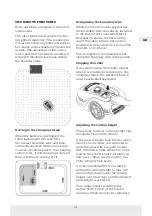
It is important to lay the cable from the 
front (to the red cable entry) under the 
drive plate and then pull it out at the 
rear of the charging station.

Adjust the length of the cable and cut 
away the excess cable.

Make sure there is at least 1 metre of 
extra cable overall, if possible, before 
cutting any excess cable.

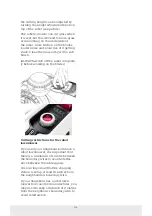
Strip the cable (peel the plastic off 
the cable) 10 mm from the ends. Use 
insulated pliers or a knife. Watch your 
fingers! Twist the metal wires from the 
cable so that the cable end is tight.

The boundary wire is now ready for 
installation.

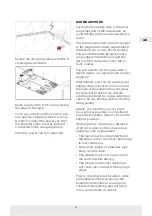
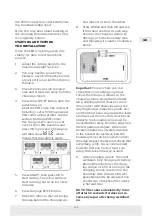
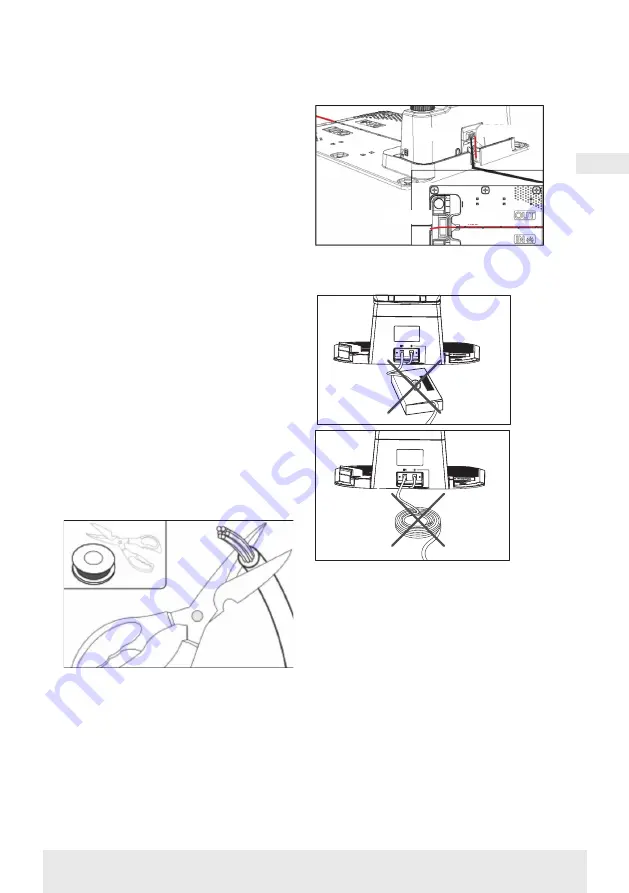
Insert the boundary wire that enters 
under the drive plate into the red con-
nector and the wire that enters from 
the rear into the black connector. If 
you get the error code ‘E1’ on the robot, 
this means that the connectors that 
the green boundary wire is attached to 

have been swapped.

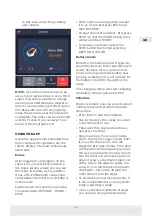
BLACK

BLACK

RED

RED

Excess boundary wire must not be 
stored behind the charging station.

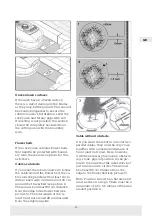
Sleeve joint when using or extending 
cable

In the event of a break in the boundary 
wire that needs to be repaired, or when 
extending the cable, it is important 
that a watertight sleeve joint (silicone 
sleeve) is used.

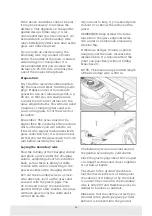
Strip approximately 7-10 mm of the 
wire before inserting it into the sleeve 
joint (stripped wire must not be ex-
posed outside of the joint). Then press 
the blue piece down. This will seal the 
sleeve joint. A small amount of silicone 
will come out of the sleeve joint.

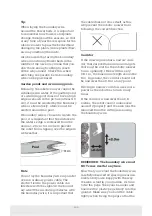
Sleeve joints should be dug slightly into 

Содержание 33888

Страница 1: ...Brugsanvisning Bruksanvisning Instruction manual DK GB SE Model 33888...

Страница 2: ...es via almindeligt husholdningsaffald Batteriet skal afskaffes via gen brugsstationer Sid aldrig p maskinen 63 Garanteret st jniveau CE godkendelsesm rke SMPS Switch mode str mforsyn ing Robotpl nekli...

Страница 3: ...lade 15 Blomsterbede 15 Kabel som forhindring 15 Kabel uden forhindring 15 Korridor 16 FORBIND AFGR NSNINGSKABLET 17 Samlemuffe ved brug eller forl ngelse af kabel 17 S T STR M TIL LADESTATION 18 OPST...

Страница 4: ...lippebegr nsninger for robotpl neklipper 32 REGNSENSOR 33 H NDTERING AF ROBOTPL NEKLIPPEREN 33 Afmontering af cover 33 Fastg relse af cover 33 RENG RING OG UDSKIFTNING AF RESERVEDELE 34 Reng ring af p...

Страница 5: ...DK Robotpl neklipper Ladestation Plastskruer for ladestation 6 stk Plastpl kker 180 stk Knive 3 stk Str mforsyning Afgr nsningskabel 130m Betjeningsvejledning Du skal yderligere bruge PAKKEN INDEHOLDE...

Страница 6: ...uges som sikkerhedskode 2 L ftesensor Hvis pl neklipperen l ftes mere end 10 mm fra jorden n r kniven er i brug stopper kniven straks med at rotere 3 Vippesensor Hvis pl neklipperen vippes opad fra en...

Страница 7: ...der driver pl neklipperen er fuldst ndig forseglet og l kker ikke nogen form for v sker uanset hvor det er placeret 9 Basisstation omkredsafbryder og afgr nsningskabel Pl neklipperen kan ikke k re hvi...

Страница 8: ...kode til download af App til IPhone 7 QR kode til download af App til Android 8 QR kode til download af manual 1 2 3 4 5 6 7 8 2800 18 8 0kg Max 36Wh 55 MANUAL Adano RM6 18711 Robotic Lawnmower RM6 IP...

Страница 9: ...tr er osv I f lgende kapitel forklares hvordan robotpl neklipperen skal installeres L s derfor dette kapitel grundigt f r planl gning og installation af afgr n sningskablet p begyndes Tjek ogs det fo...

Страница 10: ...anbefales at have 1 2 m ekstra kabel i overskud hvis muligt Se afsnit Forbind afgr nsningskablet Ladestationen skal placeres p et helt fladt underlag og skal have en helt lige str kning p minimum 1 m...

Страница 11: ...t klippe gr sset med en gr strimmer eller en alminde lig pl neklipper regelm ssigt Alternativt kan man l gge en bred flisekant mindst 12 cm hele vejen rundt om gr spl nen i samme niveau som gr sset so...

Страница 12: ...l gningen ved ladestationen og l g et stykke ind under ladesta tionen som r kker cirka 50 cm l n gere bagud s der er rigeligt med kabel at arbejde med n r det skal tilsluttes til str mstikkene p lades...

Страница 13: ...efter stoppe vende rundt og finde en ny k rselsretning Tr er De fleste tr er i haven vil robotpl nek lipperen blot se som en almindelig fast forhindring og beh ver derfor ikke beskyttes Visse tr er so...

Страница 14: ...ren ned mod afgr sningskablet fra en stigning p mere end 10 skal der v re minimum 2 meter fra kanten af skr ning til afgr n sningskablet Stier indk rsler og fliser Ligger der en gang eller k rselsarea...

Страница 15: ...om blomster bedet skal kablerne ligge parallelt med mindst 10 cm afstand og med mindst 20 cm rundt om blomsterbedet se billede 1 Der skal v re mindst 80 cm afstand fra kant til blomsterbed se billede...

Страница 16: ...for at forhindre robotten skrider ud over kanten i v dt vejr Bem rk L g ikke omkredsledningen paral lelt over et almindeligt str mkabel Det elektriske felt i str mkablet kan forstyrre signalet i afgr...

Страница 17: ...lastikken af kablet 10 mm af enderne Brug en af isolering tang eller en kniv Pas p fingrene Tvist metaltr dene fra kablet s kabelenden bliver stram Nu er afgr nsningskablet klar til mon tering Inds t...

Страница 18: ...dioden tjek da f rst 230V str mforbindelsen om den er tilsluttet korrekt og t ndt Hvis LED dioden ikke konstant lyser eller blinker gr n og der ikke er fejl i 230V forbindelsen tjek da f lgende fejls...

Страница 19: ...ka 1 m afstand til kablet 8 Tryk p HOME og derefter OK og se om robotten selv finder hjem til ladestationen ved at k re ud til afgr nsningskablet og f lge det mod uret hjem Vigtigt Det er her du kan k...

Страница 20: ...rstallet er indstillet korrekt Samme fremgang sm de bruges til dato og tid Bem rk dog at dato indstilling altid starter med m ned angivelse og de refter m nedsdag i billede eksemplet nedenfor er dato...

Страница 21: ...andard indstillet til at starte kl 9 00 dette starttidspunkt kan ndres ved at trykke og ned p samme tid i 3 sek Herefter kan nyt starttidspunkt indstilles ved hj lp af eller og til at bekr fte hver en...

Страница 22: ...3 sek Herefter kan ny klippetid indstilles ved at trykke p eller og til at bekr fte ny klippetid time antal N r ny klippetid er indstillet og gemt vises p displayet og en bip lyd vil h res I eksemple...

Страница 23: ...pecyklus n r denne knap aktiveres efterfulgt af OK Desuden funger er knappen som pil op Hjem Knap Robotten vil k re direkte tilbage til ladestation n r denne knap aktiveres efterfuldt af OK Desuden fu...

Страница 24: ...nne serienummerets QR kode med din mobiltelefons kamera QR koden sidder midt p labelen den l ngst til venstre Kontroller dine Wi Fi indstillinger Robotpl neklipperen fungerer kun med 2 4 GHz S rg for...

Страница 25: ...ia robot tens display skal denne bruges 5 V lg Wi Fi netv rk kun 2 4 GHz og tast password til netv rket 6 Robotten er nu tilf jet og fremg r i oversigten Devices og et Wi Fi ikon vil lyse p robottens...

Страница 26: ...Du kan til sidst navngive robotten kan ogs ndres under Settings Styr robot p sekund r mobiltelefon Hvis man nsker at en anden mobiltele fon ogs skal kunne styre robotten kan g res ved at dele enheden...

Страница 27: ...RE TURN eller WORK Batteritilstand Bem rk at batteritilstanden typisk vil vise 9X og ikke 100 og at det lang somt vil falde Dette er helt normalt og er for at beskytte batteriet og forl nge levetiden...

Страница 28: ...enkelt firkantet gr spl ne uden forhindringer er hur tigere at klippe frem for en gr spl ne med smalle passager og mange forhin dringer da robotten her skal bruge mere tid p at stoppe og ndre retning...

Страница 29: ...de valgte startpunk ter Rain delay Regn forsinkelse Robotten har en regnsensor p oversid en som er aktiveret som standard N r regnsensoren p robotten regis trerer vand vil robotten stoppe med at klip...

Страница 30: ...Settings Ved udarbejdelsen af denne betjen ingsvejledning er dansk sprog ikke en valgmulighed men det forventes at komme senere i 2023 Log i app I app en s hjemmesk rm Home findes en log som registre...

Страница 31: ...ronten af coveret spore det Men for at sikre det bedste klipperesultat vil robotten k re ud over afgr nsningskablet med fronten med cirka 10 12 cm klipper ikke her Dette er vigtigt at huske p n r bru...

Страница 32: ...den k rer fast Rens gr sset v k med en bl d b rste Sluk ALTID helt for robotten inden der arbejdes ved knivene Klippebegr nsninger for robot pl neklipper Hvis dig og din nabo begge har en robotpl nek...

Страница 33: ...ledninger der holder det fast Fastg relse af cover S t coveret oven p robotpl neklip peren Kig gennem hullet over displayet og s rg for at hullerne i begge bagerste hj rner rammer de 2 pinde p robotte...

Страница 34: ...om p siden p et bl dt underlag f eks gr spl nen for ikke at ridse skjoldet Brug en bl d b rste eller en plastskraber til at rense for gr s for at sikre et godt klipperesultat Regelm ssig reng ring re...

Страница 35: ...les det at robotten og ladestationen tages ind og st r t rt og lunt og at slukke for hovedafbryderen OFF for at beskytte batteriet Oplad batteriet i robotpl neklipperen via den medf lgende ladestation...

Страница 36: ...levetiden v re op til 3 5 r Batteriet udskiftes let ved at f lge disse trin 1 Vend robotten p hovedet 2 Fjern alt gr s og skidt omkring bat terid kslet inden det fjernes 3 Skru de skruer ud der sidder...

Страница 37: ...37 DK TILBEH R Der findes ekstraudstyr reservedele til robotten Kontakt din lokale Harald Nyborg butik...

Страница 38: ...p hovedet og kontrollere om der er noget der forhindrer hjulene i at rotere 4 Fjern enhver forhindring som blokerer hjulene vend robotten tilbage igen t nd den og tryk START og de refter p OK E3 Knivm...

Страница 39: ...esensor har v ret udl st H ldning er muligvis for stejl Hvis h ldningen p gr spl nen er h jere end 20o kan de f robotten til at stoppe Omr det b r udelades fra klippeomr det 1 Sluk for robotten og b r...

Страница 40: ...ekt Tryk det fast ned over maskinen 2 Genstart robotten Sluk for robotten og vent 10 se kunder 3 T nd for robotten igen tast password tryk p START og derefter p OK Hvis fejlkoden stadig vises kontakt...

Страница 41: ...l sninger fors ges Ved vrige fejl koder afbryd str mmen og genstart robotten Uanset problem der opst r anbefales det altid f rst at fors ge at genstarte robotten og se om det l ser tingene Sluk for ro...

Страница 42: ...rsdirektivet 2000 14 EU St jemission i milj et fra maskiner til udend rs brug Harmoniseret standard nr Standardens titel EN IEC 63000 2018 EN 50636 2 107 2015 A1 2018 A2 2020 EN 60335 1 2012 A11 2014...

Страница 43: ...aniske hj lpemidler f eks fotokopiering eller optagelse ej heller overs ttes eller gemmes i et informations lagrings og hentningssystem uden skriftlig tilladelse fra Schou Company A S SERVICECENTER Be...

Страница 44: ...batteriet i van ligt hush llsavfall Kassera batteriet vid en tervinningsstation Sitt aldrig p maskinen 63 Garanterad bullerniv CE godk nnandem rkning SMPS Switch mode power supply Man f r inte kasser...

Страница 45: ...or 56 Klippning l ngs kakelplattor 56 Oj mn gr syta 57 Blomsterrabatter 57 Kabeln som hinder 57 Kabel utan hinder 57 Korridor 58 Samlingshylsa vid anv ndning eller f rl ngning av kabeln 59 LADDSTATION...

Страница 46: ...llning av klipph jd 73 Begr nsningar f r robotgr sklippning 74 REGNSENSOR 75 HANTERING AV ROBOTGR SKLIPPAREN 75 Demontering av lock 75 Montering av locket 75 RENG RING OCH BYTE AV RESERVDELAR 76 Reng...

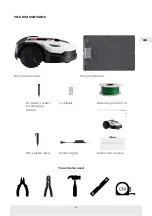
Страница 47: ...47 SE Robotgr sklippare Laddstation Plastskruvar f r laddstation 6 st Plastpinnar 180 st Knivar 3 st Stickkontakt Avgr nsningskabel 130 m Bruksanvisning Du beh ver ocks F RPACKNINGEN INNEH LLER...

Страница 48: ...aren mer n 10 mm fr n marken n r kniven anv nds slutar kniven omedelbart att rotera 3 Lutningssensor Om du lutar klipparen upp t i ett verti kalt l ge stannar kniven omedelbart 4 Hindersensor Gr sklip...

Страница 49: ...orm av v tska oavsett var du placerar batteriet 9 Basstation omkretsbrytare och avgr nsningskabel F r att gr sklipparen ska kunna k ras m ste du installera en avgr nsningska bel och aktivera den via b...

Страница 50: ...f r att ladda ned appen f r iPhone 7 QR kod f r att ladda ned appen f r Android 8 QR kod f r att ladda ned handboken 1 2 3 4 5 6 7 8 2800 18 8 0kg Max 36Wh 55 MANUAL Adano RM6 18711 Robotic Lawnmower...

Страница 51: ...kapitel f rklarar hur du in stallerar robotgr sklipparen L s det h r kapitlet noggrant innan du planerar och installerar avgr nsningskabeln G r ocks en uppskattning av hur l ng avgr nsningskabel du k...

Страница 52: ...i st llet f r gr s Observera En extra kabell ngd p 1 2 meter rekommenderas Se avsnittet Ansluta avgr nsningskabeln Laddstationen m ste placeras p en helt plan yta och ha en helt rak str cka p minst 1...

Страница 53: ...n gr strimmer eller en vanlig gr sklippare Alternativt kan du l gga ut en bred kakelkant minst 12 cm runt hela gr smattan i samma niv som gr set som roboten kan k ra ver och p s s tt undvika att f en...

Страница 54: ...kabeldragningen vid laddsta tionen och l gg ett stycke under laddstationen som str cker sig ca 50 cm l ngre bak t s att det finns gott om kabel att arbeta med n r du ansluter till eluttagen vid ladds...

Страница 55: ...tning Tr d De flesta tr d i tr dg rden identifieras som ett fast hinder av robotgr sklip paren och beh ver d rf r inte skyddas Vissa tr d som reser sig koniskt fr n marken och vars r tter r l gre n 10...

Страница 56: ...mot avgr nsningskabeln fr n en lutning p mer n 10 m ste det finnas minst 2 meter fr n kanten av sluttningen till avgr nsningsslingan Stigar uppfarter och kakelplattor Om det finns en g ngv g eller en...

Страница 57: ...ste kablar na ligga parallellt med ett avst nd p minst 10 cm och minst 20 cm runt rab atten se bild 1 Det ska vara ett avst nd p minst 80 cm fr n kant till rabatt se bild 3 Den totala l ngden p rabat...

Страница 58: ...nte avgr nsningskabeln par allellt ver en vanlig str mkabel Det elektriska f ltet i str mkabeln kan st ra signalen i avgr nsningskabeln N r du avgr nsar hinder med avgr nsningska beln r det viktigt at...

Страница 59: ...g st ngerna eller en kniv Akta fingrarna Vrid metalltr darna fr n kabeln s att kabel nden blir sl t Nu r avgr nsningskabeln klar f r installation S tt in avgr nsningskabeln som g r in under k rplattan...

Страница 60: ...0 V str mf rs rjningen r korrekt ansluten och p slagen Om lysdi oden inte lyser konstant eller blinkar gr nt och det inte finns n got fel i 230 V anslutningen b r du kontrollera f ljande fels kningssc...

Страница 61: ...mr det bakom laddstationen ca 1 meter fr n kabeln 8 Tryck p HOME och sedan p OK f r att se om roboten hittar hem till laddstationen genom att k ra ut till avgr nsningskabeln och f lja den moturs Vikti...

Страница 62: ...e siffra tills ret r korrekt inst llt Samma inst lln ingsmetod g ller f r datum och tid Observera dock att datuminst llningen alltid b rjar med m nadsangivelse och sedan m nadsdag i exemplet nedan r d...

Страница 63: ...ka p och samtidigt i 3 sekunder D refter kan du st lla in en ny starttid med hj lp av eller och f r att bekr fta varje siffra tills den nya starttiden r inst lld N r den nya starttiden har sparats vis...

Страница 64: ...ta den nya klipptiden timtal N r den nya klipptiden har st llts in och sparats visas p displayen och ett pip ljuder I exemplet nedan r den nya klipptiden inst lld p 6 timmar 06H Allm nt N r displayen...

Страница 65: ...n som en upp tpil Hemknapp Roboten k r direkt tillbaka till laddstationen n r du trycker p den h r knappen f ljt av OK Dessutom fungerar knappen som en ned tpil OK knapp Anv nds f r att bekr fta val I...

Страница 66: ...mera QR koden sitter i mit ten av etiketten l ngst till v nster Kontrollera dina Wi Fi inst llningar Robotgr sklipparen fungerar endast med 2 4 GHz Kontrollera att roboten och telefonen har samma Wi F...

Страница 67: ...s display m ste du anv nda den koden 5 V lj Wi Fi n tverk endast 2 4 GHz och ange n tverksl senordet 6 Roboten har nu lagts till och visas i versikten Devices och en Wi Fi ikon t nds p robotens displa...

Страница 68: ...ikon t nds p robotens display 8 Du kan ocks namnge roboten kan ndras under Settings Styr roboten med en sekund r mo biltelefon Om du vill att en annan mobiltelefon ska kunna styra roboten kan du g ra...

Страница 69: ...ervera att batteriniv n vanligtvis visar 9X och inte 100 och att den l ngsamt sjunker Detta r helt normalt och skyddar batteriet och f rl nger dess livsl ngd det r inte optimalt att batteriet alltid r...

Страница 70: ...are n en gr smatta med smala passager och m nga hinder eftersom roboten beh ver mer tid f r att stanna och ndra riktning Vi rekommenderar att du provar dig fram till b sta resultat Roboten b r inte k...

Страница 71: ...n regnsensor p toppen som r aktiverad som standard N r robotens regnsensor registrerar vatten slutar roboten att klippa gr set och terv nder till laddstationen och v ntar 3 timmar fr n den sista regis...

Страница 72: ...gs appinst llningar N r man utarbetar denna bruksan visning r svenska inte ett alternativ men det f rv ntas komma senare under 2023 Logga in i appen Appens startsk rm Home inneh ller en loggbok som re...

Страница 73: ...skyddet kabeln F r att s kerst lla b sta m jliga klippresultat kommer roboten dock att k ra utanf r avgr nsningskabeln med fronten ca 10 12 cm klipp inte h r T nk p detta n r du placerar ut din avgr n...

Страница 74: ...ste St ng ALLTID av roboten helt och h l let innan du arbetar med knivarna Begr nsningar f r robotgr sklippning Om du och din granne b da har en robotgr sklippare r det viktigt att det r minst en mete...

Страница 75: ...Montering av locket Placera locket ovanp robotgr sklippar en Titta genom h let ovanf r display en och se till att h len i de b da bakre h rnen r i linje med de tv pinnarna p roboten Pressa fast locket...

Страница 76: ...ndvika att k pan repas Anv nd en mjuk borste eller en plast skrapa f r att rensa gr s och s kerst lla ett bra klippresultat Regelbunden reng ring minskar ocks buller och vi brationer i samband med kli...

Страница 77: ...vintern rekommenderas det att man tas in och f rvarar roboten och laddstationen p en torr och varm plats och att man st nger av huvudbrytaren OFF f r att skydda batteriet Ladda robotgr sklipparens ba...

Страница 78: ...riet kan enkelt bytas ut med hj lp av f ljande steg 1 V nd roboten upp och ner 2 Avl gsna allt gr s och skr p fr n bat teriluckan innan du avl gsnar den 3 Skruva loss skruvarna p batteriluck an Ta bor...

Страница 79: ...79 SE TILLBEH R Valfria reservdelar finns tillg ngliga f r roboten Kontakta din lokala Harald Nyborg butik...

Страница 80: ...boten v nda den upp och ner och kontrollera om det finns n got som hindrar hjulen fr n att rotera 4 Avl gsna eventuella hinder som blockerar hjulen sl p roboten igen och tryck p START och sedan OK E3...

Страница 81: ...rd och tryck p START och sedan p OK E6 Sensorn har uppt ckt att roboten har v lt 1 Kontrollera om sluttningarna r f r branta eller f r v ta f r att k ras upp p eller om roboten st ter p n got som g r...

Страница 82: ...h sedan p OK BP Batteritemper aturen r f r h g eller l g 1 Kontrollera om batteriet r mycket varmt Placera roboten i skuggan vid behov V nta tills batteriet har svalnat och starta sedan roboten igen E...

Страница 83: ...sv nga utan mot st nd Om s r fallet kan det h nda att r rdelaren i det hjulet r trasig och m ste bytas ut Kontakta Schou Om roboten har slut p str m och inte kan startas ska du lyfta roboten manuellt...

Страница 84: ...sdirektivet 2000 14 EG Buller i milj n fr n utrustning som r avsedd att anv ndas utomhus Harmoniserad standard nummer Standards titel EN IEC 63000 2018 EN 50636 2 107 2015 A1 2018 A2 2020 EN 60335 1 2...

Страница 85: ...iga f r m nniskors h lsa och milj n n r avfall fr n elektrisk och elektronisk utrust ning WEEE inte kasseras p r tt s tt Produkter som r m rkta med nedan st ende verkorsade soptunna anger elektrisk oc...

Страница 86: ...battery must not be disposed of in normal household waste The battery must be disposed of via recycling stations Never sit on the machine 63 Guaranteed noise level CE approval mark SMPS Switch mode p...

Страница 87: ...rfaces 99 Flower beds 99 Cable as obstacle 99 Cable without obstacle 99 Corridor 100 CONNECTING THE BOUNDARY WIRE 101 Sleeve joint when using or extending cable 101 POWERING THE CHARGING STATION 102 S...

Страница 88: ...eight 115 Cutting restrictions for the robot lawnmower 116 RAIN SENSOR 117 HANDLING THE ROBOT LAWNMOWER 117 Removing the cover 117 Attaching the cover 117 CLEANING AND REPLACEMENT OF SPARE PARTS 118 C...

Страница 89: ...89 GB Robot lawnmower Charging station 6 x plastic screws for charging station 180 x plastic pegs 3 x blades Power supply Boundary wire 130 m Instruction manual You will also need THE BOX CONTAINS...

Страница 90: ...curity code 2 Lift sensor If the mower is lifted more than 10 mm from the ground when the blade is in use the blade stops rotating immedi ately 3 Tilt sensor If the mower is tilted upwards from any si...

Страница 91: ...and will not leak any liquids wherever it is placed 9 Base station circuit breaker and boundary wire The mower cannot run if a boundary wire is not installed and activated via the base station The mow...

Страница 92: ...code to download the app for iPhone 7 QR code to download the app for Android 8 QR code to download the manual 1 2 3 4 5 6 7 8 2800 18 8 0kg Max 36Wh 55 MANUAL Adano RM6 18711 Robotic Lawnmower RM6 IP...

Страница 93: ...mall trees etc The following section explains how to install the robot lawnmower Please read this section carefully before plan ning and installing the boundary wire Also check how much boundary wire...

Страница 94: ...1 2 m of extra cable if possible See sec tion Connecting the boundary wire The charging station must be placed on a completely flat surface and there needs to be a straight stretch of at least 1 metre...

Страница 95: ...regular lawn mower regularly Alternatively you can lay a wide paver edging strip at least 12 cm all around the lawn at the same level as the grass for the robot to drive over thereby avoiding the nee...

Страница 96: ...harging station and place a piece under the charging station extending about 50 cm further back so that there is plenty of cable to work with when connecting to the power sockets at the charging stati...

Страница 97: ...hen stop turn around and find a new direction of travel Trees Most trees in the garden will be seen by the robotic mower as just another fixed obstacle and therefore do not need protecting Certain tre...

Страница 98: ...drives down towards the boundary wire from an incline greater than 10 there must be a minimum of 2 metres from the edge of the slope to the boundary wire Paths driveways and paving If there is a walkw...

Страница 99: ...t be parallel with at least 10 cm distance and with a minimum of 20 cm around the flower bed see picture 1 There must be at least 80 cm distance from the edge to the flower bed see picture 3 The total...

Страница 100: ...Note Do not lay the boundary wire in parallel over an ordinary power cable The electric field in the power cable can interfere with the signal in the bound ary wire When isolating obstacles with the b...

Страница 101: ...ur fingers Twist the metal wires from the cable so that the cable end is tight The boundary wire is now ready for installation Insert the boundary wire that enters under the drive plate into the red c...

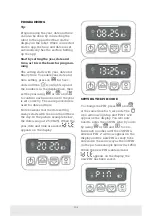
Страница 102: ...rom the LED first check that the 230V power supply is connected correctly and switched on If the LED does not light constantly or if it flashes green and if there is no fault in LED DESCRIPTION 1 Gree...

Страница 103: ...e cable 8 Press HOME and then OK and see if the robot can find its own way home to the charging station by driving out to the boundary wire and following it counter clockwise home Important This is wh...

Страница 104: ...he year is set correctly The same procedure is used for date and time Note however that the date setting always starts with the month and then the day In the picture example below the date is August 2...

Страница 105: ...tart time by pressing and down at the same time for 3 sec A new start time can then be given by using or and to confirm each number until the new start time is set When the new start time is saved wil...

Страница 106: ...m the new time number of hours When the new cutting time is set and saved will appear on the display and you will hear a beep sound In the example below new cut time is set to 6 hours 06H General When...

Страница 107: ...as an up arrow Home button The robot will drive straight back to the charg ing station when this button is pressed followed by OK The button also functions as a down arrow OK button This is used to c...

Страница 108: ...an the serial number s QR code with your mobile phone s camera The QR code is in the middle of the label far left Check your Wi Fi settings The robotic mower only works with 2 4 GHz Make sure your rob...

Страница 109: ...via the robot s display you ll need to use that one 5 Select Wi Fi network 2 4 GHz only and enter the network pass word 6 The robot has now been added and will appear in the Devices overview A Wi Fi i...

Страница 110: ...view A Wi Fi icon will also light up on the robot s display 8 You can finally name the robot this can also be changed under Settings Controlling the robot on a secondary mobile phone If you want anot...

Страница 111: ...l you need to press the STOP button first before selecting RETURN or WORK Battery mode Note that the battery level will typically show 9X and not 100 and that it will slowly decrease This is quite nor...

Страница 112: ...ot has to run to keep the grass down A single square lawn without ob stacles is faster to cut than a lawn with narrow passages and many obstacles as the robot needs more time to stop and change direct...

Страница 113: ...ints Rain delay The robot has a rain sensor on the top which is activated by default When the rain sensor on the robot de tects water the robot will stop cutting grass and return to the charging stati...

Страница 114: ...e top right corner under App Settings At the time of writing the Danish language is not an option but this is expected later in 2023 Log in app The app s home screen contains a log that records everyt...

Страница 115: ...to ensure the best cutting result the robot will run beyond the boundary wire by about 10 12 cm at the front do not cut here This is important to remember when laying the boundary wire in the garden...

Страница 116: ...off the robot complete ly before working on the blades Cutting restrictions for the robot lawnmower If you and your neighbour both have a robot lawnmower it is important that there is a minimum of 1 m...

Страница 117: ...taching the cover Place the cover on top of the robotic mower Look through the hole above the display and make sure that the holes in both back corners align with the 2 pegs on the robot Push the cove...

Страница 118: ...e g lawn to avoid scratching the mower deck Use a soft brush or plastic scraper to clean off grass and ensure a good cutting result Regular cleaning also reduces cutting noise and vibrations Check tha...

Страница 119: ...er for the winter it is recommended that the robot and charging station are brought inside and stored in a warm dry place and that the main switch OFF is turned off to protect the battery Charge the r...

Страница 120: ...e battery is easily replaced by following these steps 1 Turn the robot upside down 2 Remove all grass and debris from around the battery cover before re moving it 3 Unscrew the screws on the battery c...

Страница 121: ...121 GB ACCESSORIES Optional spare parts are available for the robot Contact your local Harald Nyborg store...

Страница 122: ...e still appears turn the robot off Turn the robot upside down and check if there is any thing preventing the wheels from rotating 4 Remove any obstacle blocking the wheels turn the robot back on press...

Страница 123: ...then OK E7 Tilt sensor has been triggered A slope may be too steep If the slope of the lawn is higher than 20 this can make the robot stop This area should be excluded from the cutting area 1 Turn of...

Страница 124: ...y Press it firmly down over the machine 2 Restart the robot Turn off the robot and wait 10 sec onds 3 Turn the robot on again enter the password press START and then OK If the error code still appears...

Страница 125: ...g For other error codes disconnect the power and restart the robot Whatever problem occurs it is always recommended that you first try restarting the robot and see if that fixes the issue Turn off the...

Страница 126: ...00 14 EU Noise Emission in the Environment by Equipment for Outdoor use Harmonized Standard No Title of the standard EN IEC 63000 2018 EN 50636 2 107 2015 A1 2018 A2 2020 EN 60335 1 2012 A11 2014 A13...

Страница 127: ...gerous and harmful to human health and the environment when waste electrical and electronic equipment WEEE is not disposed of correctly Products labelled with the crossed out waste bin symbol below ar...

Страница 128: ......
Отзывы: