


Pro
Level 40
4
OPERATION
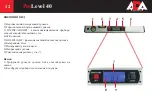
Inserting/replacing the battery
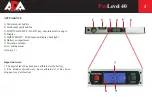
The battery compartment (6) is located at the rear side of the
digital level.
1. Depress the latch of the battery compartment lid and open
the battery compartment.
2. Insert 2 new batteries (not included) of the type LR03 (AAA)
into the battery compartment. Pay attention to the proper polar-
ity of the batteries. The polarity is printed inside the battery
compartment.
3. Close the battery compartment with the lid.
Note:
replace the batteries if the display gets weaker or if it
shows incomprehensible results.
Using
Use the digital level as a regular spirit level using the vertical
spirit bubble (1) or the horizontal spirit bubble (2). Or use the
device as precise digital spirit level as follows:
1. Shortly press the ON/OFF key (3) to switch on the digital
spirit level.
2. The blue display background light shines for a few seconds.
Hold the digital level to the object to be measured and read the
currently measured angle on the display (4).
3. If you tilt the digital level in an angle >90° the display automati-
cally flips over by 180° for better readability.
4. Press the HOLD/LIGHT key (5) to freeze the currently mea-
sured value on the display. The background light shines. Press the
HOLD/LIGHT key one more time to return and show the currently
measured values.
5. Press and hold the HOLD/LIGHT key (5) for 3 seconds to switch
on or off the display background light.
6. Shortly press the ON/OFF key (3) toggle between displaying the
absolute angle (display shows ABS) and displaying the relative an-
gle/the deviation of the angle (display shows INC). When switching
to the INC mode, the device resets the display to zero degrees. The
following measurement readings refer to this zero point.
7. Press and hold the ON/OFF key for 3 seconds to switch off the
digital level. If you do not operate the device for approx. 5 minutes,
the device switches off automatically.
Notes:
1) The deviation (7) in mm/m of the currently measured angle is
displayed when an angle <5.7° (max. 100 mm/m) is measured.
2) A small arrow icon (8) additionally appears indicating if the de-
vice is measuring ascends (arrow up) or descends (arrow down).
Содержание ProLevel 40
Страница 1: ...Operating manual Digital Level Model ProLevel 40 Manufacturer Address WWW ADAINSTRUMENTS COM...
Страница 10: ...ProDigit Mini ADAINSTRUMENTS WWW ADAINSTRUMENTS COM...
Страница 11: ...ProLevel 40 11 1 12 2 13 3 14 4 14 5 14 6 15 1 2...
Страница 12: ...ProLevel 40 12 1 2 3 ON INC ABS OFF 4 5 HOLD LIGHT 6 7 8 9 1 2 8 9 7 1 2 3 4 5 6...
Страница 14: ...ProLevel 40 14 1 2 hold Light 5 on Off 3 1 3 3 1 2 4 180 3 2 0 1 0 2 0 90 2xLR03 AAA 416x50x21 100 330 2...
Страница 15: ...ProLevel 40 15...
Страница 16: ...1 2 3 4 5 6 7 8 9 WWW ADAINSTRUMENTS COM info adainstruments com...
Страница 19: ......
Страница 20: ...ADA MEASUREMENT FOUNDATION WWW ADAINSTRUMENTS COM...


