


2.0 BIOS
2.0 BIOS Settings
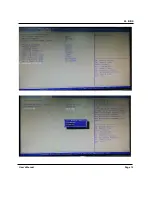
2.1 Enter The BIOS
Power on the computer and the system will start POST (Power On Self Test)
process. When the message below appears on the screen, press (DEL) key to
enter Setup.
Press DEL to enter SETUP
If the message disappears before you respond and you still wish to enter Setup,
restart the system by turning it OFF and On or pressing the RESET button. You
may also restart the system by simultaneously pressing <Ctrl>, <Alt>, and
<Delete> keys.
Important
•
The items under each BIOS category described in this chapter are under continuous update for
better system performance. Therefore, the description may be slightly different from the latest
BIOS and should be held for reference only.
•
Upon boot
‐
up, the 1st line appearing after the memory count is the BIOS version. It is usually in the
format.
Control Keys
Power on the computer and the system will start POST (Power On Self Test)
process. When the message below appears on the screen, press (DEL) key
to enter Setup.
<
↑
>
Move to the previous item
<
↓
>
Move to the next item
<
←
>
Move to the item in the left hand
<
→
>
Move to the item in the right hand
<Enter>
Select the item
<Esc>
Jumps to the Exit menu or returns to the main menu from a submenu
<+/PU>
Increase the numeric value or make changes
<
‐
/PD>
Decrease the numeric value or make changes
<F1>
General Help
<F3>
Load Optimized Defaults
<F4>
Save all the CMOS changes and exit
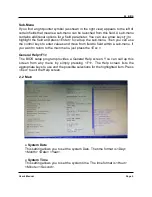
Getting Help
After entering the Setup menu, the first menu you will see is the Main Menu.
Main Menu
The main menu lists the setup functions you can make changes to. You can use the arrow
keys (
↑↓) to select the item. The on‐line description of the highlighted setup function is
displayed at the bottom of the screen
.
User’s Manual Page4
Содержание PowerBrick Ultra
Страница 5: ...1 0 Introduction 1 3 System s Dimensions Unit mm User s Manual Page 3...
Страница 8: ...2 0 BIOS 2 3 Advanced 2 4 CPU Configuration User s Manual Page 6...
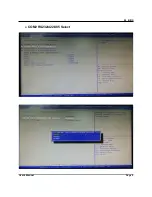
Страница 10: ...2 0 BIOS COM1 RS232 422 485 Select User s Manual Page 8...
Страница 11: ...2 0 BIOS COM2 RS232 422 485 Select User s Manual Page 9...
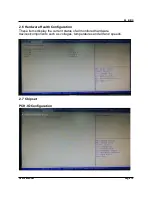
Страница 13: ...2 0 BIOS System Agent SA Configuration Graphics Configuration User s Manual Page 11...
Страница 14: ...2 0 BIOS User s Manual Page 12...


