DVR User Manual
3
2
Hardware Installation
2.1 Install Hard Drive
Check the unit and the accessories after getting the DVR. Please don‟t power up the unit till
the physical installation is complete.
Notice:
1. This series support one SATA hard drive. Please use the hard drive the
manufacturers recommend specially for security and safe field.
2. Please calculate HDD capacity according to the recording setting. Please refer to
“Appendix B Calculate Recording Capacity”.
Step 1
: Unscrew and open the top cover.
Step 2
: Connect the power and data cables. Place the HDD onto the bottom case as Fig 2-1.
Step 3
: Screw the HDD as Fig 2-2.
Fig 2-1 Connect HDD Fig 2-2 Screw HDD
Note
: For convenience installation, please connect the power and data cables first and
then wind the screws to fix the HDD.
2.2 Front Panel Descriptions
Notice:
The front panel descriptions are only for reference; please make the object as
the standard.
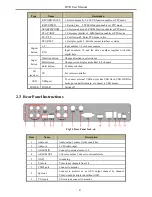
Type
Name
Description
Work
state
indicator
Power
The power indicator turns blue when DVR is powered up.
HDD
The light turns blue when HDD is writing and reading.
Net
The light turns blue when it is able to access the network.
Backup
The light turns blue when backing up files and data.
Play
The light turns blue when playing video.
REC
The light turns blue when recording.
Function
button
MENU/+
1. Enter menu in live 2. Increase the value in setup
BACKUP/-
1. Decrease the value in setup 2. Enter backup mode in live
Содержание Ai-T40
Страница 1: ...Ai T40 T80 TVI DVR User Manual For H 264 4 8 channel digital video recorder All rights reserved...
Страница 16: ...DVR User Manual 11 Fig 3 3 Live Playback...
Страница 70: ...A0...


