background image

Intelli-Time

®

 Clock 

Intelli-Time products are pre-programmed with the correct time and date. 

Intelli-Time technology instructs the time and date to set themselves. All you 

need to do is select your Time Zone and Daylight Saving Time preferences. The 

clock will then automatically set itself and change for Daylight Saving Time.


Set the Time, Date & Units 

Press and release the SET button to enter SETUP MODE. Once in setup mode, 

the preference you are currently setting will blink on the display.


To adjust the currently selected (flashing) item, press and release the “

” or 

” buttons (press and HOLD to fast adjust).


To save your adjustments, press and release the SET button again to adjust the 

next preference. The preference set order is as follows:


LANGUAGE (English or French)


COUNTRY (USA, CAN, AUS)


DST* (Daylight Saving Time ON or OFF)


TIME ZONE (PST MST CST EST AST HAT AKT NST AEST ACST AWST)


CLOCK HOUR


CLOCK MINUTE


CALENDAR MONTH


CALENDAR DATE


CALENDAR YEAR


TEMPERATURE SCALE (ºF or ºC)


BAROMETRIC PRESSURE SCALE (inHg or hPa)


*If you live in an area that observes daylight saving time, DST should be set to 

ON, even if it is not currently Daylight Savings Time.


You will automatically exit SETUP MODE if no buttons are pressed for 20 

seconds. Enter setup mode at any time by pressing the SET button.


Display Backlight Settings 

This weather station’s color display features three different lighting settings: 

High (100%) brightness, Medium (60%) brightness and Low (30%) brightness.


Using battery power alone, the backlight is available momentarily for 10 

seconds by pressing the “BACKLIGHT” button.


When display is powered with the power adapter, backlight remains on at 

100% brightness. Press “BACKLIGHT” button once to dim to 60% brightness; 

press again to dim to 30%, press a 3rd time to enter “AUTO DIM” mode.


AUTO DIM MODE: 

Automatically adjusts display brightness based on time of day. 

6:00 a.m. - 9:00 p.m. = 100% brightness


9:01 p.m. - 5:59 a.m.= 30% brightness


Содержание 02050CAUDI

Страница 1: ... 5 Display Setup 6 Intelli Time Clock 7 Set the Time Date Units 7 Backlight Settings 7 Placement Guidelines 8 Using the Weather Station 9 Troubleshooting 10 Care Maintenance 11 Calibration 12 Replace Intelli Time Battery 13 Specifications 14 FCC Information 14 Customer Support 15 Questions Contact Customer Support at 877 221 1252 or visit www AcuRite com SAVE THIS MANUAL FOR FUTURE REFERENCE ...

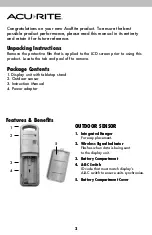
Страница 2: ...using this product Locate the tab and peel off to remove Package Contents 1 Display unit with tabletop stand 2 Outdoor sensor 3 Instruction Manual 4 Power adapter Features Benefits 1 OUTDOOR SENSOR 1 Integrated Hanger 2 For easy placement 2 Wireless Signal Indicator Flashes when data is being sent to the display unit 3 Battery Compartment 3 4 A B C Switch ID code that must match display s 4 A B C ...

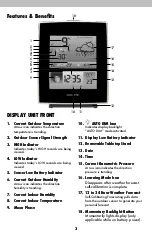
Страница 3: ...idity is trending 7 Current Indoor Humidity 8 Current Indoor Temperature 9 Moon Phase 10 AUTO DIM Icon Indicates display backlight AUTO DIM mode activated 11 Display Low Battery Indicator 12 Removable Tabletop Stand 13 Date 14 Time 15 Current Barometric Pressure Arrow icon indicates the direction pressure is trending 16 Learning Mode Icon Disappears after weather forecast self calibration is compl...

Страница 4: ... 3 SET Button for setup preferences 4 Button for setup preferences and viewing LOW records 7 8 9 10 5 A B C Switch ID code that must match sensor s A B C switch to ensure units synchronize 6 RESET Button Full reset to factory defaults 7 Plug in For Power Adapter 8 Battery Compartment 9 Intelli Time Battery Compartment 10 Battery Compartment Cover 4 ...

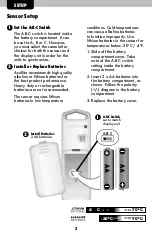
Страница 5: ...y duty or rechargeable batteries are not recommended The sensor requires lithium batteries in low temperature Install Batteries 2 AA batteries conditions Cold temperatures can cause alkaline batteries to function improperly Use lithium batteries in the sensor for temperatures below 20ºC 4ºF 1 Slide off the battery compartment cover Take note of the A B C switch setting inside the battery compartme...

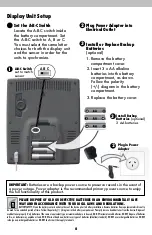
Страница 6: ...recommended primary power source to enjoy the full functionality of this product A B C 2 3 Plug in Power Adapter PLEASE DISPOSE OF OLD OR DEFECTIVE BATTERIES IN AN ENVIRONMENTALLY SAFE WAY AND IN ACCORDANCE WITH YOUR LOCAL LAWS AND REGULATIONS BATTERY SAFETY Clean the battery contacts and also those of the device prior to battery installation Remove batteries from equipment which is not to be used...

Страница 7: ...T NST AEST ACST AWST CLOCK HOUR CLOCK MINUTE CALENDAR MONTH CALENDAR DATE CALENDAR YEAR TEMPERATURE SCALE ºF or ºC BAROMETRIC PRESSURE SCALE inHg or hPa If you live in an area that observes daylight saving time DST should be set to ON even if it is not currently Daylight Savings Time You will automatically exit SETUP MODE if no buttons are pressed for 20 seconds Enter setup mode at any time by pre...

Страница 8: ...well covered tree branch The best location is 1 to 2 meters 4 to 8 feet above the ground with permanent shade and plenty of fresh air to circulate around the sensor Important Placement Guidelines To ensure accurate temperature measurement place units out of direct sunlight and away from any heat sources or vents Display unit and outdoor sensor must be within 100 m 330 ft of each other To maximize ...

Страница 9: ...le variations in barometric pressure greatly affect the weather This weather station displays the current pressure with an arrow icon to indicate the direction the pressure is trending FALLING STEADY or RISING Moon Phase Track the phases of the moon conveyed through simple lunar phase icons NEW WAXING 1ST FULL 3RD WANING CRESCENT QUARTER QUARTER CRESCENT High Low Records Today s high and low recor...

Страница 10: ...doors and remove batteries from each 2 Make sure the A B C switch on both units match 3 Reinstall batteries in the outdoor sensor 4 Reinstall batteries in the display unit 5 Let the units sit within a couple feet of each other for about 20 minutes to gain a strong connection Sometimes changing to a different channel can help Inaccurate forecast Weather Forecast icon predicts conditions for the nex...

Страница 11: ...eeds to be replaced see page 13 Once the new battery is installed time and date will need to be set manually If your AcuRite product does not operate properly after trying the troubleshooting steps visit www AcuRite com or call 877 221 1252 for assistance Care Maintenance Display Unit Care Clean with a soft damp cloth Do not use caustic cleaners or abrasives Keep away from dust dirt and moisture C...

Страница 12: ... be erased if the display is reset or if batteries are removed and the power adapter is unplugged Calibrate Barometric Pressure The weather station default pressure mode is AUTO In auto mode the pressure will calibrate itself over a 14 day Learning Mode Barometric pressure can be manually calibrated 1 Press AND HOLD the Set button located on the back of the display unit for at least 10 seconds to ...

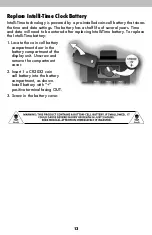
Страница 13: ...ores the time and date settings The battery has a shelf life of several years Time and date will need to be entered after replacing Intelli Time battery To replace the Intelli Time battery 1 Locate the coin cell battery compartment door in the battery compartment of the display unit Unscrew and remove the compartment cover 2 Insert 1 x CR2032 coin cell battery into the battery compartment as shown...

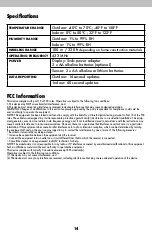
Страница 14: ...l installation This equip ment generates uses and can radiate radio frequency energy and if not installed and used in accordance with the instructions may cause harmful interference to radio communications However there is no guarantee that interference will not occur in a particular installation If this equipment does cause harmful interference to radio or television reception which can be determ...

Страница 15: ...of this product available and contact us in any of the following ways 877 221 1252 info chaney inst com 24 7 support at www AcuRite com Installation Videos Register your Product Instruction Manuals Support User Forum Replacement Parts Submit Feedback Ideas Imported by Costco Wholesale Australia Pty Ltd 17 21 Parramatta Rd Lidcombe NSW 2141 15 ...

Страница 16: ... provide you with information you can depend on to Plan your day with confidence www AcuRite com Chaney Instrument Co All rights reserved AcuRite is a registered trademark of the Chaney Instrument Co Lake Geneva WI 53147 All other trademarks and copy Printed in China rights are the property of their respective owners AcuRite uses patented technology 02050CAUDI INST 042315 Visit www AcuRite com pat...

Отзывы: