Active Vision SX-1400 Series Скачать руководство пользователя страница 26

25 


PTZ Control   

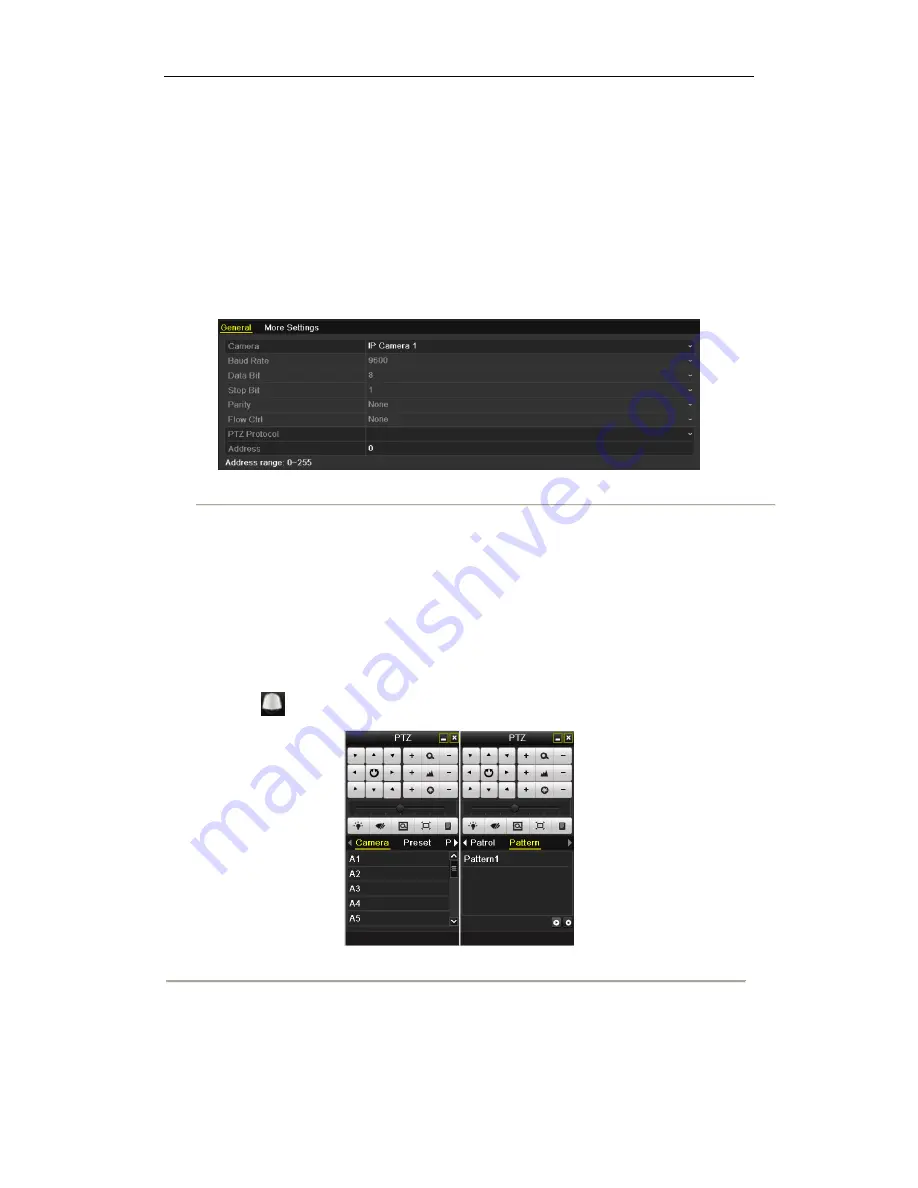
Follow the procedure to set the parameters for PTZ. The configuring of the PTZ parameters should be done before 

you set the PTZ camera.   

Before you start, please check that the PTZ and the NVR are connected properly through RS-485 interface. 

PTZ Settings   

Steps: 

1.


Enter the PTZ Settings interface. 

Menu >Camera> PTZ 


Camera Settings Interface 


2.


Choose the camera for PTZ setting next to 

Camera

 label. 

3.


Enter the parameters of the PTZ camera. 

Note: 

All the parameters should be exactly the same as the PTZ camera parameters. 

4.


Click 

Copy

 if you want to configure same settings to other PTZ cameras. 

5.


Click the 

Apply

 button to save and exit the interface. 

PTZ Control 

In the Live View mode, you can press the PTZ Control button on the front panel or on the remote, or  choose the 

PTZ Control icon 

  to enter the PTZ toolbar. 


PTZ Control Bar 


Quick Operation Guide 

for the SX-1400

 Series NVR 

Содержание SX-1400 Series

Страница 1: ...UD 6L0202B0042A02 Quick Operation Guide for SX 1400 Series NVR...

Страница 2: ...from the NVR by unfastening the screws on the rear and side panel 2 Connect one end of the data cable to the motherboard of NVR and the other end to the HDD Quick Operation Guide for the SX 1400 Serie...

Страница 3: ...n fasten the screws on the bottom to fix the HDD 2 Connect one end of the data cable to the motherboard of NVR and the other end to the HDD Quick Operation Guide for the SX 1400 Series NVR Steps Alter...

Страница 4: ...r cable to the HDD 4 Place the HDD on the bottom of the device and then fasten the screws on the bottom to fix the HDD 5 Re install the cover of the NVR and fasten screws Quick Operation Guide for the...

Страница 5: ...us HDD Power Tx Rx DVD R W Control Buttons Compound Buttons Shuttle Button Power Button USB interface USB Interface Status Indicators Alarm Ready Status HDD power Tx Rx SHIFT Compound Buttons Control...

Страница 6: ...5 Status Indicator Power Status Tx Rx USB Interface Quick Operation Guide for the SX 1400 Series NVR...

Страница 7: ...ermination Switch RS 485 termination switch Up position is not terminated Down position is terminated with 120 resistance 10 RS 485 Interface Connector for RS 485 devices T and T pins connects to R an...

Страница 8: ...ot terminated Down position shows the RS 485 is terminated with 120 resistance 10 RS 485 Interface Connector for RS 485 devices T and T pins connects to R and R pins of PTZ receiver respectively Contr...

Страница 9: ...deo output and menu 6 HDMI HDMI video output connector 7 USB Connects USB disks and devices 8 LAN Interface Connector for LAN Local Area Network 9 RS 485 Interface Connector for RS 485 devices T and T...

Страница 10: ...l devices such as USB mouse and USB Hard Disk Drive HDD 6 GND Ground needs to be connected when NVR starts up 7 HDMI Interface HDMI video output connector 8 VGA Output DB9 connector for VGA output Dis...

Страница 11: ...load JP4 can be used within the limit of 12V 1A safely If the interface is connected to an AC load JP4 should be left open Use an external relay for safety as shown in the figure above There are 4 ju...

Страница 12: ...oller Connection To connect a controller to the NVR 1 Disconnect pluggable block from the KB terminal block 2 Unfasten stop screws from the KB D D pluggable block insert signal cables into slots and f...

Страница 13: ...ayback 16 ch Hard disk SATA 4 SATA interfaces for 2 HDDs 1 DVD R W default or 4HDDs eSATA 1 eSATA interface Capacity Up to 4TB capacity for each HDD External interface Network interface 1 RJ 45 10 100...

Страница 14: ...interfaces for 2 HDDs 1 DVD R W default or 4HDDs eSATA 1 eSATA interface Capacity Up to 4TB capacity for each HDD External interface Network interface 1 RJ 45 10 100 1000 Mbps self adaptive Ethernet i...

Страница 15: ...P UXGA 720P VGA 4CIF DCIF 2CIF CIF QCIF Synchronous playback 16 ch Hard disk SATA 2 SATA interfaces Capacity Each interface supports up to 4TB capacity for recording External interface Network interfa...

Страница 16: ...me 8 ch 4CIF Real time 8 ch 720P 4 ch 1080P 2 ch 5MP Non real time Hard disk SATA 2 SATA interfaces for 2 HDDs Capacity Up to 4TB for each disk External interface Network interface 1 RJ 45 10 100 1000...

Страница 17: ...28K 56M 160K 70M 192K 84M 224K 98M 256K 112M 320K 140M 384K 168M 448K 196M 512K 225M 640K 281M 768K 337M 896K 393M 1024K 450M 1280K 562M 1536K 675M 1792K 787M 2048K 900M Note Please note that supplied...

Страница 18: ...17 Menu Operation Menu Structure Quick Operation Guide for the SX 1400 Series NVR The menu structure of the SX 1400 Series NVR The alternate menu structure of the SX 1400 Series NVR...

Страница 19: ...on Using the Start Wizard By default the Setup Wizard starts once the NVR has loaded as shown in Figure below Start Wizard Interface Operating the Setup Wizard 1 The Setup Wizard can walk you through...

Страница 20: ...admin password check the New Admin Password checkbox Enter the new password and confirm the password in the given fields 5 Click the Next button to enter the date and time settings window Date and Tim...

Страница 21: ...d the network parameters which takes you to the HDD Management window Quick Operation Guide for the SX 1400 Series NVR Note the internal NIC IPv4 address should be configured for the cameras connectin...

Страница 22: ...he HDD 9 Click Next button You enter the Adding IP Camera interface 10 Click Search to find online IP Camera Select the IP camera to be added and click the Add button Search for IP Cameras 11 Click Ne...

Страница 23: ...tus These icons include Live View Icons In the live view mode there are icons at the right top of the screen for each channel showing the status of the record and alarm in the channel so that you can...

Страница 24: ...s Steps 1 Enter the Camera Management interface Menu Camera Camera Main Menu 2 To add the online cameras with same network segment 1 Click Search to search the online cameras Camera Settings Interface...

Страница 25: ...cameras Steps 1 Click the icon to edit the parameters you can edit the IP address protocol and other parameters Edit the Parameters 2 Click apply to save the settings and click OK to exit the editing...

Страница 26: ...erface 2 Choose the camera for PTZ setting next to Camera label 3 Enter the parameters of the PTZ camera Note All the parameters should be exactly the same as the PTZ camera parameters 4 Click Copy if...

Страница 27: ...ws Exit Playback Play back the record files of a specific channel in the live view menu Channel switch is supported Instant playback by channel Choose a channel under live view using the mouse and cli...

Страница 28: ...view record files of the top left channel not masked will be played back Note pressing numerical buttons will switch playback to related channels during playback process 2 Playback management The too...

Страница 29: ...ultiple channels All day Playback Interface with Channel List Backup Recorded files can be backed up to various devices such as USB flash drives USB HDDs or a DVD writer Steps 1 Enter Video Export int...

Страница 30: ...using USB1 1 3 Check backup result Choose the record file in Export interface and press button to check it Checkup of Quick Export Result Using USB1 1 0202031021126 Quick Operation Guide for the SX 1...

Отзывы: