background image


User Guide 


Issued 1

st

 October 2007 


Содержание Phoenix Buggy

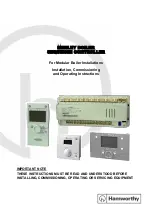
Страница 1: ...User Guide Issued 1st October 2007 ...

Страница 2: ......

Страница 3: ...e Brakes 4 Tilting Seat Footrest Seat Depth 5 Hip Guides Lateral Support 6 Headrest Harness Seat Attachment 7 Castors Handle Height Rear Wheels 8 Hood Footmuff 9 Using the Stroller 10 Transportation 11 Transportation 12 Transportation 13 Care and Maintenance 14 Service Record ...

Страница 4: ......

Страница 5: ...ier The seat removes and the stroller base also folds for storage or stowage improving your convenience The appearance is designed to look as normal as possible on the high street It is in fact based on a high street stroller Please read this User Guide before using your Phoenix Buggy for the first time If you have any further questions after you have read the User Guide please contact your dealer...

Страница 6: ...re making adjustments Patron Bohemia Activate and your dealer cannot accept responsibility for the use of accessories other than those supplied by them Full concentration must be maintained during travel to avoid collisions or other dangerous situations Make sure that the stroller brakes are applied while adjusting the tilt of the seat This will leave both hands free to operate these features avoi...

Страница 7: ...ches upwards until they are clear of the lower frame One of the catches should be rotated to release the safety lock The handle can then be folded downwards allowing the frame to collapse There is a strap provided to keep frame closed for easy handling Take care to avoid trapping fingers Always keep a firm grip on the stroller while folding or unfolding OPERATING THE PARKING BRAKE To put the brake...

Страница 8: ...re this position To attach the footrest the pop pin must be pulled out as the footrest hanger is placed into the bracket under the seat The pop pin will click into positon to secure the footrest SEAT DEPTH ADJUSTMENT To adjust the seat depth the bolts that attach the seat base plate to the seat brackets should be loosened as shown there are four altogether The seat depth should then be reset and t...

Страница 9: ...at plate To adjust the Hip Guide backwards or forwards loosen the bolts inside the hip guide pad cover and move to the desired position Retighten the bolts LATERAL SUPPORT ADJUSTMENT The lateral supports are adjusted by loosening the bolts as shown This gives width and height adjustment Retighten the bolts when the desired position is obtained The Lateral supports swing away for easy access Push w...

Страница 10: ...and the cam buckle closed firmly on it in the correct position for the occupant The lower straps are attached to the seat bracket using the triglide provided Harnesses will be supplied with appropriate instructions REMOVING AND ATTACHING THE SEAT To attach the seat the front bar of the seat unit is positioned into the front channel The seat is then rotated backwards so that the back bar fits into ...

Страница 11: ... The height of the handle is adjusted by pressing the buttons on the adjustment knuckles as shown REMOVING THE REAR WHEELS The rear wheels are quick release making storage easier The clips are pushed in to release the wheel When refitting check that the wheel clip is located ADJUSTING THE SUSPENSION The suspension has two settings The firmer setting should be used for occupants over 10kg to ensure...

Страница 12: ...gular catch and slide the hood forward FITTING THE FOOTMUFF The Footmuff is attached to the hood as shown There is an alternative position to pin the footmuff about 100ml above the seat level TO LOAD INTO A CARBOOT Remove the footrest Remove the seat from the chassis The seat will now sit firmly on the two tubes underneath Fold and load the chassis separately 8 ...

Страница 13: ...nto the stroller NEGOTIATING A KERB OR SINGLE STEP To go down a kerb approach the kerb until the front castors are near the edge Grip the handle firmly and tip the stroller backwards to balance on the rear wheels Lower the castors over the kerb on the rear wheels returning the front castors to the ground when you have reached the lower level To go up a kerb reverse the procedure Do not approach th...

Страница 14: ...ound the v shaped section of the frame the strongest part of the construction Now that the front of the stroller has been secured carefully move the stroller backwards to take up the slack in the front restraints and re apply the brakes The rear restraints are attached to the upright section of the stroller frame at the clearly marked attachment point When the restraint is also attached to the tra...

Страница 15: ...t fit snugly over the pelvis and between the seat side and the backrest on the other side of the seat unit The clip then attaches to the stalk which is fixed to the track in the vehicle floor The lap belt should be adjusted to be close fitting to avoid abdominal intrusion on impact The upper torso restraint is reeled out of the rear of the double inertia unit The leading clip is passed over the oc...

Страница 16: ...d fit snugly over the pelvis of the occupant at a steep angle of application to avoid abdominal intrusion 6 Check with the vehicle converter that the vehicle floor and side wall structures have the appropriate strength required by the restraint manufacturers for the installation of the restraint systems 7 Check that the vehicle converter has fitted the restraint system in conjunction with the rest...

Страница 17: ... your dealer Only genuine Patron Bohemia parts should be used when your stroller is repaired Regular lubrication of moving parts will extend the life of your stroller and will make folding and unfolding easier Use a spray lubricant and wipe off any excess spray Any overspray will encourage a build up of dirt Make sure that you are familiar with the folding method for your stroller It should always...

Страница 18: ...gy set the seat carriage level You may always have the seat tilted but the buggy must not be folded with the seat carriage in this position Attempting to fold the buggy incorrectly may damage the frame and invalidate the warranty 14 ...

Страница 19: ...Service Record Date Details ...

Страница 20: ......

Отзывы: