background image

 3


Assembly |  

Montage


| Montage


1


• 

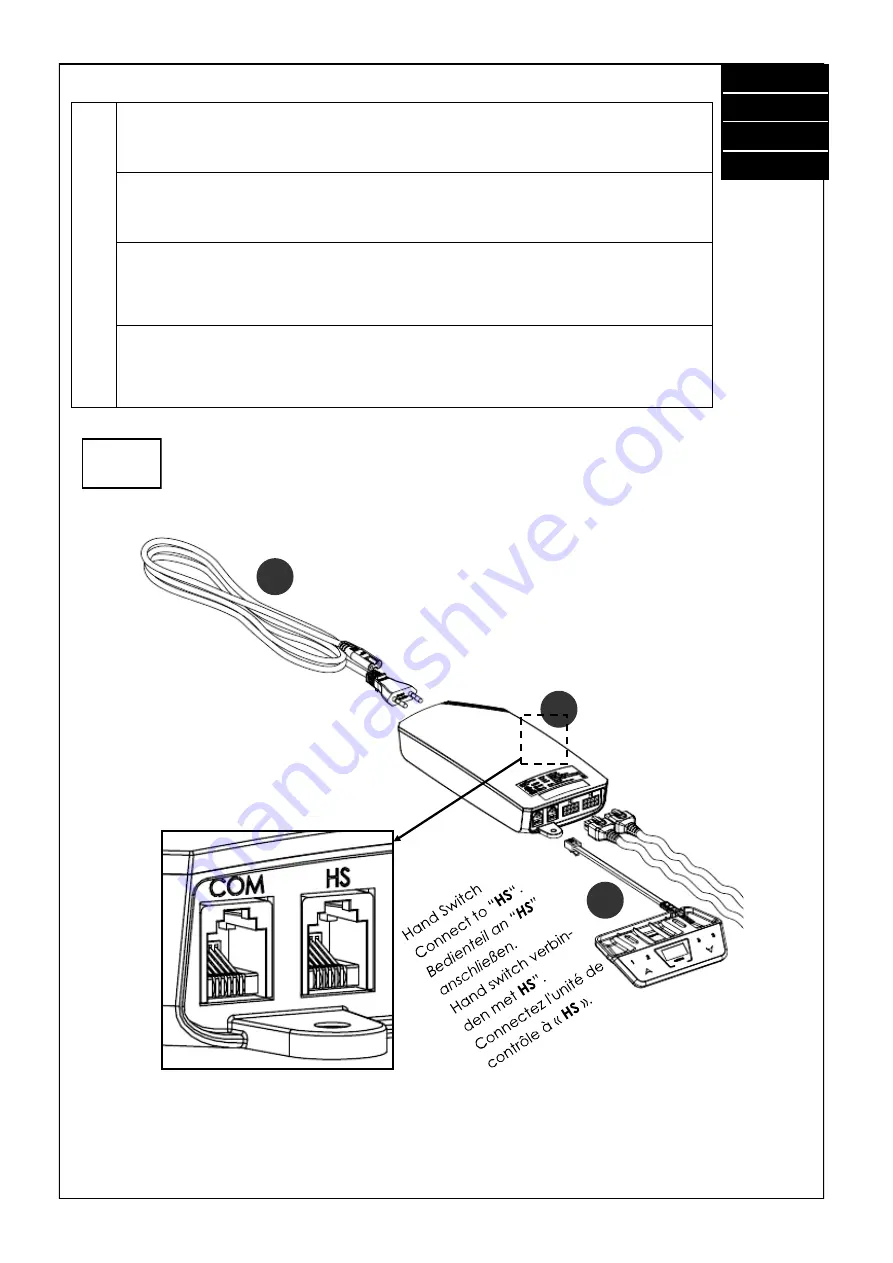
Proceed  with  the  assembly  of  the  frame  until  the  table  top  has 
been mounted. Only then you may go forward with the assembly of 
this product. 


• 

Setzen Sie die Montage des Gestells fort, bis die Tischplatte montiert 
worden ist. Erst hiernach sollten Sie mit der Montage dieses Produkts 
fortfahren. 


• 

Ga verder met de montage van het frame totdat het tafelblad is 
gemonteerd. Daarna kunt u verder gaan met het monteren van dit 
product. 


• 

Continuez à assembler le cadre jusqu'à ce que le plateau de la 
table soit assemblé. Ce n'est qu'alors que vous devez procéder à 
l'assemblage de ce produit. 


 

English 

Deutsch 

Nederlands 

Français 

Содержание Acti Switch Pro Memory

Страница 1: ...ung Bitte sorgfältig lesen und sicher aufbewahren Montagehandleiding Lees deze handleiding aandachtig door en bewaar deze goed Notice de montage Veuillez lire attentivement cette notice et la conserver en lieu sûr RNDP17030 IM0001 0EN DE NL Acti Switch Pro Memory FA SLS AS0007 00 Scan the QR code to download the Actifit App ...

Страница 2: ...schgestells sollte griffbereit sein da diese möglicherweise benötigt wird Onderdelen 1 2 zijn altijd onderdeel van de levering Onderdelen 3 5 kunnen variëren afhankelijk van de specifieke behoeften maar zijn essentieel voor het functioneren Sluit deze kit enkel aan wanneer de stroom is uitgeschakeld Om hier zeker van te zijn dient u de stroomkabel los te koppelen Koppel de kabels van de voeding en...

Страница 3: ...platte montiert worden ist Erst hiernach sollten Sie mit der Montage dieses Produkts fortfahren Ga verder met de montage van het frame totdat het tafelblad is gemonteerd Daarna kunt u verder gaan met het monteren van dit product Continuez à assembler le cadre jusqu à ce que le plateau de la table soit assemblé Ce n est qu alors que vous devez procéder à l assemblage de ce produit 4 1 3 English Deu...

Страница 4: ...e button up or down until the table reaches the desired height 2 Press the save key The display shows S 3 Select and press one of the memory keys 4 The control unit will confirm the successful setting by flashing S the number on the memory key you chose before In addition a green flashing status bar and a double click from the control unit confirm the saved preset 5 After the preferred height posi...

Страница 5: ...w these instructions 1 Determine the value you want to add to the displayed value 2 Press the save key The display shows S 3 Press and hold down for five seconds The displayed height starts flashing 4 Press the button up or down until the required value is shown in the display 5 Press the save key 6 The status bar flashes in green and the display now indicates the table height according to your se...

Страница 6: ...e display shows U L UNLOCK LOWER 5 To limit the upper height apply the same procedure of bullet points 1 4 but select S 4 instead The display shows two conditions L U LOCK UPPER and U U UNLOCK UPPER Users can connect to the frame with their smartphone and ActiFit App via Bluetooth connection Please follow the following steps for Bluetooth activation and pairing between the hand switch and their sm...

Страница 7: ...Das Display zeigt S 3 Wählen und drücken Sie eine der Speicherpositionen 4 Der Memory Master bestätigt die erfolgreiche Höheneinstellung durch Blinken von S Nummer der Speicherposition die Sie gewählt haben Zusätzlich bestätigt ein grünes Blinken des Statusring und ein Doppelklick der Steuerung die erfolgreiche Höheneinstellung 5 Nachdem die bevorzugte Höheneinstellung gespeichert wurde drücken Si...

Страница 8: ...en Wert der angezeigt werden soll 2 Drücken Sie die Speichertaste Das Display zeigt S 3 Drücken und halten Sie die Abwärtstaste für 5 Sekunden Die angezeigte Höhe im Display fängt an zu blinken 4 Drücken Sie Aufwärts oder Abwärtstaste bis der gewünschte Wert im Display angezgeit wird 5 Drücken Sie die Speichertaste 6 Der Statusring blinkt grün und das Display zeigt nun die Höhe gemäß Ihrer Einstel...

Страница 9: ...gleiche Verfahren wie Punkt 1 4 an wählen Sie jedoch stattdessen S 4 Das Display zeigt zwei Zustände an L U LOCK UPPER und U U UNLOCK UPPER Bluetooth aktivieren und App verbinden Höheneinstellung begrenzen Benutzer können mit Ihrem Smartphone und der ActiFit App über Bluetooth eine Verbindung zum Tisch herstellen Folgen Sie den Schritten zur Aktivierung des Bluetooth und zum anschließenden Verbind...

Страница 10: ...hoogte heeft bereikt 2 Druk op de save toets Het display toont S 3 Selecteer en druk op een van de geheugentoetsen 4 Wanneer de hoogte succesvol is opgeslagen zal het display S gaan knipperen het num mer op de eerder gekozen geheugentoets Daarnaast bevestigen een groen knipperende statusbalk en een dubbele klik van de voeding de opgeslagen preset 5 Nadat de gewenste hoogte is ingesteld houdt u de ...

Страница 11: ...blad Ga als volgt te werk om de tafelhoogte indicatie aan te passen 1 Bepaal de waarde die u aan de weergegeven waarde wilt toevoegen 2 Druk op de save toets Het display toont S 3 Druk op de down toets en houd deze vijf seconden ingedrukt Het scherm gaat knipperen 4 Druk op de toets up of down tot de gewenste hoogte op het display wordt weergegeven 5 Druk op de knop save toets 6 De statusbalk knip...

Страница 12: ...fde procedure toe als omschreven in de stap pen 1 4 maar selecteert u S 4 Het display toont twee voorwaarden L U LOCK UP PER en U U UNLOCK UPPER Bluetooth activering en koppeling Het aanpassen van het hoogteverstelbereik Gebruikers kunnen met hun smartphone via Bluetooth verbinding maken met het frame en de ActiFit App Volg de volgende stappen voor Bluetooth activering en een koppeling tussen de h...

Страница 13: ...auvegarde L écran affiche S 3 Sélectionnez et appuyez sur l une des touches mémoire 4 L unité de contrôle confirmera le réglage réussi en faisant clignoter S le numéro de la touche mémoire que vous avez choisi auparavant De plus une barre d état verte cligno tante et un double clic de l unité de contrôle confirment le préréglage enregistré 5 Après avoir préréglé la position de hauteur préférée app...

Страница 14: ...z la valeur que vous souhaitez ajouter à la valeur affichée 2 Appuyez sur la touche de sauvegarde L écran affiche S 3 Appuyez sur la touche bas et maintenez la enfoncée pendant cinq secondes La hauteur affichée commence à clignoter 4 Appuyez sur la touche haut ou bas jusqu à ce que la valeur souhaitée s affiche à l écran 5 Appuyez sur la touche de sauvegarde 6 La barre d état clignote en vert et l...

Страница 15: ...liquez la même procedure que les étapes 1 4 mais sélec tionnez S 4 au lieu 6 L écran affiche deux conditions L U VERROUILLÉ SUPÉRIEUR et U U DÉVERROUILLÉ SUPÉRIEUR Activation et couplage Bluetooth Limites de réglage de la hauteur Les utilisateurs peuvent se connecter au cadre avec leur téléphone intelligent et l application ActiFit via une connexion Bluetooth Veuillez suivre les étapes suivantes p...

Страница 16: ...16 2x 2 2 Mounting the table top Montage der Tischplatte Montage van het werkblad Montage du plateau de bureau ...

Страница 17: ...17 70 mm 125 mm Technical Specification Technische Daten Technische specificaties Caractéristiques techniques ...

Страница 18: ...typ angeben Houd de gegevens van het frame bij de hand wanneer u contact opneemt met uw dealer Lorsque vous contactez le service après vente veillez à disposer des informations concernant le bâti de bureau à portée de main Manufacturer Hersteller Fabrikant Fabricant Retailer Händler Dealer Revendeur Actiforce International B V Xenonweg 11 3812 SZ Amersfoort The Netherlands 31 0 33 4600120 www acti...

Отзывы: