background image

www.acti.com

Installation Guide 


31 

High Voltage DO Device Connection 

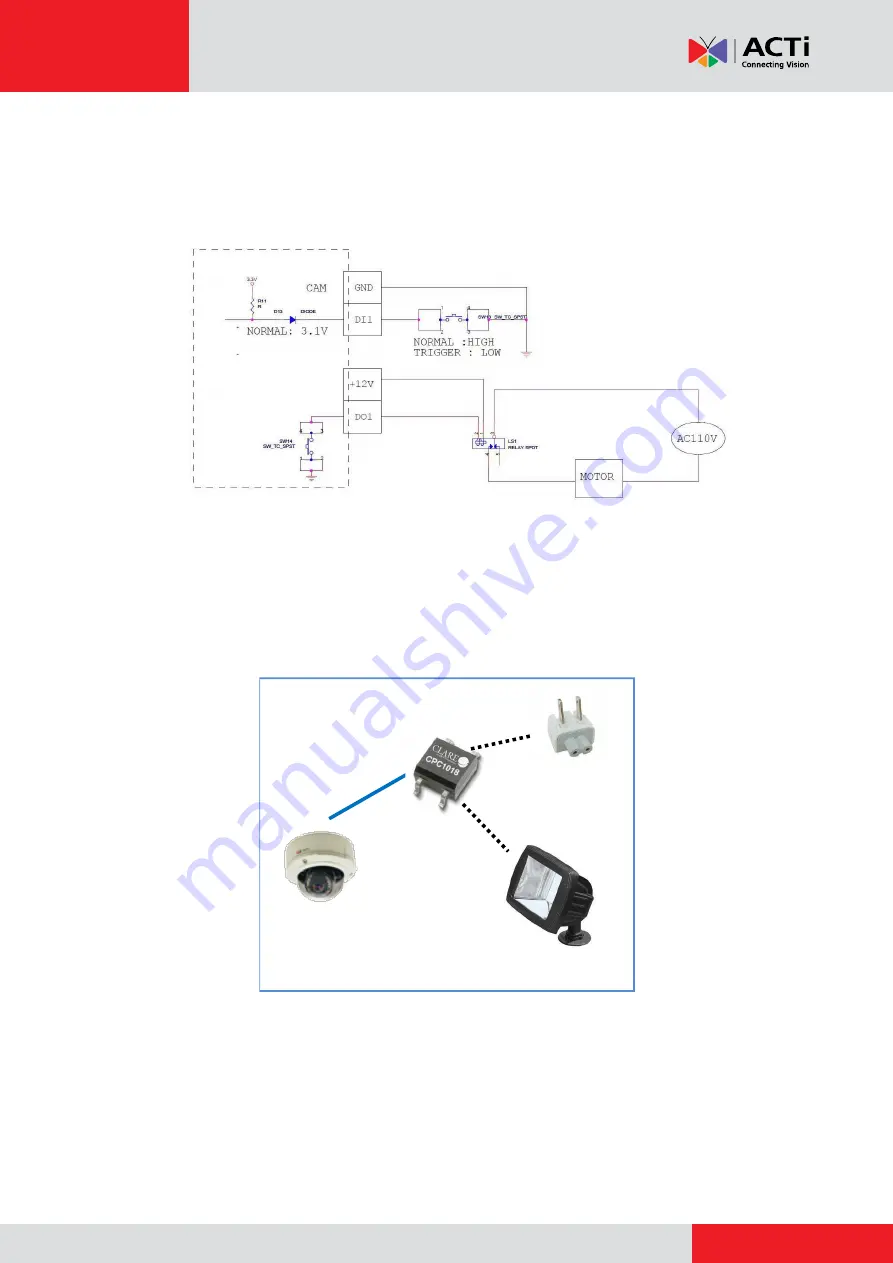
Even though the camera provides 12V power, this may not be enough for some high voltage DO 

devices, such as a ceiling light or a motor that opens or closes a gate. In this case, there is a 

need to connect an external relay. See wiring scheme below: 


Note that when choosing an appropriate relay, please refer to its specifications and make sure 

they match the above design. The triggering circuit voltage has to be around 12V DC and the 

switch-controlled circuit voltage has to match the external power supply (e.g. 110V AC or 220V 

AC). 


The illustration below is a graphic example of connecting a relay to a high voltage DO device. 


Relay 

(DO1 Device) 

Camera 

Illuminator 

110V-220V AC 

External Power 

Source 


NOTE:

 For more information on DI/DO connections, please refer to the Knowledge Base 

article 

All about Digital Input and Digital Output

 downloadable from the link below


(

http://www.acti.com/kb/detail.asp?KB_ID=KB20091230001

). 


Содержание B81

Страница 1: ...2014 01 13 Outdoor Dome Mounting on the Wall with Gang Box Face Forward Installation Guide For Models B81 B84 B85 B87 ...

Страница 2: ...t the Cable s 9 Waterproof Solution with Naked Cable 9 Waterproof Solution with Conduit 12 Step 6 Install the Camera 16 Step 7 Connect to Network 17 Step 8 Access the Camera Live View 17 Step 9 Adjust the Viewing Angle 18 Step 10 Close the Dome Cover 19 Appendices 20 How to Access the Camera Live View 20 How to Connect a Power Adapter Optional 27 How to Connect DI DO Devices Optional 29 How to Con...

Страница 3: ...res in installing the camera on a Two Gang Box which is mounted on the wall With this type of installation the following accessories and tools are required Gang Box Two Gang Gang Box Converter PMAX 0804 with Bundled Screw Pack Phillips Screwdriver Network Cable Flexible Conduit if necessary ...

Страница 4: ...nduit This solution is recommended when an exterior grade Ethernet cable is not available or other cables such as power adapter DI DO devices etc will be connected to the camera Note that throughout this documentation this solution is referred to as the Waterproof Solution with Conduit 1 Determine the type of waterproof solution that is applicable to your installation requirements and prepare the ...

Страница 5: ...ched once the cables pass through the camera hole later Step 2 Prepare the Camera for Installation NOTE To avoid scratches or leaving fingerprints on the dome cover it is recommended to retain the plastic covering the dome cover until the camera is completely installed However the plastic has been removed on some of the pictures in this documentation to show clarity of the procedures being describ...

Страница 6: ...r 3 Carefully lift to open the dome cover and place it on the side of the camera NOTE Do not abruptly lift the dome cover it is attached to the camera with a spring wire 4 If necessary insert a memory card with the metallic contacts facing down into the card slot of the camera Push the card until it clicks into place ...

Страница 7: ...ucceeding procedures and images show how to do the camera installation with a gang box installed inside the wall same procedures apply if the gang box is on the wall 1 Remove a knockout on the gang box where you want to route the network cable If the gang box will be installed in the wall insert the network cable through this knockout at this point Using the Naked Cable Solution Using the Flex Con...

Страница 8: ...installed on the wall and the cable be routed along the wall This way the cable will be routed with a downward position which will be an added protection against possible water leak Determine the most appropriate orientation for your installation environment NOTE The succeeding procedures and images show how to do the camera installation with a gang box installed inside the wall same procedures ap...

Страница 9: ...the cable s based on your selected waterproof solution Waterproof Solution with Naked Cable see Waterproof Solution with Naked Cable below Waterproof Solution with Conduit see Waterproof Solution with Conduit on page 12 Waterproof Solution with Naked Cable This section describes the procedures in using the bundled cable gland and an exterior grade Ethernet cable 1 Disassemble the cable gland as sh...

Страница 10: ...ation Guide 10 2 Insert the clamping nut into the Ethernet cable 3 Insert the sealing insert with claw 4 Attach the cable gland body to the hole of the camera 5 Pull the network cable through the bottom hole of the camera ...

Страница 11: ...a 7 Insert the sealing insert with the claw into the gland body and then attach the clamping nut to complete the cable solution NOTE Make sure the clamping nut is tightly attached to the cable gland body and the sealing insert is squeezed tightly 8 Proceed with Step 6 Install the Camera on page 16 ...

Страница 12: ...nded solution if an exterior grade Ethernet cable is not available or when other cables such as power adapter DI DO devices etc will be connected to the camera 1 Prepare the following materials for waterproof installation Conduit Gland included in the camera package Flexible Conduit 1 2 Trade size not included in the package For use with 1 2 flexible conduit Network Cable CAT 5 or CAT 6 not includ...

Страница 13: ...ut is not necessary Please set the lock nut aside 3 Pull the network cable through the flex conduit If connecting other input output devices or an external power adapter pull the cables through the flex conduit without connectors The terminal blocks will be attached once the cables pass through the camera hole later 4 Insert the clamping nut through the flex conduit Lock Nut Body Sealing Insert Cl...

Страница 14: ...nstallation Guide 14 5 Insert the sealing insert and attach it at the end of the flex conduit 6 Screw the conduit gland body to the conduit hole of the camera 7 Pull the cable s through the bottom hole of the camera ...

Страница 15: ...sections below for detailed information How to Connect a Power Adapter Optional on page 27 How to Connect DI DO Devices Optional on page 29 How to Connect Audio Devices Optional on page 32 10 Connect the network cable to the Ethernet port and other cables if any to the corresponding connectors on the camera 11 Proceed with Step 6 Install the Camera on page 16 Digital Input Output DI DO Connector E...

Страница 16: ...are bundled with the gang box converter to secure the camera to the converter CAUTION When using electric screwdrivers be careful not to touch the internal camera components while attaching the screws Since electric screwdrivers vary in sizes speed and force they may bruise and damage the internal camera components DISCLAIMER ACTi will not be responsible for camera damage caused by improper instal...

Страница 17: ...r Ethernet PoE example connection diagram below Network AC Power Source PoE Injector PoE Switch Power Cable Ethernet Cable Ethernet Cable Data Power Ethernet Cable Data Camera In case of using a non PoE switch power up the camera using a power adapter not supplied As needed power up the other connected devices Step 8 Access the Camera Live View See How to Access the Camera Live View on page 20 for...

Страница 18: ...ustment Procedures 1 Loosen the tilt adjustment screws adjust the tilt and then tighten back the screws to fix the tilt position 2 Loosen the rotation adjustment screw rotate the viewing orientation and then tighten back the screw to fix the orientation 3 Loosen the pan adjustment screw move the pan direction and then tighten back the screw to fix the pan position 1 2 3 ...

Страница 19: ...llation Guide 19 Step 10 Close the Dome Cover 1 Tighten the three 3 screws to attach the dome cover to the camera body 2 Remove the plastic covering the dome cover Final installation will look like the illustration below ...

Страница 20: ... from your PC both the camera and the PC have to be within the same network segment In most cases it means that they both should have very similar IP addresses where only the last number of the IP address is different from each other There are 2 different approaches to IP Address management in Local Area Networks by DHCP Server or Manually Using DHCP server to assign IP addresses If you have conne...

Страница 21: ...local area network will be discovered by Windows thanks to the UPnP function support of our cameras In the example below we successfully found the camera model that we had just connected to the network By double clicking the mouse button on the camera model it is possible to automatically launch the default browser of the PC with the IP address of the target camera filled in the address bar of the...

Страница 22: ...addresses serial numbers firmware versions etc and allows quick configuration of multiple devices at the same time The IP Utility can be downloaded for free from http www acti com IP_Utility With just one click you can launch the IP Utility and there will be an instant report as follows You can quickly notice the camera model in the list Click on the IP address to automatically launch the default ...

Страница 23: ... network and it does not detect any DHCP services it will automatically assign itself a default IP 192 168 0 100 Whereas the default port number would be 80 In order to access that camera the IP address of the PC has to be configured to match the network segment of the camera Manually adjust the IP address of the PC In the following example based on Windows 7 we will configure the IP address to 19...

Страница 24: ... IP Utility With the procedure shown above all the cameras will have unique IP addresses starting from 192 168 0 101 In case there are 20 cameras selected the last one of the cameras would have the IP 192 168 0 120 Later by pressing the Refresh button of the IP Utility you will be able to see the list of cameras with their new IP addresses Please note that it is also possible to change the IP addr...

Страница 25: ...onfigurations Yes Yes QuickTime http www apple com quicktime download has to be installed in PC first before using any non Internet Explorer browsers to be able to get live video feed from the camera with those browsers It is a free and open source cross platform multimedia player Disclaimer Notice The camera manufacturer does not guarantee the compatibility of its cameras with QuickTime since it ...

Страница 26: ...p 192 168 0 100 Upon successful connection to the camera the user interface called Web Configurator would appear together with the login page The HTTP port number was not added behind the IP address since the default HTTP port of the camera is 80 which can be omitted from the address for convenience Before logging in you need to know the factory default Account and Password of the camera Account A...

Страница 27: ...er adapter and directly connect the camera to a power outlet The power adapter must be connected to the supplied terminal block before use To do this follow the procedures below 1 Loosen the screws of the 12V and GND pins of the power terminal block 2 Take note that a standard power adapter cable has two 2 different wires White stripe Connects to 12V Pin Connects to GND Pin ...

Страница 28: ...n and the other to the GND pin 4 Tighten the screws of the 12V pin and the GND pins to secure the wire connection 5 Set the prepared power adapter for connection later Below is an example of a power adapter with an attached terminal block NOTE The power adapter is not bundled in the package ...

Страница 29: ... are activated by the camera upon an event inside the camera For example you can connect an alarm horn to the camera as such when an event occurs inside the camera e g detected intruder the alarm horn will sound Other common DO device applications are motion triggered lights electric fence magnetic door locks etc You can connect up to two DI and two DO devices to your camera Press and hold the ora...

Страница 30: ...trigger low Logic level 0 0V 0 4V Normal high Logic level 1 3 1V 30V Current 10mA 100mA DO Connection design Transistor Open Collector Voltage Current 24V DC 50mA Typical Connection Based on these specifications if the DI device has a voltage of 0V 30V or the DO device has a voltage of 24V 100mA then the camera can supply internal power to these devices and there is no need to connect the DI DO de...

Страница 31: ...ions and make sure they match the above design The triggering circuit voltage has to be around 12V DC and the switch controlled circuit voltage has to match the external power supply e g 110V AC or 220V AC The illustration below is a graphic example of connecting a relay to a high voltage DO device Relay DO1 Device Camera Illuminator 110V 220V AC External Power Source NOTE For more information on ...

Страница 32: ...ce Pin Mapping Instructions Audio Output 1 GND Connect the wires of the audio output device to GND Pin 1 and AUDIO OUT Pin 2 2 DI1 Audio Input 3 GND Connect the wires of the audio input device to GND Pin 3 and AUDIO IN Pin 4 4 DI2 Press and hold the orange tab as you insert the wire through the pin slot then release the orange tab to secure the wire NOTE For more information about AUDIO in connect...

Страница 33: ...e care has been taken during the writing of this manual Please inform your local office if you find any inaccuracies or omissions We cannot be held responsible for any typographical or technical errors and reserve the right to make changes to the product and manuals without prior notice Cleaning Disconnect this video product from the power supply before cleaning Attachments Do not use attachments ...

Страница 34: ...ectly exposed to rain or water 4 If the video product does not operate normally by following the operating Instructions in this manual Adjust only those controls that are covered by the instruction manual as an improper adjustment of other controls may result in damage and will often require extensive work by a qualified technician to restore the video product to its normal operation Safety Check ...

Страница 35: ...Copyright 2014 ACTi Corporation All Rights Reserved 7F No 1 Alley 20 Lane 407 Sec 2 Ti Ding Blvd Neihu District Taipei Taiwan 114 R O C TEL 886 2 2656 2588 FAX 886 2 2656 2599 Email sales acti com ...

Отзывы: