background image

www.acti.com

  Hardware Manual 


30 

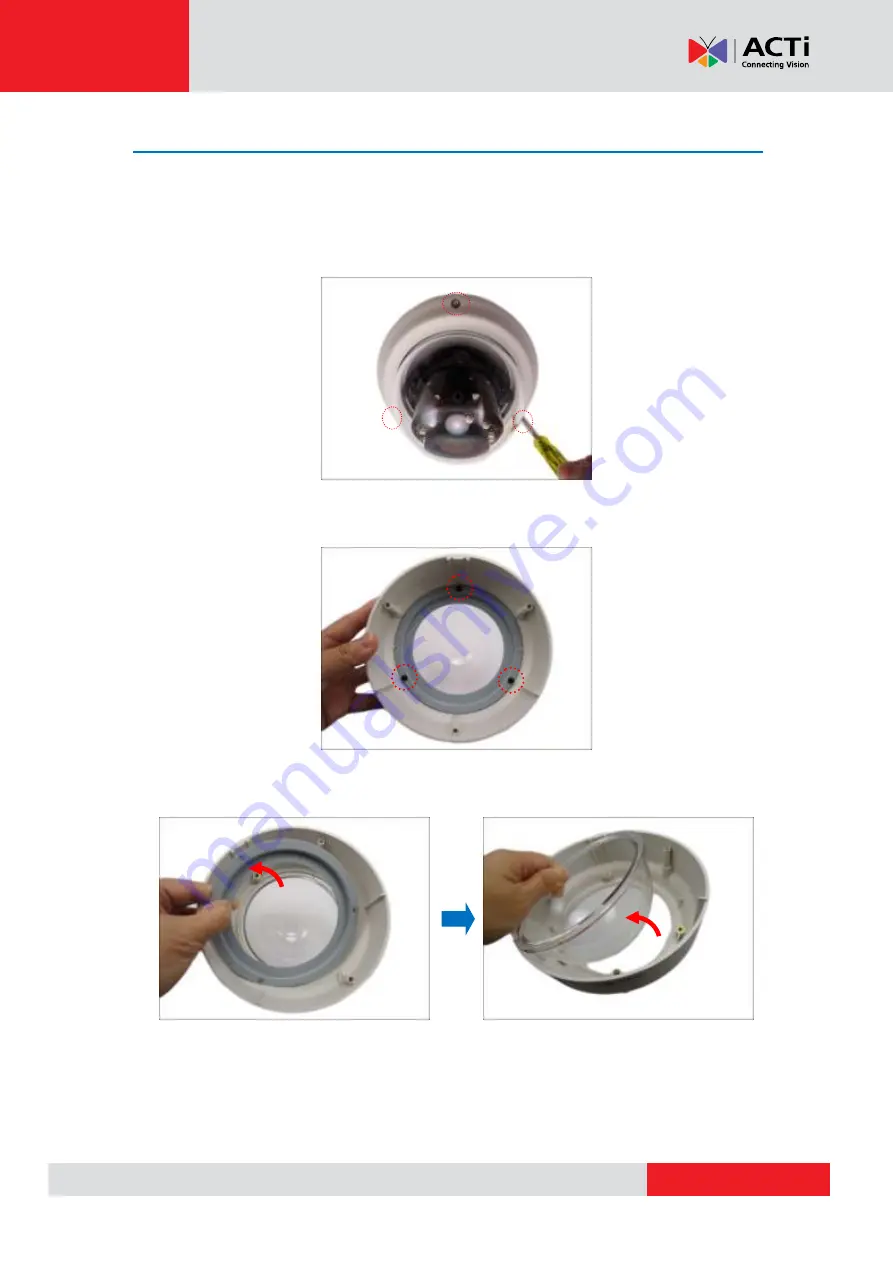
How to Replace the Dome Cover 

For more discrete surveillance needs, the bundled dome cover can be replaced with a smoke, 

vandal proof cover available for purchase. To replace the dome cover, do the following: 

1.


Loosen the three (3) screws to open the dome cover. 


2.


Remove the three (3) screws to detach the bracket. 


3.


Remove the bracket and dome cover from the cover housing. 


Содержание B612

Страница 1: ...Indoor Zoom Dome Hardware Manual B612 2018 06 29...

Страница 2: ...fore Installation 14 Connecting a Power Adapter Optional 14 Connecting the DI DO Devices Optional 16 Connecting Audio In Out Devices Optional 20 Installing the Camera on a Surface 21 Step 1 Drill the...

Страница 3: ...ccessories 28 How to Install a Memory Card 28 How to Insert the Memory Card 28 How to Remove the Memory Card 28 How to Adjust the Viewing Angle 29 How to Replace the Dome Cover 30 Accessing the Camera...

Страница 4: ...attempt to service this video device yourself as opening or removing covers may expose you to dangerous voltage or other hazards Refer all servicing to qualified service personnel Trademarks All names...

Страница 5: ...urning the equipment off and on the user is encouraged to try to correct the interference by one or more of the following measures Reorient or relocate the receiving antenna Increase the separation be...

Страница 6: ...e personnel under the following conditions 1 When the power supply cord or plug is damaged 2 If liquid has been spilled or objects have fallen into the video product 3 If the inner parts of video prod...

Страница 7: ...acti com Hardware Manual 7 Introduction The List of Models This hardware manual contains the following models B612 3MP Video Analytics Indoor Zoom Dome with D N Adaptive IR Extreme WDR SLLS 3x Zoom l...

Страница 8: ...nting Screw Kit Hexagon Screwdriver Microfiber Cloth Terminal Block for DI DO Terminal Block for Audio In Out Quick Installation Guide Warranty Card Drill Template NOTE The above pictures are for refe...

Страница 9: ...ory Card on page 28 for more information NOTE Supports microSDHC and microSDXC cards 3 Reset Button Restores the factory default settings of the camera To reset the camera while the power is on press...

Страница 10: ...Devices Optional on page 20 for more information 6 Digital Input Output Connects to digital input or output devices such as alarm triggers panic button etc Digital Input DI and Digital Output DO devic...

Страница 11: ...r mounting instructions Flush Mount Suitable when mounting the camera discretely above dropped ceilings wherein only the dome cover will be visible underneath the ceiling PMAX 1014 Gang Box Converter...

Страница 12: ...walls PMAX 0313 Heavy Duty Wall Mount Vertical Pole Mount Suitable when mounting the camera on vertical poles PMAX 0313 PMAX 0503 Horizontal Pole Mount Suitable when mounting the camera on horizontal...

Страница 13: ...Extension Tube NOTE For more information about the mounting solutions and accessories please check the Mounting Accessory Selector in our website http www acti com mountingselector The above mounting...

Страница 14: ...camera can be powered by a Power over Ethernet PoE switch that is IEEE802 3af compliant In case of using a non PoE switch or your PoE switch has limited power supply you can purchase a power adapter a...

Страница 15: ...nd the other to the GND pin 4 Tighten the screws of the 12V pin and the GND pins to secure the wire connection 5 Set the prepared power adapter for connection later Below is an example of a power adap...

Страница 16: ...h the camera Other common DI device applications are emergency button smoke detector passive infrared sensor etc Digital Output DO devices are external devices that are activated by the camera upon an...

Страница 17: ...t output device to 12V and DO1 DO1 Digital Output 2 DO2 12V Connect the wires of the second output device to 12V and DO2 DO2 The table below shows the DI DO connection specifications Device DI Connect...

Страница 18: ...n though the camera provides 12V power this may not be enough for some high voltage DO devices such as a ceiling light or a motor that opens or closes a gate In this case there is a need to connect an...

Страница 19: ...y to a high voltage DO device Relay DO1 Device Camera Illuminator 110V 220V AC External Power Source NOTE For more information on DI DO connections please refer to the Knowledge Base article All About...

Страница 20: ...o one of the pin combinations below Device Mapping Instructions Audio Output GND Connect the wires of the audio output device to GND and AUDIO OUT AUDIO OUT Audio Input GND Connect the wires of the au...

Страница 21: ...era logo This influences the camera placement and where you should drill the hole where the cables will pass through or how the cables will go along the ceiling or wall 1 Use the supplied drill templa...

Страница 22: ...astic has been removed on some of the pictures in this documentation to show clarity of the pictures being described 1 With the bundled hex screwdriver loosen the three 3 screws securing the dome cove...

Страница 23: ...s facing towards the lens 2 If the cables will pass through the wall or ceiling break the rubber hole on the camera to route the cables to pass through the hole If the cables will be routed along the...

Страница 24: ...re the camera CAUTION When using electric screwdrivers be careful not to touch the camera components while attaching the screws Since electric screwdrivers vary in sizes speed and force they may bruis...

Страница 25: ...le to a switch or injector Then connect the switch or injector to a network PC and a power source See Power over Ethernet PoE connection example below Network AC Power Source PoE Injector PoE Switch P...

Страница 26: ...he Viewing Angle on page 29 for more information Step 7 Close the Dome Cover 1 Align the screws with the screw holes of the camera Note that if the cables are routed along the ceiling or wall route th...

Страница 27: ...www acti com Hardware Manual 27 Final installation should look similar to the illustration below...

Страница 28: ...microSDXC cards How to Insert the Memory Card Insert a memory card into the card slot with the metallic contacts facing towards the lens How to Remove the Memory Card In case there is a need to remov...

Страница 29: ...tment screws adjust the tilt and then tighten back the screws to fix the tilt position 2 Loosen the rotation adjustment screw rotate the viewing orientation and then tighten back the screw to fix the...

Страница 30: ...the bundled dome cover can be replaced with a smoke vandal proof cover available for purchase To replace the dome cover do the following 1 Loosen the three 3 screws to open the dome cover 2 Remove th...

Страница 31: ...nt dome cover into the cover housing 5 Align and attach the three 3 screws to secure the bracket to the cover housing 6 Attach the dome cover to the camera by tightening the three 3 screws Final insta...

Страница 32: ...server running then you do not need to configure the IP addresses at all both the camera and the PC would request a unique IP address from DHCP server automatically In such case the camera will immed...

Страница 33: ...ot only discover the cameras but also list lots of valuable information such as IP and MAC addresses serial numbers firmware versions etc and allows quick configuration of multiple devices at the same...

Страница 34: ...etwork and it does not detect any DHCP services it will automatically assign itself a default IP 192 168 0 100 Whereas the default port number would be 80 In order to access that camera the IP address...

Страница 35: ...P Utility With the procedure shown above all the cameras will have unique IP addresses starting from 192 168 0 101 In case there are 20 cameras selected the last one of the cameras would have the IP 1...

Страница 36: ...comparison Functionality Internet Explorer Live Video Yes Live Video Area Resizable Yes PTZ Control Yes Capture the snapshot Yes Video overlay based configuration Motion Detection regions Privacy Mas...

Страница 37: ...ddress bar http 192 168 0 100 Upon successful connection to the camera the user interface called Web Configurator would appear together with the login page The HTTP port number was not added behind th...

Страница 38: ...Copyright 2018 ACTi Corporation All Rights Reserved 7F No 1 Alley 20 Lane 407 Sec 2 Ti Ding Blvd Neihu District Taipei Taiwan 114 R O C TEL 886 2 2656 2588 FAX 886 2 2656 2599 Email sales acti com...

Отзывы: