background image

www.acti.com

  Hardware Manual 


19 

Other Connections 

This section describes the procedures in preparing the external devices that you can connect to 

the camera. The camera supports DC12V power input, Digital Input and Output (DI/DO) and 

Audio Input and Output devices using the bundled terminal blocks. The use of these devices, 

however, is optional. 


NOTE:

 After connecting external devices, use a waterproof tape to protect the cable connection 

or house the cable inside a junction box (purchased separately). 


Connecting a Power Adapter (Optional) 

The camera can be powered by a Power over Ethernet (PoE) switch that is IEEE802.3af 

compliant. In case of using a non-PoE switch or your PoE switch has a limited power supply, you 

can purchase a power adapter and directly connect the camera to a power outlet. 

NOTE:

 The power adapter is not bundled in the package. 


How to Connect Audio Input / Output Devices 
(Optional for A41~A47 only) 

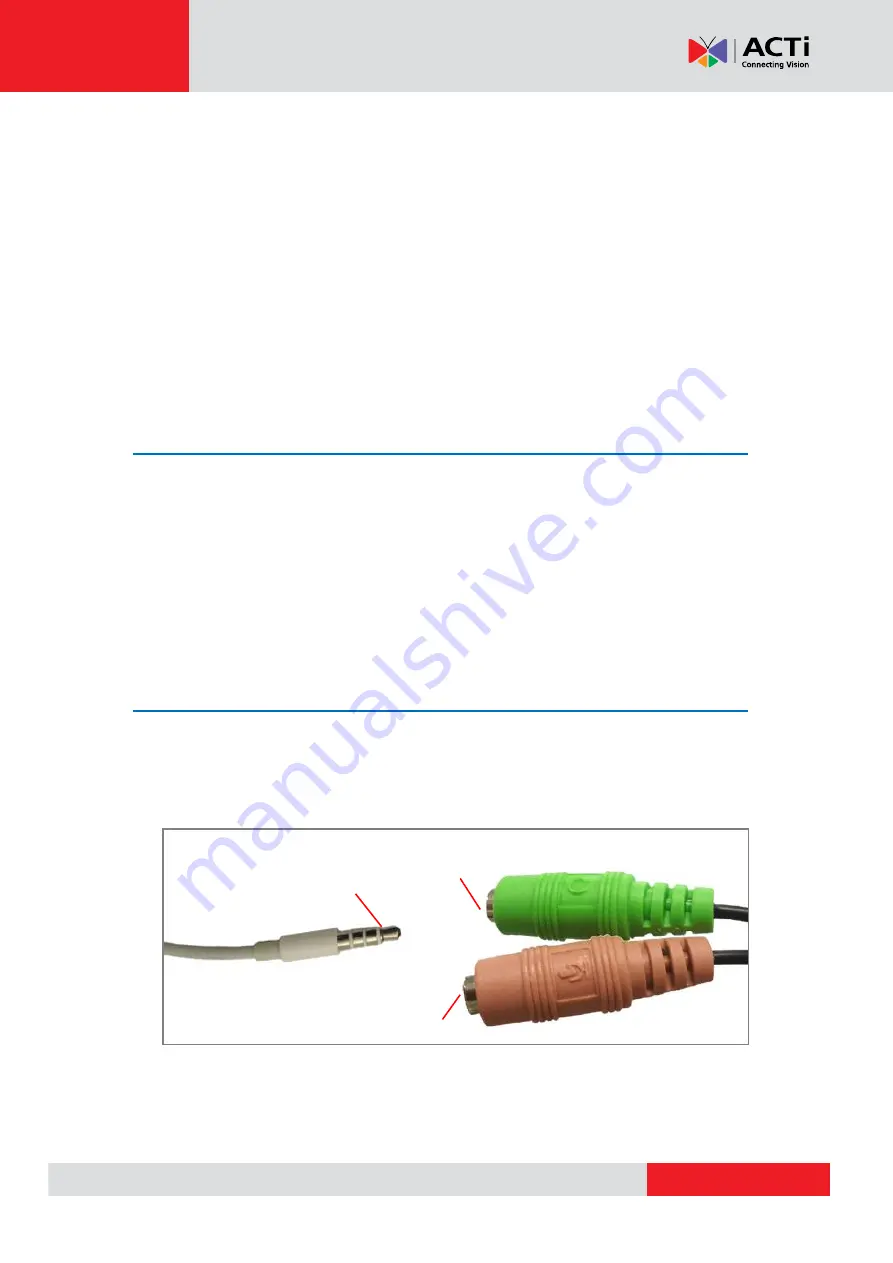
If using an audio input device, such as a microphone with a built-in amplifier, connect the device 

to the 

Mic Input

 jack (RED) of the camera. If using an audio output device, such as a speaker, 

connect the device to the 

Audio Output

 jack (GREEN) jack of the camera. 


NOTE:


Make sure that the connected audio input device has a built-in amplifier. Connecting an 

ordinary microphone will dwarf sounds and will result in inaudible recording. 


Audio Output Jack 

Audio Input Jack 

Audio Device 

Содержание A3 Series

Страница 1: ...A3x A4x Bullet Camera Hardware Manual A31 A41 A42 A43 A47 A49 A415 Ver 2021 07 06...

Страница 2: ...allation 12 Step 2 Mount the Camera 13 Step 3 Waterproof and Connect the Cable s 14 Using Waterproof Tape for A31 A41 A47 A415 14 Using the Cable Gland on A49 15 Step 4 Connect to Network 18 Step 6 Ac...

Страница 3: ...Accessories 21 How to Install Remove the Memory Card A49 A415 only 21 How to Insert the Memory Card 21 How to Remove the Memory Card 21 How to Reset the Camera A41 A47 only 22 Accessing the Camera 23...

Страница 4: ...attempt to service this video device yourself as opening or removing covers may expose you to dangerous voltage or other hazards Refer all servicing to qualified service personnel Trademarks All names...

Страница 5: ...equipment is operated in a commercial environment This equipment generates uses and can radiate radio frequency energy and if it is not installed and used in accordance with the instruction manual it...

Страница 6: ...ce personnel Damage Requiring service Disconnect this video product from the power supply immediately and refer servicing to qualified service personnel under the following conditions 1 When the power...

Страница 7: ...3x Zoom lens A42 5MP Zoom Bullet with D N Adaptive IR Extreme WDR SLLS 2 8x Zoom lens A43 2MP Zoom Bullet with D N Adaptive IR Extreme WDR ELLS 4 3x Zoom lens A47 2MP Zoom Bullet Day Night Extreme WDR...

Страница 8: ...dware Manual 8 Package Contents Camera Mounting Screw Kit Camera Base Wrench Drill Template Cable Gland with Washer for A49 only DI DO Terminal Block A41 A47 only Quick Installation Guide Warranty Car...

Страница 9: ...a standard Ethernet cable 2 DC 12V Power Input Connects the camera to an external power adapter not included See Connecting a Power Adapter Optional on page 19 for more information 3 Memory Card Slot...

Страница 10: ...deo Output Connects the camera directly to a monitor with BNC input 5 Audio Input This jack connects to a microphone See How to Connect Audio Input Output Devices Optional for A41 A47 only on page 19...

Страница 11: ...See Installation Procedures on page 12 Ceiling Suitable when mounting the camera directly on walls using the integrated bracket See Installation Procedures on page 12 Vertical Pole Suitable when moun...

Страница 12: ...e How to Insert the Memory Card on page 21 2 Depending on the wall material purchase applicable screws and screws plugs as needed that can hold the camera and bracket weight on the wall 3 Attach the s...

Страница 13: ...in the package NOTE Depending on the surface where you will install the camera it may be necessary to drill three 3 holes and use the supplied screw tox 2 Attach the camera to the surface using the t...

Страница 14: ...hape of the camera cable connector the simplest way to waterproof to connection is by using the waterproof tape Connect an Ethernet cable from the network side to the Ethernet port of the camera and w...

Страница 15: ...re connection prepare an exterior grade Ethernet cable with RJ 45 connector without sleeve Perform the following to waterproof the pigtail using the cable gland 1 Attach the washer to the Ethernet con...

Страница 16: ...ardware Manual 16 4 Insert the sealing insert through the Ethernet cable 5 Insert the cable through the gland body 6 Push the sealing insert into the gland body 7 Connect the RJ 45 connector to the ca...

Страница 17: ...ach the gland body to the camera connector 9 Attach the clamping nut to the gland body to complete the cable solution NOTE Make sure the clamping nut is tightly attached to the cable gland body and th...

Страница 18: ...injector to a network PC and a power source See Power over Ethernet PoE connection example below Network AC Power Source PoE Injector Power Cable Ethernet Cable Ethernet Cable Data Power Ethernet Cab...

Страница 19: ...ch that is IEEE802 3af compliant In case of using a non PoE switch or your PoE switch has a limited power supply you can purchase a power adapter and directly connect the camera to a power outlet NOTE...

Страница 20: ...ive infrared sensor etc Digital Output DO devices are external devices that are activated by the camera upon an event inside the camera For example you can connect an alarm horn to the camera as such...

Страница 21: ...ld and the front cover 2 Insert a memory card into the card slot with the metallic contacts facing the lens of the camera Push the card until it clicks into place 3 Close the front cover and attach th...

Страница 22: ...t be accessed In case of IP address mask or allow deny filter related issues resulting with the inability to modify these settings In case of connectivity issues or abnormal video quality Perform the...

Страница 23: ...would request a unique IP address from DHCP server automatically In such case the camera will immediately be ready for the access from the PC The user however might not know the IP address of the came...

Страница 24: ...l numbers firmware versions etc and allows quick configuration of multiple devices at the same time The latest IP Utility can be downloaded for free from http www acti com IP_Utility When you launch I...

Страница 25: ...etwork and it does not detect any DHCP services it will automatically assign itself a default IP 192 168 0 100 Whereas the default port number would be 80 In order to access that camera the IP address...

Страница 26: ...P Utility With the procedure shown above all the cameras will have unique IP addresses starting from 192 168 0 101 In case there are 20 cameras selected the last one of the cameras would have the IP 1...

Страница 27: ...ased configuration Motion Detection regions Privacy Mask regions Yes All the other configurations Yes When using Internet Explorer browser the ActiveX control for video stream management will be downl...

Страница 28: ...t number was not added behind the IP address since the default HTTP port of the camera is 80 which can be omitted from the address for convenience Before logging in you need to setup the root Account...

Страница 29: ...Copyright 2021 ACTi Corporation All Rights Reserved 7F No 1 Alley 20 Lane 407 Sec 2 Ti Ding Blvd Neihu District Taipei Taiwan 114 R O C TEL 886 2 2656 2588 FAX 886 2 2656 2599 Email sales acti com...

Отзывы: