background image

6  Configuring Acronis Cyber Infrastructure and 

Acronis Cyber Protect

This section describes how to deploy and configure Acronis Cyber Protect in the form of the “All-in-

One Appliance” virtual machine in Acronis Cyber Infrastructure. You can then connect your Acronis 

Cyber Appliance cluster to Acronis Cyber Protect as a storage backend. As a result, you will have 

both the storage and the backup server running on Acronis Cyber Appliance.

6.1  Deploying the compute cluster

Before creating a compute cluster, make sure the network is set up according to recommendations 

in "Setting up networks for the compute cluster" in the Administrator Guide. The basic requirements 

are: (a) the traffic types 

VM private

VM public

Compute API

, and 

VM backups

 must be assigned 

to networks; (b) the nodes to be added to the compute cluster must be connected to these networks 

and to the same network with the 

VM public

 traffic type.

Once you’ve configured the networks, you can proceed to create the compute cluster:

 1.  On the 

Compute

 screen, click 

Create compute cluster

.

 2.  In the 

Nodes

 section, select all the nodes and make sure the network state of each selected 

node is 

Configured

. Then, click 

Next

.

If the node network interfaces are not configured, click the cogwheel icon, select the networks as 

required, and then click 

Apply

.

 3.  In the 

Physical network

 section, leave the IP address management disabled if you want the IP 

address for Acronis Cyber Protect Appliance virtual machine to be allocated by an external DHCP 

server. Otherwise, you can enable it. For more information, refer to "Creating the compute 

cluster" in the Administrator Guide.

 4.  On the 

Summary

 step, review the configuration, and then click 

Create cluster

.

You can monitor compute cluster deployment on the 

Compute

 screen.

6.2  Deploying the Acronis Cyber Protect “All-in-One” 

Appliance virtual machine

6.2.1  Downloading the Acronis Cyber Protect “All-in-One” Appliance

 1.  Go to 

https://account.acronis.com/

 and log in to your account. If you do not have one, you will 

need to create it—refer to 

https://kb.acronis.com/regacc

.

 2.  Register your Acronis products, if not done before. For more information, see 

https://kb.acronis.com/productwebreg

.

 3.  In the 

Products

 section, locate the Acronis Cyber Protect download links. For more information, 

refer to 

https://kb.acronis.com/latest

.

23

© Acronis International GmbH, 2003-2021

Содержание Cyber Appliance

Страница 1: ...Acronis Cyber Appliance R E V I S I O N 6 1 4 2 0 2 1 Quick Start Guide acronis com...

Страница 2: ...icenses 20 5 Managing updates 21 6 Configuring Acronis Cyber Infrastructure and Acronis Cyber Protect 23 6 1 Deploying the compute cluster 23 6 2 Deploying the Acronis Cyber Protect All in One Applian...

Страница 3: ...several models which vary by storage capacity Model Raw storage TB Usable storage1 TB Capacity Performance 15031 60 31 18 15062 120 62 36 15078 150 78 45 15093 180 93 54 15108 210 108 60 15124 240 12...

Страница 4: ...The default IPMI password to access the management node via SSH is Acronis Infra 30 it changes to a user specified password during deployment The USB and VGA ports allow you to connect a keyboard and...

Страница 5: ...an You may only perform troubleshooting as authorized by the support team Damage due to unauthorized repairs is not covered by the warranty If you need to reset a node to the factory default settings...

Страница 6: ...a rack 3 Connect cables to the appliance 4 Configure Acronis Cyber Appliance by using the wizard 5 Log in to the admin panel and install a license 6 Set up the desired workloads in the admin panel Ste...

Страница 7: ...engage 3 Install the outer rail into the rack When selecting the location note that the rails are in the middle of the appliance Make sure that you install the outer rails with 1U clearance above and...

Страница 8: ...required to perform this step Insert the inner rail into the outer rail as shown in the figure Important Make sure that the ball retainer is fully open before installing the chassis Otherwise you ris...

Страница 9: ...wing 1 Connect the appliance to the electrical outlets by using the supplied power cables 2 On every node connect any SFP or RJ45 network port 1 on the diagram to a switch 2 on the diagram with access...

Страница 10: ...ode and the chassis 1 on the diagram to a switch with access to the IPMI subnet for your appliance 2 on the diagram The nodes have preconfigured IPMI IP addresses 10 20 30 11 to 10 20 30 15 The chassi...

Страница 11: ...have preconfigured IP addresses 10 20 20 11 to 10 20 20 15 3 On this computer open a web browser and visit the default primary node IP address 10 20 20 11 The configuration wizard has been tested to...

Страница 12: ...the admin panel You can read more about its high availability in the Enable management node high availability in the Administrator Guide l New host names for all nodes or leave the default names Each...

Страница 13: ...l be blocked until all nodes are green which means they can be accessed and configured from the primary node Note You will be able to configure bonds and VLANs later in the admin panel 5 Under Applian...

Страница 14: ...c IP address from the nodes new subnet to the admin laptop from which you can access Acronis Cyber Appliance 3 4 2 Joining the existing cluster You can connect the appliance to the existing Acronis Cy...

Страница 15: ...ization s naming policies Note Each node in the existing cluster and in the appliance must have a unique name If at least two nodes have the same name the installation will stop l New static IP addres...

Страница 16: ...admin panel 5 Under Join existing cluster enter the private IP address of the management node and the administrator password of the existing cluster 6 During the deployment the Acronis Cyber Infrastr...

Страница 17: ...s in the Administrator Guide 3 In case you created a new cluster update the product to the latest version after the deployment refer to Managing updates p 21 Proceed to Settings Licenses and upgrade t...

Страница 18: ...unlimited storage capacity and customers are charged for their actual usage of these resources With an SPLA Acronis Cyber Infrastructure automatically sends reports to Acronis Cyber Cloud once every f...

Страница 19: ...do the following 1 If you are switching from an SPLA ask your service provider to terminate the agreement by either disabling the Acronis Cyber Infrastructure application for your account or deleting...

Страница 20: ...its URL directly into the drop down field for example https eu cloud acronis com Then click Activate You will be redirected to the login page of Acronis Cyber Cloud Note For more information on datac...

Страница 21: ...NS must be configured and point to a DNS table to resolve external host names For more details refer to Adding external DNS servers in the Administrator Guide l Unassigned nodes can be updated l Updat...

Страница 22: ...one node actually cannot enter it then a window will open showing the reasons for that You will need to decide how to proceed You can cancel the update solve the issues and retry updating without down...

Страница 23: ...select all the nodes and make sure the network state of each selected node is Configured Then click Next If the node network interfaces are not configured click the cogwheel icon select the networks a...

Страница 24: ...ere you will need to specify the VM parameters b Specify a name for the new VM c In Deploy from select Image d In the Images window select AcronisBackupAppliance iso and then click Done e In the Volum...

Страница 25: ...ng from local disk No bootable device restart the virtual machine by clicking Send keys Ctrl Alt Del ii Change the installation settings specify a host name optional and a password for the root user a...

Страница 26: ...tname of the machine used to access the Acronis Cyber Protect console example http 192 168 128 212 9877 If you use https make sure the SSL certificate is trusted Provide the credentials of the local m...

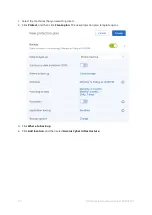
Страница 27: ...want to protect 2 Click Protect and then click Create plan The new protection plan template opens 3 Click Where to back up 4 Click Add location and then select Acronis Cyber Infrastructure 27 Acronis...

Страница 28: ...Create to create a new plan To run an existing protection plan click Run now For detailed information on how to configure and use Acronis Cyber Protect see the product documentation 28 Acronis Interna...

Страница 29: ...self service resources l Knowledge base https kb acronis com a repository of frequently asked questions step by step instructions and articles about known issues Visit the following knowledge base se...

Страница 30: ...total Network 2x 1 10GbE RJ45 2x 10GbE SFP Power supply 750W 1 1 current share and cold redundancy depending on power loads also see table below IO ports Rear 2x USB 2 0 1x VGA 2x 1 10GbE RJ45 2x 10Gb...

Страница 31: ...bles Store temperature 40 C to 85 C 40 F to 185 F Store temperature gradient 20 C 68 F per hour Operating temperature 10 C to 35 C 50 F to 95 F Operating temperature gradient 20 C 68 F per hour Relati...

Страница 32: ...t which crystalline materials begin adsorbing large quantities of water from the atmosphere Gaseous corrosion level in terms of in Angstrom as per ISA l Copper reactivity rate must be less than 300 A...

Отзывы: