Acorn AC-308 Скачать руководство пользователя страница 5

4

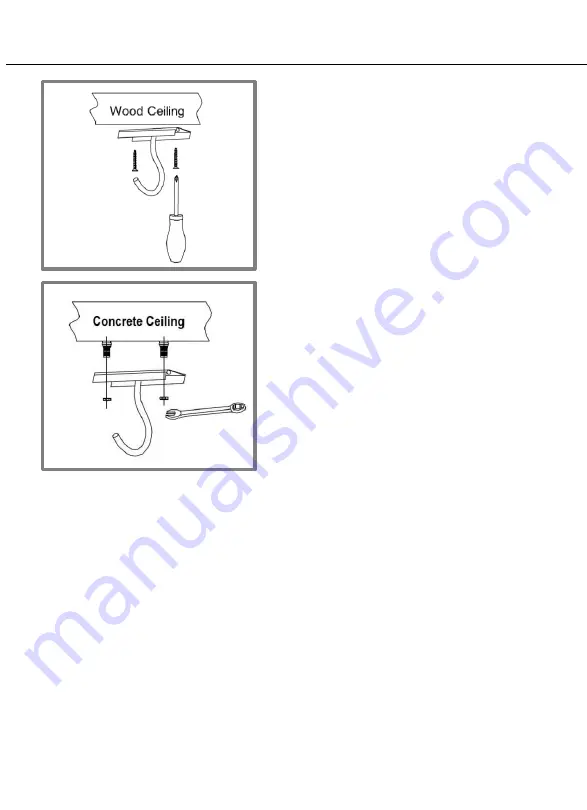
INSTALLATION OF HANGER HOOK:

fig 1

fig 2

1) For Wood Ceiling: Install the 

hanger hook firmly onto the 
wood ceiling with two screws 
(fig 1).

2) For Concrete Ceiling: To use 

two expansion setscrew to 
install the hanger hook onto 
the concrete ceiling and fasten 
firmly (fig 2).

Содержание AC-308

Страница 1: ...ildren with reduced physical sensory or mental capabilities or lack of experience and knowledge unless they have been given supervision or instruction concerning use of the appliance by a person respo...

Страница 2: ...f Fan Blades 5 Installation of Down Rod Hanger Ball 6 Hanging of Ceiling Fan 7 Wiring of Ceiling Fan 8 Installation of Canopy 9 Installation of Lightkit 10 Maintenance Tips 11 Troubleshooting 12 Perfo...

Страница 3: ...ed at a min height of 2 3meters of clearance from the floor 7 Do not insert any objects in the path of the blades 8 When all electrical connections are done store all wires neatly 9 Make sure all scre...

Страница 4: ...FAN STRUCTURE DRAWING 3...

Страница 5: ...1 fig 2 1 For Wood Ceiling Install the hanger hook firmly onto the wood ceiling with two screws fig 1 2 For Concrete Ceiling To use two expansion setscrew to install the hanger hook onto the concrete...

Страница 6: ...ce gap fig 3 2 Only fasten each of the screws at 3 Follow the same procedure to complete install all 3 blades onto the upper fixed plate 4 Turn over the motor and fasten 6 screws onto the lower fixed...

Страница 7: ...Loosen the two setscrews in the down rod support Install back the Cross pin and secured with the R pin The R pin must be properly installed to prevent the Cross pin from working loose fig 7 fig 6 fig...

Страница 8: ...3 After connecting the wires spread them apart so that the Green White wires are on one side and the Red wire is on the other side fig 9 4 Earth wire is longer than safety cord by 60mm and more When...

Страница 9: ...ng the holes of lightkit to the screws by pushing up and twist clockwise fig 12 5 Fasten the first screw back to the hole and tighten all the screws firmly fig 12 6 Carefully lift the light cover by p...

Страница 10: ...ratching the finish The plating is coated with a lacquer to minimize the ratio of discoloration or tarnishing which would damage the motor or the wood or possibly cause an electric shock 3 You can app...

Страница 11: ...housing Fan noisy 1 Housing screw loose 2 Wire nut connections rattles against each other 3 Canopy touches the ceiling 1 Tighten all screws 2 Separate store neatly all the wire nut connections 3 Check...

Страница 12: ...regulator and number of running positions Remote type regulator e Class of insulation Class B f Type of bearings Deep groove sealed ball baring g Rated air delivery 270m3 min h Co officient of Perfor...

Отзывы: