background image

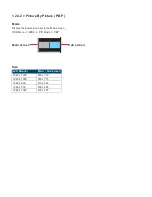
< 2.4.2 > Picture By Picture ( PBP )


Mode


Display the Sub screen next to the Main screen. 

OSD Menu  

>  

MISC 

>  

PIP Mode 

>  

PBP


Main scree n 

Sub s creen


Size


LCD Monitor


Main  /  Sub screen


1920 x 1200


955 x 716


1920 x 1080


955 x 716


1440 x 900


715 x 536


1366 x 768


678 x 508


1280 x 1024


635 x 476


Содержание MKD6117M

Страница 1: ...on and productspecifications aresubject to changewithout notice For lastest product information pleasevisit Acnodes website atwww acnodes com 14628 Central Ave Chino CA91710 Tel 909 597 7588 Fax 909 597 1939 C opyright 2015 Acnodes C orp ...

Страница 2: ...open the chassis Opening it yourself could damage the equipment and invalidate its warranty If any part of the equipment becomes damaged or stops functioning have it checked by qualified service personnel What the warranty does not cover Any product on which the serial number has been defaced modified or removed Damage deterioration or malfunction resulting from Accident misuse neglect fire water ...

Страница 3: ... 3 On screen Display Operation OSD 2 4 Picture In Picture PIP Picture By Picture PBP P 6 7 P 8 10 P 11 12 P 13 14 Part 3 Options 3 1 Audio 3 2 48V 24V or 12VDC power P 15 P 15 Part 4 KVM Integration http www acnodes com files downloads MKVM UM pdf Matrix DB 15KVM Local Remote IP 8 port 16 port 1 1 1 MKP813 MKP1613 1 1 2 MKP824 MKP1624 1 1 0 MKS802 MKS1602 1 2 0 MKS803 MKS1603 1 3 0 MKS804 MKS1604 ...

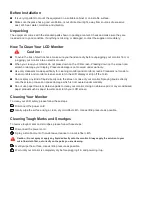
Страница 4: ...monitors and monitor screens can scratch the LCD display or strip off the finish Do not spray any kind of liquid directly onto the screen or case of your monitor Spraying liquids directly onto the screen or case can cause damage which is not covered under warranty Do not use paper towels or abrasive pads to clean your monitor Using an abrasive pad or any wood based paper product such as paper towe...

Страница 5: ...sher X 8 5 1 6 7 2 8 3 9 4 1 LCD interchangeable module kit 2 Installation Slides 3 LCD membrane 4 Membrane switch KVM option 5 Micro switch for screen auto power off 10 6 Keyboard interchangeable module kit 7 Mouse interchangeable module kit 8 Blue Power LED 9 Front USB port for device access USB Hub KVM only 10 Molded front handle ...

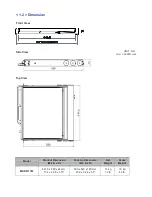
Страница 6: ...View UNIT mm 1mm 0 03937 inch Top View Model Product Dimension W x D x H Packing Dimension W x D x H Net Weight Gross Weight MKD6117M 441 6 x 580 x 44 mm 17 4 x 22 8 x 1 73 590 x 823 x 140 mm 23 2 x 32 4 x 5 5 15 kg 33 lb 19 kg 42 lb ...

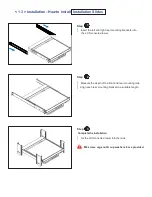
Страница 7: ... rear mounting brackets into the LCD console drawer Step 2 Measure the depth of the front and rear mounting rails Align each rear mounting bracket to a suitable length Step 3 Complete the installation Fix the LCD console drawer into the rack M6 screw cage nut cup washerx 8 are provided ...

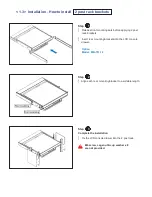
Страница 8: ...ears before applying 2 post rack brackets Insert rear mounting brackets into the LCD console drawer Option Model MB 751 12 Step 2 Align each rear mounting bracket to a suitable length Step 3 Complete the installation Fix the LCD console drawer into the 2 post rack M6 screw cage nut cup washer x 8 are not provided ...

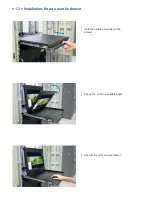
Страница 9: ... 1 3 Installation How to use the drawer Hold the handle and slide out the drawer Flip up the LCD to a suitable angle Operate the LCD console drawer ...

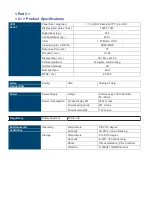
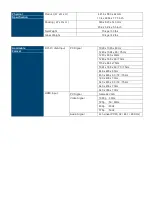
Страница 10: ...re Hard coating Surface hardness 3H BacklightType LED MTBF hrs 20 000 Video Connectivity Analog VGA Analog 0 7Vp p Power Power Supply Range Auto sensing 100 to 240VAC 50 60Hz Power Consumption Screen display ON 34W or less Power saving mode 4W or less Power button OFF 1W or less Regulatory SafetyApproval FCC CE Environmental Conditions Operating Temperature 0 to 50 C degree Humidity 20 90 non cond...

Страница 11: ...able Format DVI D VGAInput PC Signal 1920 x 1080 x 60Hz 1280 x 1024 x 60 75Hz 1280 x 960 x 60Hz 1280 x 768 x 60 75Hz 1152 x 864 x 75Hz 1024 x 768 x 60 70 75Hz 848 x 480 x 60Hz 800 x 600 x 60 72 75Hz 720 x 400 x 70Hz 640 x 480 x 60 72 75Hz 640 x 400 x 70Hz 640 x 350 x 70Hz HDMI Input PC Signal Same as VGA Video Signal 1080p 60Hz 720p 50 60Hz 480p 60Hz 576p 50Hz Audio Signal 2ch Linear PCM 32 44 1 4...

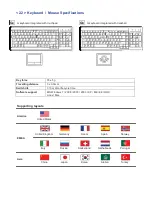
Страница 12: ... force 55 5g Travelling distance 3 0 3mm Switch life 10 million life cycle time Software support MS Windows 7 2008 2003 2000 XP ME 98 DOC Linux Mac Supporting layouts America EMEA Asia United States United Kingdom Germany France Spain Norway Italy Russia Switzerland Netherlands Portugal China Japan Korea Arabia Turkey ...

Страница 13: ...ng layouts America United States How to Use MAC Keyboard Keyboard Features F1 Decrease display brightness F2 Increase display brightness F3 Mission control Only works with OS X Lion default Keyboard Shortcuts F4 Dashboard F9 Fast forward F10 Mute sound F11 Decrease volume F12 Increase volume F7 Rewind Eject disc F8 Play Pause Command ...

Страница 14: ...mpose Copy and Help 104 keynotepad keyboard with full numerical pad and SUN function USB interface US layout only How to Use S Keyboard Num LED in Off mode Key pad behaves as a SUN Solar system administration command mode Num LED in Green mode Key pad behaves as a normalkey pad mode Audio Display Keys Please ask your supplier for full details F9 Audio Mute Display Degauss F11 Audio Decrease volume...

Страница 15: ...ttons will automatically turn off after 10 minutes of idle status except the Power 2 Light up all membrane buttons please press any button for 1 2 seconds except the Power 1 Picture Picture mode Standard Vivid Soft User mode to choose Brightness Adjust background black level of the screen image Contrast Adjust the difference between the image background black level and the foreground white level H...

Страница 16: ...me Adjust the volume of sound Bass Set the value of bass sound Treble Set the value of treble sound Balance Set the balance value of treble and bass sound Analog TV audio Set the value of analog TV audio sound Mute Turn off the surrounding sound 4 MISC Language Select the language in which the OSD menu is displayed English Sleep timer Set the off time PIP mode Adjust picture in picture setting PIP...

Страница 17: ...bottom left top right bottom right OSD Menu MISC PIP Position top left top right bottom left bottom right top left top right bottom left bottom right Size Adjust the size of the Sub screen Large Small OSD Menu MISC PIP Mode Large Small Size of Sub screen LCD Monitor Large Sub screen Small Sub screen 1920 x 1200 552 x 414 480 x 360 1920 x 1080 552 x 414 480 x 360 1440 x 900 414 x 310 360 x 270 1366...

Страница 18: ...Display the Sub screen next to the Main screen OSD Menu MISC PIP Mode PBP Main screen Sub screen Size LCD Monitor Main Sub screen 1920 x 1200 955 x 716 1920 x 1080 955 x 716 1440 x 900 715 x 536 1366 x 768 678 x 508 1280 x 1024 635 x 476 ...

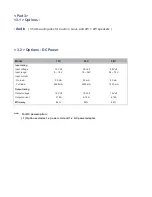
Страница 19: ...ng Input voltage 12 Volt 24 Volt 48 Volt Input range 9 18V 18 36V 36 75V Input current No load 50 mA 50 mA 50 mA Full load 4950 mA 2450 mA 1220 mA Output rating Output voltage 12 Volt 12 Volt 12 Volt Output current 4 16A 4 16A 4 16A Efficiency 84 85 85 For DC power option 1 Option excludes 1 x power cord and 1 x AC power adapter ...

Отзывы: