background image

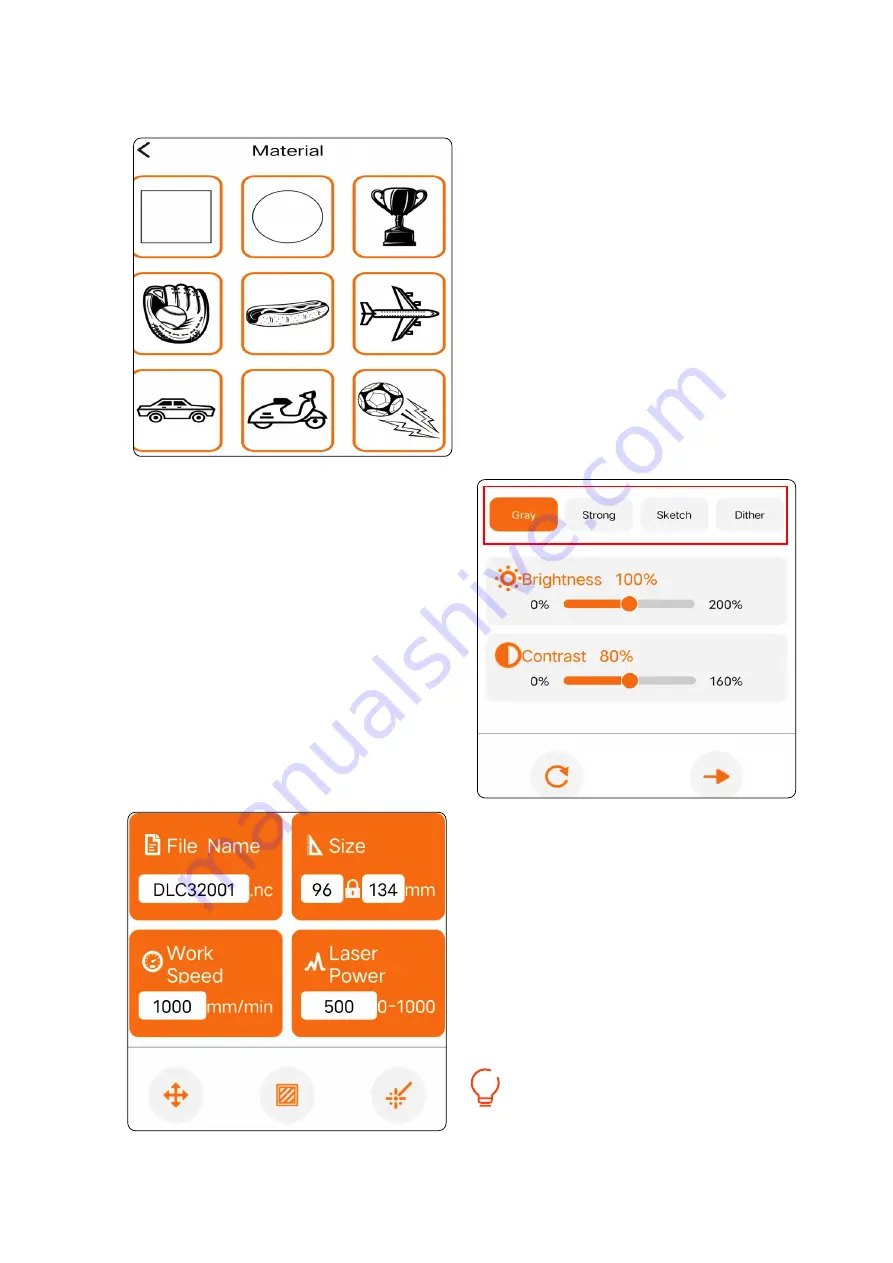
② Select the engraving pattern.

③ Select the engraving mode.

④ Adjust the engraving size and set 
the  engraving  parameters,  then 
click  the  bottom  right  button  to 
send the data.

We suggest you set the engraving speed 

below 8000mm/min for better results!

01

02

03

04

05

06

07

08

09

10

11

12

13

14

15

16

17

18

19

20

21

22

23

24

25

26

27

28

29

30

31

32

33

34

Содержание P2

Страница 1: ...https www facebook com groups 1614455505653986 ...

Страница 2: ...USER MANUAL V1 0 Acmer 3D Electronlc Technology Co Ltd ACMER P2 LASER ENGRAVER ...

Страница 3: ...e ciate your approval of our products and services and we sincerely hope that you will enjoy this product and that it will bring you joy If you have any problem in using it please feel free to let us know and we will do our best to help you You can join our Facebook group to share your ideas and can get ideas and inspirations from others Thank you again for your support and we will continue to pro...

Страница 4: ...t wearing protective glasses laser goggles When the machine is running please do not touch the laser beam to avoid personal injury Minors especially children over 14 years old must use the machine under the supervision of an adult throughout engraving machine work will produce a lot of smoke please place the ma chine in a ventilated environment before work and ensure that there is no other flammab...

Страница 5: ... Engraving File Format Engraving Accuracy Fuselage Material 600 650 170mm 420 400mm 6 5kg 5mm 10W 20W 30W 450 5nm Diode Laser DC 24V USB APP LaserGRBL Lightburn MAC Windows NC DXF BMP JPG PNG etc 0 01mm Aluminum profiles 3 Machine Parameters wood bamboo paper plastic leather PCB board aluminium oxide non reflective coating and lacquered metal ceramic 5mm 5mm 10W 20W 30W Focal Length 03 ...

Страница 6: ...Front Component Air Pipe Rear Component X axis Assembly 1 3 5 7 Air Pump Left Component Right Component Laser Module 2 4 6 8 4 Machine Description 4 5 7 8 6 1 3 2 04 ...

Страница 7: ...rd x1 Machine Key x1 Air Pipe x1 Test Plank x2 Screwdriver x4 M3 6 Screw x12 M4 8 Screw x4 Front component x 1 Left component x 1 Rear component x 1 Right component x 1 Frame 5 Machine List Accessories X axis assembly x 1 Brushes x1 Circuit Group x1 Laser Goggle x1 Wrench x1 Air Pump x 1 05 ...

Страница 8: ... Component x 1 6 1 You will need to prepare the following sections 6 1 1 Install the box in the direction shown and place it on a horizontal table 6 Installation Steps Right component x 1 M3 6 Screw x 12 Rear Component x 1 06 ...

Страница 9: ...is no need to lock the screws in this step lock the screws again in step 6 3 3 Note There is no need to lock the screws in this step lock the screws again in step 6 3 3 6 1 3 Insert the right assembly to the rear assembly in the same way and then also secure it with 3 M3X6 screws 07 ...

Страница 10: ...6 2 You will need to prepare the following sections X axis assembly x 1 M4 8 Screwx4 6 2 1 Secure the X axis assembly to the gantry frame using four M4 8 screws from each side 08 ...

Страница 11: ...prepare the following sections Note The left and right belt tightness needs to be consistent 6 3 2 Use an Allen wrench to adjust the belt tightness Install the left and right belts 6 3 1 Belt x2 Laser Module x 1 1 2 3 4 09 ...

Страница 12: ...odule slide it into the slide slot and tighten the side screws to secure it 6 3 3 Slowly move the X axis assembly back and forth to ensure smooth movement in the Y axis direction and then lock the previously unlocked screws 10 ...

Страница 13: ...6 4 Connecting wires 1 2 3 4 1 11 ...

Страница 14: ...over switch please toggle the switch to the right end when using the rotary module 2 USB port communicate with computer through USB data 3 Emergency stop switch press the emergency stop button the machine stops working rotate the emergency stop button clockwise the machine resets 1 10 11 7 7 Buzzer will sound and flash when open flame is detected 11 Flame sensor switch turn on or off the flame det...

Страница 15: ...e to operate LightBurn which is also an excellent engraving software but it costs 40 with a free one month trial for the first installation and this software also supports Windows systems If you want to download and install LaserGRBL you can get the data directly from the TF card or you can visit the official website of Laser GRBL to download for Lightburn users you can Lightburn official website ...

Страница 16: ...lick the Open File button Select the engraving file Click OPEN Brightness contrast black and white limit adjustment Select the engraving mode Adjust the engraving quality recommended quality setting is about 10 Click NEXT 14 ...

Страница 17: ...efer to the engraving parameter table Select Laser Mode M4 for engraving and M3 for cutting Set the engraving power 1000 is the maximum power Set the engraving size Click Create Preview engraving range Click Run Program to start engraving 15 ...

Страница 18: ...8 2 1 Connecting the machine Click Devices and then click Create Manually Select GRBL and click NEXT Select Serial USB and then click NEXT 8 2 Lightburn Tutorial 16 ...

Страница 19: ... Click Finish Set the engraving range of the machine and then click NEXT Select the origin of the machine uncheck the box to return to zero automatically and then click NEXT 17 ...

Страница 20: ... Select GRBL and click OK after the meal Return to the main interface and select the correct port to complete the connection Click Setting and set the speed unit to mm min 8 2 2 Software setup 18 ...

Страница 21: ... Set the machine engraving starting point as Current Position and set Job Origin to the lower left corner Click Device Settings and set the S value max to 1000 19 ...

Страница 22: ... Click OPEN to select the engraving file Click Open Click on the picture area Adjust the engraving size 8 3 3 Start engraving 20 ...

Страница 23: ...red box area Click Frame to preview the engrav ing area Click Start to start engraving Adjust the carving speed and carv ing power suggest to refer to the carving parameter table Set the engraving quality Set the engraving mode Click OK 21 ...

Страница 24: ...e engraving speed below 8000mm min for better results 9 1 APP Download Android users can scan the QR code below or directly visit the ACMER website to download Android user iPhone user Search for MKSLaser in App Store Insert the TF card into the card slot 22 ...

Страница 25: ...er the IP address and then click CONNECT Note The default IP address is 192 168 4 1 no need to change it Power on the machine search for the network name ACMER_P2_ through the cell phone WIFI function and enter the password to connect The initial password is 12345678 23 ...

Страница 26: ...ving This function can be used to control the machine movement and also to bring the machine back into position Get the material provided by ACMER for you to engrave You can store the programs generated by the computer software to the TF card and then access the files in the TF card for offline engraving through this function 9 4 Operation Demo Select Material 24 ...

Страница 27: ... pattern Select the engraving mode Adjust the engraving size and set the engraving parameters then click the bottom right button to send the data We suggest you set the engraving speed below 8000mm min for better results 25 ...

Страница 28: ... Wait for sending to complete Click Confirm to start the engraving process Wait for the carving to be com pleted 26 ...

Страница 29: ...10 Air Assist 10 1 Connections 10 1 2 Connect the air pump conversion wire 10 1 1 Connect the air pipe 27 ...

Страница 30: ...10 2 Software Control 10 2 1 Lightburn Control Check the M7 option You can control the air pump directly from the Cuts Layers window by un checking checking it 28 ...

Страница 31: ...se to the blank area at the bottom right of the interface then right click and select import custom buttons Select the CustomButtons file from the Software folder in the TF card The air pump is controlled by clicking the Air Pump button 29 ...

Страница 32: ...cuts specific parameters can refer to the table of common carving parameters 1 Check whether the CH340 driver is installed on the computer if not please get the driver file from the TF card for installation 2 Check if the correct port is selected 3 Replace the USB cable and connect again 4 Replace another computer to try Q2 Engraving machine can not be connected to the computer side 11 FAQ Q1 Engr...

Страница 33: ...ck whether the Y axis motor wiring is loose at both ends 3 If possible use a multimeter to measure the output voltage of the motor port on the main board Q4 Y axis moving abnormally or not moving After installing the belt twist the top wire on the tensioner to adjust the belt tight ness twist clockwise to tighten the belt twist counterclockwise to loosen the belt and keep the belt tightness on bot...

Страница 34: ...er supply is properly connected 2 Check if there is any abnormal obstruction to the limit switch at this time the command bar will have the following prompt 3 Check whether there is a flame generated during the carving process at this time the command bar will have the following prompt 32 ...

Страница 35: ...ARTS Creating a Service Ticket will serve as your official requests for ACMER support Our Customer Support Team will contact you within 48 hours ACMER products are covered under a Replacement Part Program for a period of 12 months from the date of purchase Missing Damaged Defective Parts 1 2 1 Within 7 days of the delivery date ACMER will replace any parts free of charge including shipping fees 1 ...

Страница 36: ...tomer shall take photos or video and submit them when filling out a Service Ticket Report a Problem Defective Electronic Parts 2 4 1 If the part is the LCD Panel Power Supply or Mainboard the customer shall ship the part back to ACMER and ACMER will send a new part 2 1 3 ACMER will work with the customer on replacing the parts in the claim 3 GENERAL SUPPORT 2 3 2 2 2 4 For information and support ...

Отзывы: