background image


9A 

(000-2555,clockwise/counterclockwise), 

or 

(125-255)

,

press  ENTER button 

to confirm and use DOWN and UP button to adjust the value, once select press ENTER 

button to setup or automatically exit menu mode without any change after one minute. To go 

back to the last function without any change press the MENU button. 


    Self-test 

Press the MENU button up to when the 

  is shown on the display, Pressing ENTER 

button to run the auto test. Back to the functions without any change press MENU button. 

Back to the functions without any change press MENU button. 


Temperature Test 

Press the MENU button up to when the 

  is blinking on the display. Pressing ENTER 

button and the display will show the temperature of the unit. To go back to the functions 

press the MENU button again. 


  Fixture Hours 

Press the MENU button up to when the 

  is blinking on the display. Pressing ENTER 

button and the display will show the number of working hours of the unit. To go back to the 

functions press the MENU button. 


Software version


Press the MENU button up to when the 

 is 

showing

 on the display. Pressing ENTER 

button and the display will show the version of software of the unit. To go back to the 

functions press the MENU button again. 


  Factory reset all channels 

Press the MENU button up to when the 

 is shown on the display, press ENTER 

button to setup. Back to the functions without any change press MENU button. 


6A 

4   Only for remote control: Connecting with CA-8/UC3 to control the unit for 

                            Stand by, Function and Mode function 

5  DMX output: For DMX512 link, use 3-pin XLR plug cable to link the next unit 

6  DMX input: For DMX512 link, use 3/5-pin XLR plug cable to input DMX signal 

7  Mains input: Connect to supply mains power for the unit 

8   Mains output: Connect and supply mains power for the other unit 

9   Cooling system: for cooling down the unit   


3.2  Installation 

A. Product Items 

z

 User 

manual 

z

 60

°

lens 


B.  Mounting


You can install the unit on the truss or ceiling; Use clamps to fix the unit to truss. Always 

ensure that the unit is firmly fixed to avoid vibration and slipping while operating. Always 

ensure that the structure to which you are attaching the unit is secure. Also always use a 

safety cable that can hold 10 times of the weight of the unit when installing the fixture. 


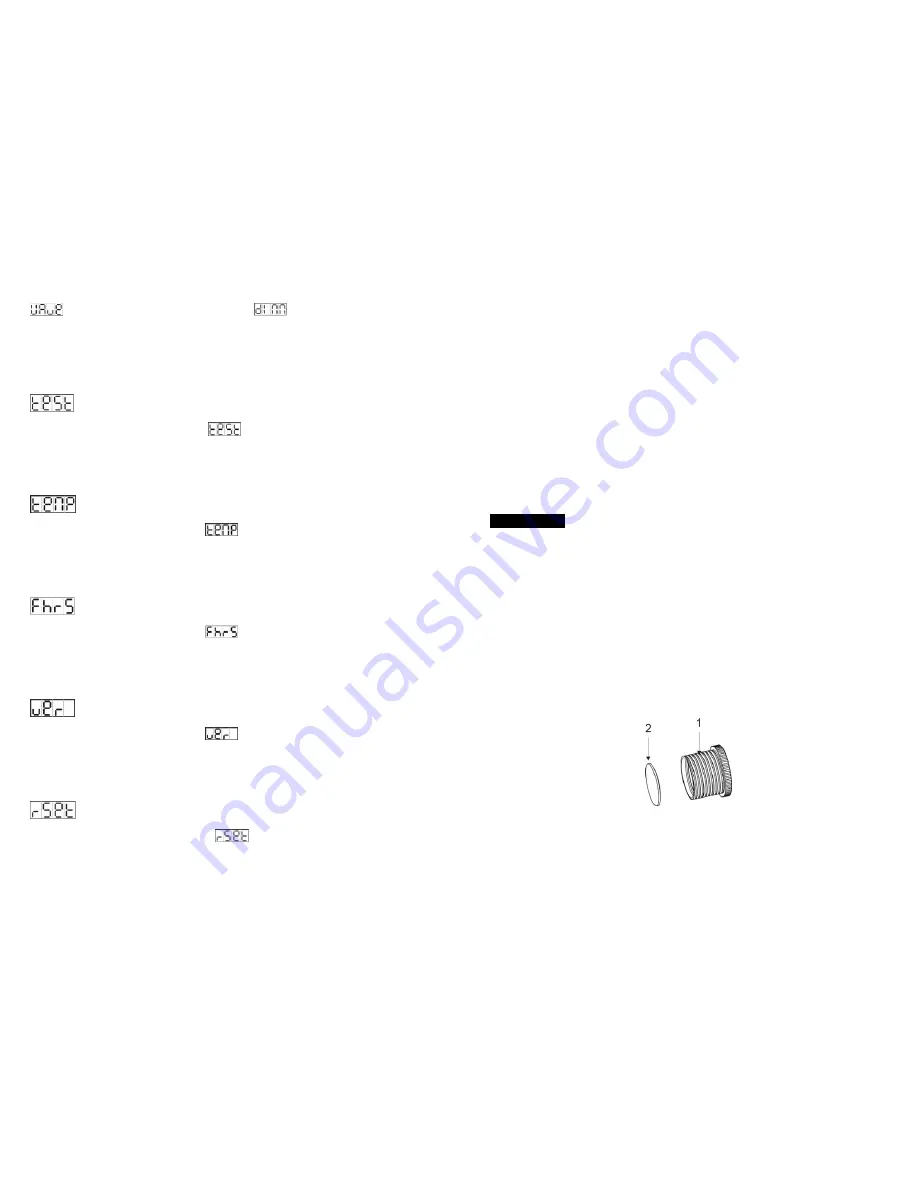
C.  Replace the lens 

You could replace the other lens if you want to, as following picture. 


You should screw the lens roller to take it down as NO.1, and bring the lens out as No.2. 

Then you could replace the lens that you want to. 

Notes: the lens roller has two slots for the lens; you should pay more attention that the latest 

slot is for the 34

°

lens, and the far slot is for 60

°

lens.  

Содержание DELUGE LED-WAV-50W

Страница 1: ...Innovation Quality Performance DELUGE LED WAV 50W User Manual Please read the instructions carefully before use ...

Страница 2: ...e greater accumulation of dirt on the fixture s optics y Clean with soft cloth using normal glass cleaning fluid y Always dry the parts carefully y Clean the external optics at least every 20 days Clean the internal optics at least every 30 60 days ...

Страница 3: ...MX cables run near or run alongside to high voltage cables that may cause damage or interference to DMX interface circuit C Some fixtures don t respond to the easy controller 1 You may have a break in the DMX cabling Check the LED for the response of the master slave mode signal 2 Wrong DMX address in the fixture Set the proper address D No response to the sound 1 Make sure the fixture does not re...

Страница 4: ... flammable materials close to the unit while operating as it is fire hazard y Look over power wires carefully replace immediately if there is any damage y Never run on for a long time lest shortening lifespan y Avoid any inflammable liquids water or metal objects entering the unit Once it happen cut off the mains power immediately y Do not operate in dirty and dusty environment also cleaning fixtu...

Страница 5: ...d other cables y Disconnect mains power before fuse lamp replacement or servicing y Replace fuse only with the same type y In the event of serious operating problem stop using the unit immediately y Never turn on and off the unit time after time y The housing the lenses or the ultraviolet filter must be replaced if they are visibly damaged y Do not open the unit as there are no user serviceable pa...

Страница 6: ...ceive DMX signal or run the built in programs 4 1 Master Slave Built In Preprogrammed Function The fixture will allow you to link 2 fixtures together and operate without a controller In Master Slave mode the first fixture whose DMX input jack has with nothing connect need to set as master and the other unit need to set as slave 1 via menu then the first unit will control the other to give an autom...

Страница 7: ...et all channels Press the MENU button up to when the is shown on the display press ENTER button to setup Back to the functions without any change press MENU button 6A 4 Only for remote control Connecting with CA 8 UC3 to control the unit for Stand by Function and Mode function 5 DMX output For DMX512 link use 3 pin XLR plug cable to link the next unit 6 DMX input For DMX512 link use 3 5 pin XLR pl...

Страница 8: ...on up to when the is showing on the display Pressing ENTER button and the display will blink Use DOWN and UP button to select the set the fixture as master or set the fixture as slave Once the mode has been selected press the ENTER button to setup or automatically return to the main functions without any change after one minute To go back to the functions without any change press the MENU button a...

Отзывы: