background image

English

1. 

Press the MENU key to open the OSD.

2.  Toggle the joystick to the up or down to select System from the OSD.Then toggle to the 

right to


navigate to the element you wish to adjust and press the joystick to enter it.

3.  Toggle to the left or right to control functions.
4.  Input: Select the source from HDMI1, HDMI2, DP.

5. 

Auto Source: The default is “On”, which can support auto search for signal source in 

order. 

-----------------------------------------------------------------------------------------------------------


Note: 

Surround application must set Auto Source is “Off”.

6.  DP Format: Default is DP1.4, can selection support DP1.1, DP1.2 or DP1.4 format.

7. 

Wide mode: You can select which screen aspect you are using. The options are Aspect 

and Full.

8.  PIP/PBP: Select to set PIP/PBP.
9. 

Hot Key Assigment: Select the function of shortcut key 1(Modes, Volume, Brightness,  

Gamma, Contrast, Blue Light, Over Drive

PIP/PBP) and shortcut keys 2 (Modes, 

Volume, Brightness, Gamma, Contrast, Blue Light, Over Drive, PIP/PBP).

10.  DDC/CI: Allows the monitor settings to be set through the software on the PC. 

-----------------------------------------------------------------------------------------------------------

Note: 

DDC/CI, short for Display Data Channel/Command Interface, which allows 

monitor controls to be sent via software.

11.  HDMI Black level: Select to set HDMI black level.
12.  Quick start mode: Select Off or On. Turn on to speed up boot speed.

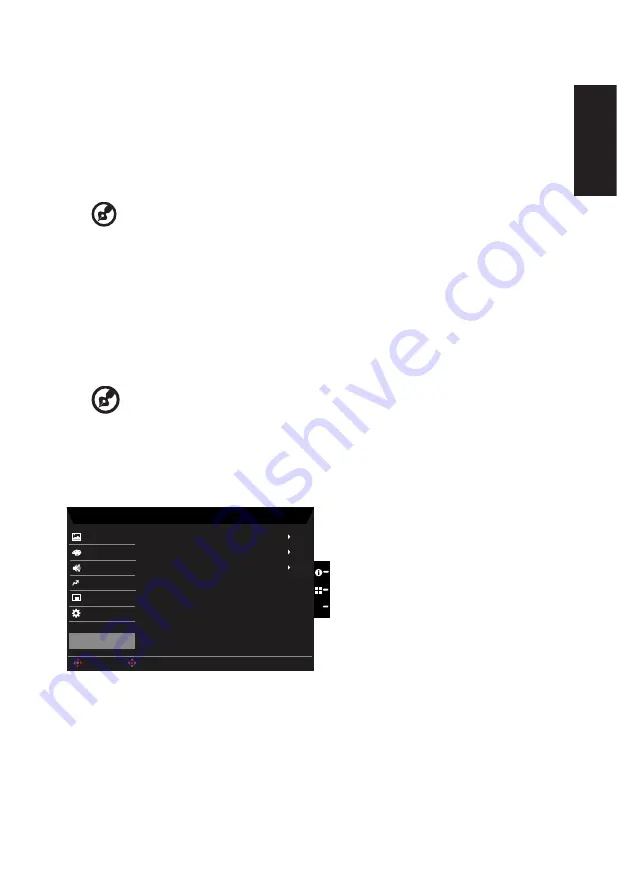
Save Setting to…(User mode only)

Game Mode:  Racing

Picture

Game Mode:  Action

Game Mode:  Sports

Mode - User

Enter

Move

Color

OSD

System

Audio

Pertormance

X

Save setting to...


1. 

Press the MENU key to open the OSD.

2.  Toggle the joystick to the up or down to select "Save Setting to..." from the OSD.Then 

toggle to the right to


navigate to the element you wish to adjust and press the joystick 

to enter it.

3. 

Save Setting to Game mode: There are three user-defined profiles available. When 

you have decided what settings suit you, save them and system will be able to recall 

the settings in the future when you turn on gaming mode .

Содержание VG271U

Страница 1: ...Acer LCD Monitor User Guide...

Страница 2: ...provided below The serial number and model number are recorded on the label affixed to your computer All correspondence concerning your unit should include the serial number model number and purchase...

Страница 3: ...ind slightly uneven brightness on the screen depending on the desktop pattern you use The LCD screen has 99 99 or more effective pixels It may include blemishes of 0 01 or less such as a missing pixel...

Страница 4: ...g These openings must not be blocked or covered The openings should never be blocked by placing the product on a bed sofa rug or other similar surface This product should never be placed near or over...

Страница 5: ...tric shock and or injury Note The grounding pin also provides good protection from unexpected noise produced by other nearby electrical devices that may interfere with the performance of this product...

Страница 6: ...rticles such as grain dust or metal powders Additional safety information Your device and its enhancements may contain small parts Keep them out of the reach of small children IT Equipment Recycling I...

Страница 7: ...the risk of physical injury Incorrect computer usage may lead to carpal tunnel syndrome tendonitis tenosynovitis or other musculoskeletal disorders The following symptoms may appear in the hands wrist...

Страница 8: ...nd or contrast to a comfortable level for enhanced text readability and graphics clarity Eliminate glare and reflections by placing your display in such a way that the side faces the window or any lig...

Страница 9: ...ribed above is in conformity with the relevant Union harmonization legislations as below Directive and following harmonized standards and or other relevant standards have been applied EMC Directive 20...

Страница 10: ...undesired operation The following local Manufacturer Importer is responsible for this declaration Product LCD Monitor Model Number VG271U SKU Number VG271U xxxxxx x 0 9 a z or A Z Name of Responsible...

Страница 11: ...isposal instructions 6 LCD pixel statement 7 Tips and information for comfortable use 7 Finding your comfort zone 7 Taking care of your vision 8 Developing good work habits 8 Federal Communications Co...

Страница 12: ...le use vii Finding your comfort zone vii Taking care of your vision viii Developing good work habits viii Declaration of Conformity ix Federal Communications Commission Declaration of Conformity x Unp...

Страница 13: ...re present when you unpack the box and save the packing materials in case you need to ship or transport the monitor in the future LCD monitor Quick start guide AC Power cord USERGUIDE LCD Monitor NITR...

Страница 14: ...or face down on a stable surface use a cloth to avoid scratching the screen Screen position adjustment To optimize the viewing position you can adjust the monitor tilt by using both of your hands to h...

Страница 15: ...wire and plug rated 10 A 125 V For units using 220 240 V AC Use a cord set consisting of H05VV F cord and plug rated 10 A 250 V The cord set should have the appropriate safety approvals for the count...

Страница 16: ...informs the host system about its capabilities for example supported resolutions and corresponding timing The monitor supports the DDC2B standard 20 pin color display signal cable PIN No Description...

Страница 17: ...TMDS Data2 2 TMDS Data2 Shield 3 TMDS Data2 4 TMDS Data1 5 TMDS Data1 Shield 6 TMDS Data1 7 TMDS Data0 8 TMDS Data0 Shield 9 TMDS Data0 10 TMDS Clock 11 TMDS Clock Shield 12 TMDS Clock 13 CEC 14 Rese...

Страница 18: ...VESA 720x400 70Hz 4 SVGA 800x600 56Hz 5 SVGA 800x600 60Hz 6 XGA 1024x768 60Hz 7 XGA 1024x768 70Hz 8 VESA 1152x864 75Hz 9 SXGA 1280x1024 60Hz 10 VESA 1280x720 60Hz 11 WXGA 1280x800 60Hz 12 WXGA 1440x90...

Страница 19: ...nal and or DP optional output socket of the graphics card on the computer Then tighten the thumbscrews on the signal cable connector 3 Insert the monitor power cable into the power port at the back of...

Страница 20: ...select scenario mode or game mode 4 Function key X a Press to view Main page Press again to enter Input select function b When the Function Menu is active this button will quit the OSD 5 Function key...

Страница 21: ...enu 1 Hot Key1 Modes Brightness Volume Gamma Contrast Blue Light Over Drive PIP PBP VRB 2 Hot Key2 Modes Brightness Contrast Volume Gamma Blue Light Over Drive PIP PBP VRB 3 Hot Key3 Input Switch Hot...

Страница 22: ...ey To change Modes Hot Key menu Exit Hot Key X To exit current page and store Picture Mode User 80 O O 50 Brightness Contrast Blue Light ACM O HDR O Super Sharpness Picture Enter Move 9 Black Boost Co...

Страница 23: ...s of T V Rheinland s Low Blue Light Content standard 9 ACM Turn ACM on or off Note Set to On will be based on the current screen to dynamic contrast adjustment 10 HDR can control off and auto the defa...

Страница 24: ...the up or down to select Color from the OSD Then toggle to the right to navigate to the element you wish to adjust and press the joystick to enter it 3 Toggle to the left or right to adjust the slidi...

Страница 25: ...09 EBU DCI SMPTE C The Modes Standard and parameters can be adjusted and saved as shareable values Color Space sRGB Rec 709 HDR EBU DCI SMPTE C If to adjust the parameter the Modes will not jump to Us...

Страница 26: ...eeSync O Enter Move VRB O Aim Point OSD System Save Settings to Audio Gaming X O Refresh Rate Num O Ultra Low Latency 1 Press the MENU key to open the OSD 2 Toggle the joystick to the up or down to se...

Страница 27: ...Normal or Extreme because the IC control dynamic picture is cleaner so the overall Brightness will be dark Extreme will be darker than Normal 8 Ultra Low Latency Set to On to speed up the processing...

Страница 28: ...of the screen LED lights will be changed from blue light to orange light Press any Key screen to prompt OSD Locked message OSD Unlocked In normal display condition to press the Navi Key in the middle...

Страница 29: ...tcut keys 2 Modes Volume Brightness Gamma Contrast Blue Light Over Drive PIP PBP 10 DDC CI Allows the monitor settings to be set through the software on the PC Note DDC CI short for Display Data Chann...

Страница 30: ...ess and contrast to maximum or reset to their default setting Off Check the power switch Check if the AC power cord is properly connected to the monitor Amber Check if the video signal cable is proper...

Страница 31: ...English...

Отзывы: