background image

5

CONNECTING THE POWER CORD

•  Check first to make sure that the power cord you use is the correct type 

required for your area.

•  This monitor has a universal power supply that allows operation in 

either 100/120V AC or 220/240 V AC voltage area. No user-adjustment 

is required.

•  Plug one end of the AC power cord to an AC inlet, and plug the other 

end into an AC outlet.

•  For unit using at 120 V AC:

Use a UL Listed Cord Set, Type SVT wire and plug rated 10 A/125 V.

•  For unit using at 220/240 V AC (outside of U.S.):

Use a Cord Set consisting of H05VV-F cord and plug rated 10 A, 250 V. 

The cord set should have the appropriate safety approvals for the 

country in which the equipment will be installed.

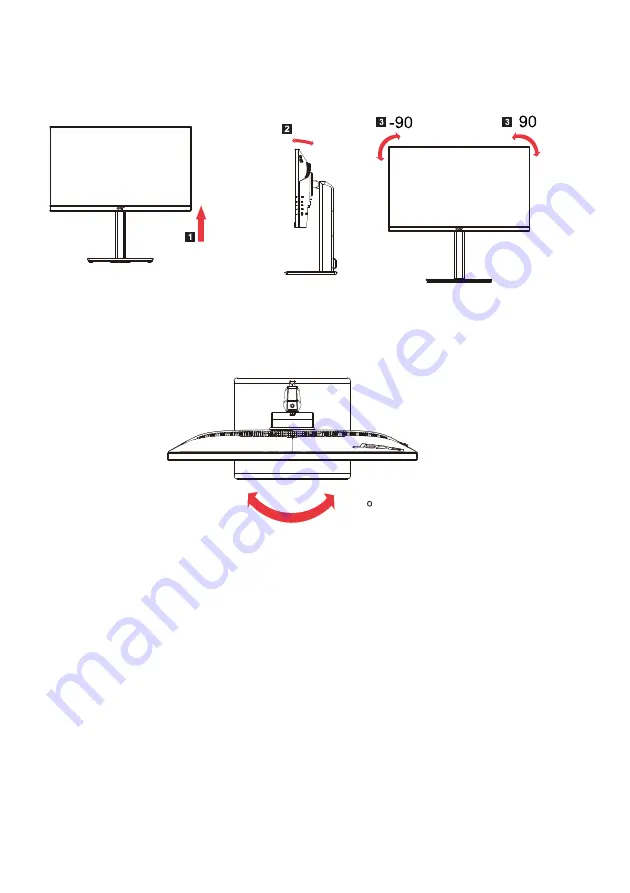
•  Swivel

With the built-in pedestal, you can swivel the monitor for the most 

comfortable viewing angle.

•  Monitor Pivot

Before rotating the display, lift it to the top position and then push it back to 

the utmost degree. Rotate until the monitor stops at 90°.

o

o

o

150mm

35

o

-45

45

Содержание UM.QB7AA.H01

Страница 1: ......

Страница 2: ......

Страница 3: ......

Страница 4: ......

Страница 5: ......

Страница 6: ......

Страница 7: ... technology IT equipment owners to responsibly recycle their equipment when it is no longer needed Acer offers programs and services to assist equipment owners with this process For more information on recycling IT equipment please go to https www acer com ac en US content recycling ...

Страница 8: ......

Страница 9: ......

Страница 10: ...CHING REMOVING THE BASE 2 SCREEN POSITION ADJUSTMENT 4 CONNECTING THE POWER CORD 5 POWER SAVING 7 DDC 7 CONNECTOR PIN ASSIGNMENT 8 STANDARD TIMING TABLE 10 INSTALLATION 11 2 1 S L O R T N O C R E S U TROUBLESHOOTING 24 TCO CERTIFIED 26 ...

Страница 11: ... ship or transport the monitor in future Below items shown here is indicative only The actual product may be different LCD Monitor Quick Start Guide AC Power Cord Optional Power adapter Optional D Sub Cable Optional HDMI Cable Optional DP cable Optional Audio Cable Optional USB Cable Optional USB Type C Cable Optional XZ2 series XZ342CU ...

Страница 12: ...e down on a stable surface use a cloth to avoid scratching the screen 1 Attach the monitor stand arm to the base 2 Ensure that the base is screwed tight onto the monitor stand arm Note If using a wall mounting kit we recommend using a VESA mounting kit 100 mm 100 mm and M4 10 L mm screws to secure the monitor to the wall ...

Страница 13: ... base from the monitor Note Carefully place the monitor face down on a flat surface sue a cloth pad to prevent scratching the screen 1 Push up the split button to separate the base from the monitor 2 Remove the screws that connect to the base ...

Страница 14: ... viewing position you can adjust the height tilt Pivot Swivel of the monitor Tilt Please see the illustration below for an example of the tilt range Height Adjustment After pressing the top of the monitor then you can adjust the height of the monitor 2 1 150mm ...

Страница 15: ...t 120 V AC Use a UL Listed Cord Set Type SVT wire and plug rated 10 A 125 V For unit using at 220 240 V AC outside of U S Use a Cord Set consisting of H05VV F cord and plug rated 10 A 250 V The cord set should have the appropriate safety approvals for the country in which the equipment will be installed Swivel With the built in pedestal you can swivel the monitor for the most comfortable viewing a...

Страница 16: ...6 ...

Страница 17: ...7 Type 1 Amber Type 2 LED flashes ...

Страница 18: ...8 ...

Страница 19: ...turn 13 Line sync signal 6 Red ground 14 Field sync signal 7 Green ground 15 DDC continuous clock 8 Blue ground 9 PIN No Signal Assignment PIN No Signal Assignment A1 GND B12 GND A2 SSTXp1 B11 SSTXp1 A3 SSTXn1 B10 SSTXn1 A4 VBUS B9 VBUS A5 CC1 B8 CC1 A6 Dp1 B7 Dp1 A7 Dn1 B6 Dn1 A8 SBU1 B5 SBU1 A9 VBUS B4 VBUS A10 SSTXn2 B3 SSTXn2 A11 SSTXp2 B2 SSTXp2 A12 GND B1 GND 24 pin USB Type C cable ...

Страница 20: ...0 75Hz 4 MAC 640x480 66 66Hz 5 VESA 720x400 70Hz 6 800x600 56Hz 7 800x600 60Hz 8 800x600 72Hz 9 800x600 75Hz 10 MAC 832x624 74 55Hz 11 1024x768 60Hz 12 1024x768 70Hz 13 1024x768 75Hz 14 MAC 1152x870 75Hz 15 1152x864 75Hz 16 1280x960 60Hz 17 1280x1024 60Hz 18 1280x1024 75Hz 19 VESA 1280x720 60Hz 20 WXGA 1280x800 60Hz 21 WXGA 1440x900 60Hz 22 WSXGA 1680x1050 60Hz 23 1920x1080 60Hz 24 1920 1080 75Hz ...

Страница 21: ...ower cords of your computer and your monitor into a nearby electrical outlet 1 Turn off your computer and unplug the power cord 3 Connec t the Audio cable only Audio input model optional 2 3 Connect DP Cable Only DP input model Optional a Make sure both the monitor and computer are powered OFF b C onnect the DP cable to the computer Optional Optional 7 Select Power off USB charge ON OFF to enable ...

Страница 22: ...y according to monitor model and some button may not available for some models 12 3 4 HotKey 1 2 buttons Press to activate user defined hotkey function Type1 Power 3 4 Type2 3 4 Type3 1 Type3 2 Menu Navi OK button Power on Long press to Power off Enter the main menu Select Adjust menu options ...

Страница 23: ...n and the actual functions depend on detail model Some functions might be grayed if the model can not support Note Please select the button function operation according to the actual button type The button of Type 1 The button of Type 2 1 ...

Страница 24: ...on 4 to select the menu function and then use Buttons 1 2 3 4 to adjust the settings you need When finished use Button 4 to return to the previous level or exit the menu The button of Type 3 1 Open the Function page to select a menu function and adjust the settings which you want using the Navi OK button When you are done press to exit You can also press from any function page to select your prefe...

Страница 25: ...ct the Settings you need from the OSD 2 Use Buttons 1 2 to select the Settings you need from the OSD 2 Using the Navi Ok button to select the Settings you need from the OSD 3 Then Using the Navi Ok button to navigate to the setting you want to adjust The button of Type 3 2 2 Using the Menu Navi Ok button to select the Settings you need from the OSD 3 Then Using the Menu Navi Ok button to navigate ...

Страница 26: ...etween light and dark areas 3 Low Blue Light Filter out blue light to protect your eyes by adjusting how much blue light is shown Level 1 2 3 4 Note A lower level allows more blue light to pass through so in order to achieve the best protection please select a higher level of which Level 4 is in the best state 4 Black Boost This boosts the amplitude of the dark color levels of the display blacks w...

Страница 27: ...l position from 0 to 100 8 V Position only Analog input mode l Adjust the vertical position from 0 to 100 9 Focus only Analog input model Adjust the focus from 0 to 100 10 Clock only Analog input model Adjust the clock from 0 to 100 Information Information 5 6 1 2 ...

Страница 28: ... for getting better color matching representation with the peripheral device such as DSCs or printers 6 7 Information Adjusting the Performance VRB Refresh Rate Num Off Off FreeSync Information Normal Over Drive 3 5 1 2 ...

Страница 29: ...efresh Rate Num Off Off VRB Refresh Rate Num Off Off VRB Refresh Rate Num Off Off FreeSync Premium FreeSync Premium Pro Information Information Information Normal Over Drive Normal Over Drive Normal Over Drive ...

Страница 30: ...able for AMD supported graphic cards only Adaptive Sync Select On or Off Adaptive Sync is available for AMD supported graphic cards only Note Freesync Freesync Premium Freesync Premium Pro Adaptive Sync depend on detail model 3 Refresh Rate Num Display the panel s current refresh rate on the screen 4 VRB Optional When VRB is Extreme or Normal VRB provides a sharper and clearer dynamic picture the ...

Страница 31: ...4 21 Note 1 For Side 9 key Must press Navi Key in the middle to unlock OSD 2 For side Bottom 1 5key except power key can be unlocked Information 1 2 3 ...

Страница 32: ...or PIP PBP Mode are Off PIP Large PIP Small and PBP You can also adjust the PIP Position PBP Size Sub Source Source Swap and Audio Source 6 DDC CI Allows the monitor settings to be set through the software on the PC Note DDC CI short for Display Data Channel Command Interface which allows monitor controls to be sent via software 7 HDMI Black Level You can select the level of blackness under HDMI s...

Страница 33: ...23 55KHZ 60HZ Information 55KHZ 60KHZ 60HZ ...

Страница 34: ...24 ...

Страница 35: ...LED flashes 25 ...

Страница 36: ...26 ...

Страница 37: ...015 A1 2020 Class B EN IEC 63000 2018 EN 55035 2017 A11 2020 Jan 31 2023 B247Y B247Y EN IEC 61000 3 2 2019 A1 2021 Class D EN 61000 3 3 2013 A2 2021 EU Declaration of Conformity Acer Incorporated New Taipei City ...

Страница 38: ...xxxxxx x 0 9 a z A Z or blank B247Y B247Y ...

Страница 39: ......

Страница 40: ...gency Acer is committed to offer products and services worldwide that help customers save money conserve energy and improve the quality of our environment The more energy we can save through energy efficiency the more we reduce greenhouse gases and the risks of climate change More information refers to http www energystar gov Acer ENERGY STAR qualified products Produce less heat and reduce cooling...

Отзывы: